2003 NISSAN ALMERA N16 Front
[x] Cancel search: FrontPage 3095 of 3189
Front LH seat belt pre-
tensioner circuit is mal-
functioning.
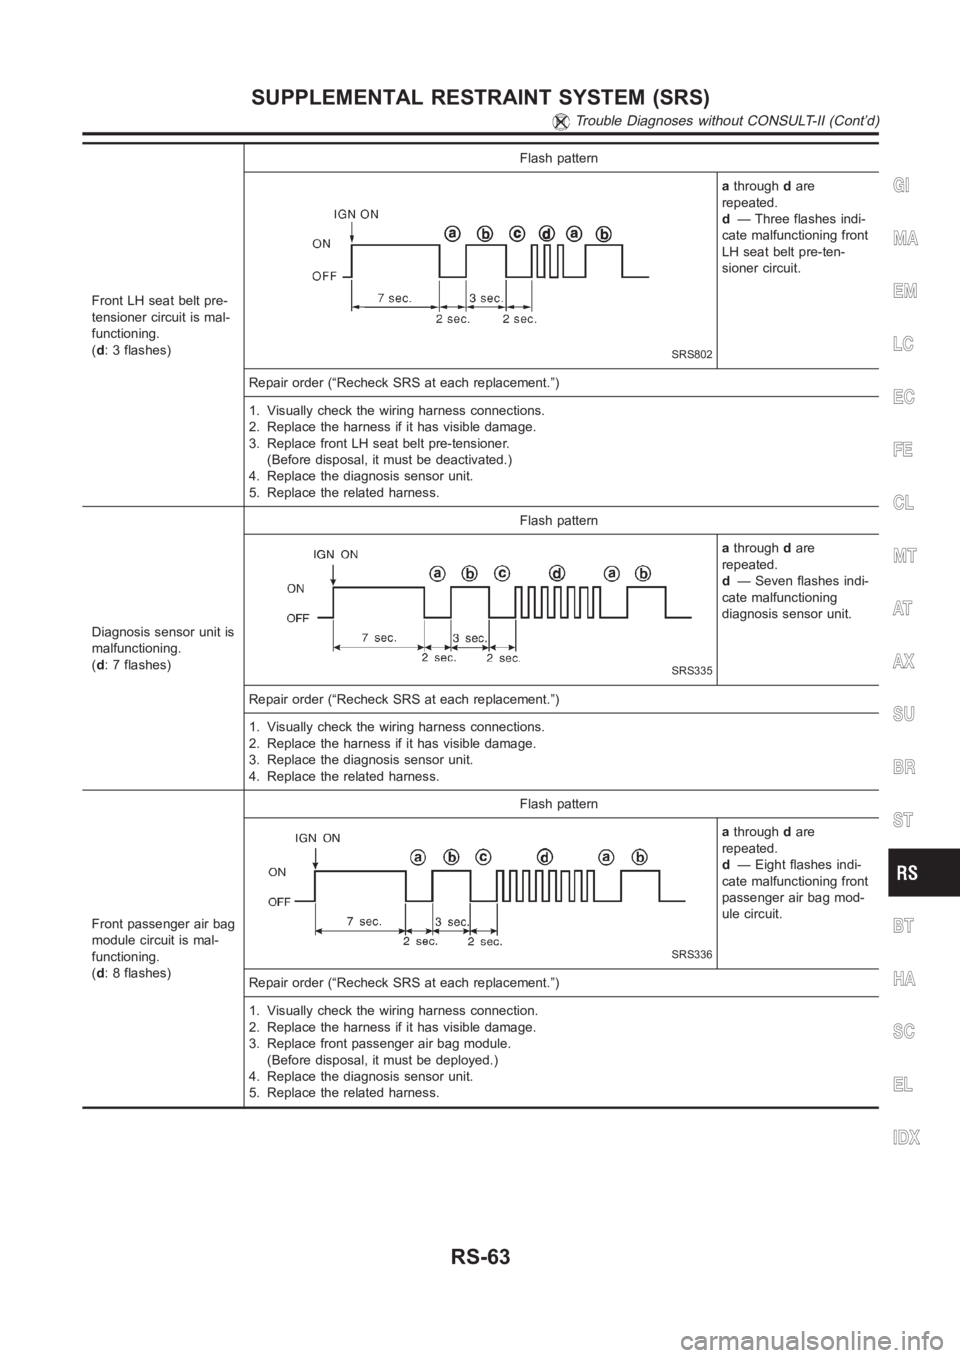
(d: 3 flashes)Flash pattern
SRS802
athroughdare
repeated.
d— Three flashes indi-
cate malfunctioning front
LH seat belt pre-ten-
sioner circuit.
Repair order (“Recheck SRS at each replacement.”)
1. Visually check the wiring harness connections.
2. Replace the harness if it has visible damage.
3. Replace front LH seat belt pre-tensioner.
(Before disposal, it must be deactivated.)
4. Replace the diagnosis sensor unit.
5. Replace the related harness.
Diagnosis sensor unit is
malfunctioning.
(d: 7 flashes)Flash pattern
SRS335
athroughdare
repeated.
d— Seven flashes indi-
cate malfunctioning
diagnosis sensor unit.
Repair order (“Recheck SRS at each replacement.”)
1. Visually check the wiring harness connections.
2. Replace the harness if it has visible damage.
3. Replace the diagnosis sensor unit.
4. Replace the related harness.
Front passenger air bag
module circuit is mal-
functioning.
(d: 8 flashes)Flash pattern
SRS336
athroughdare
repeated.
d— Eight flashes indi-
cate malfunctioning front
passenger air bag mod-
ule circuit.
Repair order (“Recheck SRS at each replacement.”)
1. Visually check the wiring harness connection.
2. Replace the harness if it has visible damage.
3. Replace front passenger air bag module.
(Before disposal, it must be deployed.)
4. Replace the diagnosis sensor unit.
5. Replace the related harness.
GI
MA
EM
LC
EC
FE
CL
MT
AT
AX
SU
BR
ST
BT
HA
SC
EL
IDX
SUPPLEMENTAL RESTRAINT SYSTEM (SRS)
Trouble Diagnoses without CONSULT-II (Cont’d)
RS-63
Page 3096 of 3189
Front RH side air bag
module circuit is mal-
functioning.
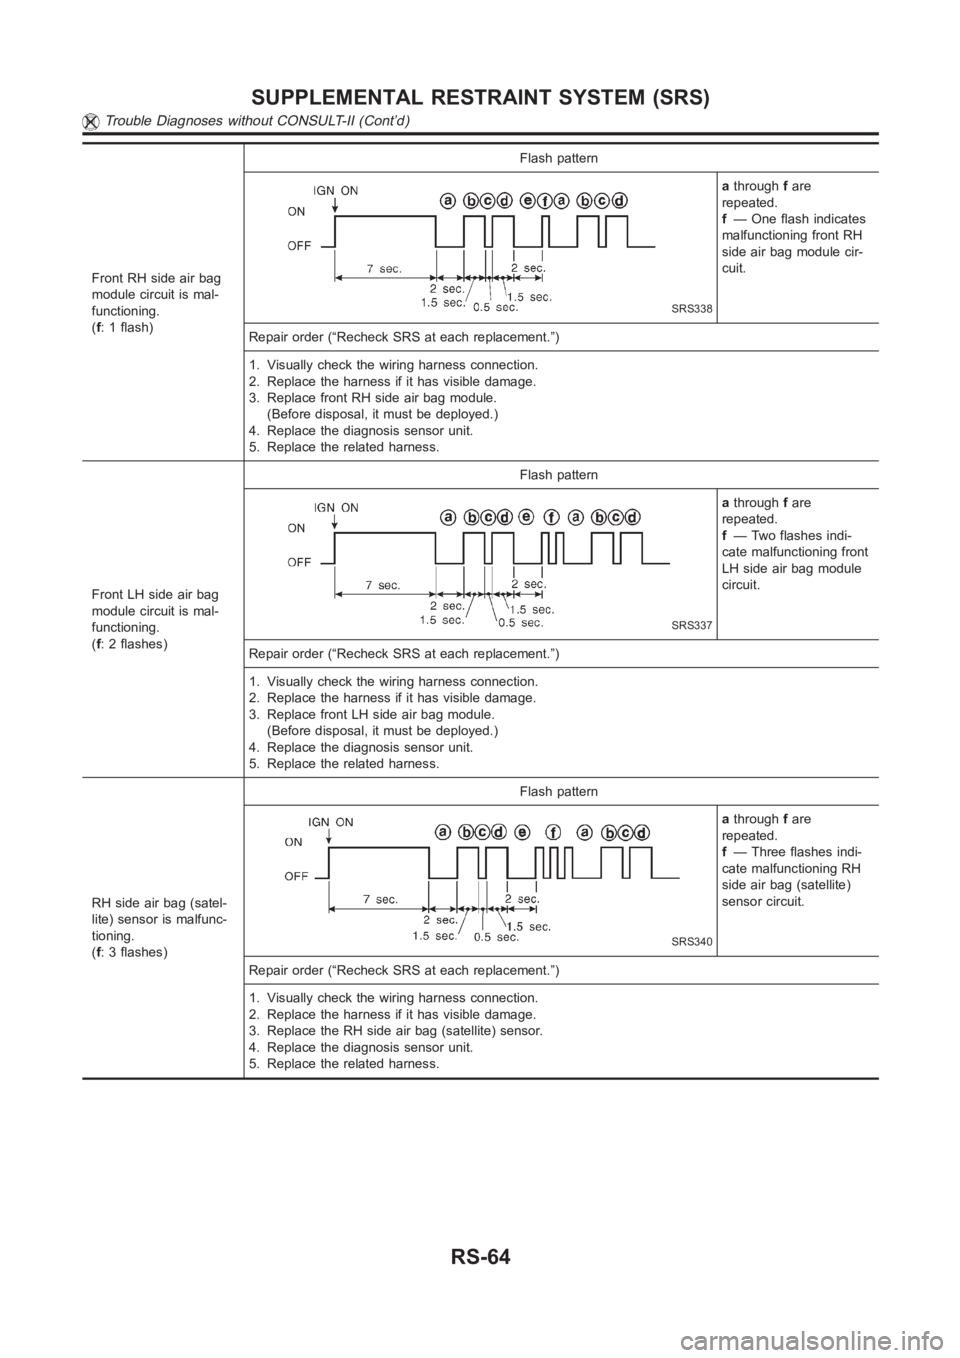
(f: 1 flash)Flash pattern
SRS338
athroughfare
repeated.
f— One flash indicates
malfunctioning front RH
side air bag module cir-
cuit.
Repair order (“Recheck SRS at each replacement.”)
1. Visually check the wiring harness connection.
2. Replace the harness if it has visible damage.
3. Replace front RH side air bag module.
(Before disposal, it must be deployed.)
4. Replace the diagnosis sensor unit.
5. Replace the related harness.
Front LH side air bag
module circuit is mal-
functioning.
(f: 2 flashes)Flash pattern
SRS337
athroughfare
repeated.
f— Two flashes indi-
cate malfunctioning front
LH side air bag module
circuit.
Repair order (“Recheck SRS at each replacement.”)
1. Visually check the wiring harness connection.
2. Replace the harness if it has visible damage.
3. Replace front LH side air bag module.
(Before disposal, it must be deployed.)
4. Replace the diagnosis sensor unit.
5. Replace the related harness.
RH side air bag (satel-
lite) sensor is malfunc-
tioning.
(f: 3 flashes)Flash pattern
SRS340
athroughfare
repeated.
f— Three flashes indi-
cate malfunctioning RH
side air bag (satellite)
sensor circuit.
Repair order (“Recheck SRS at each replacement.”)
1. Visually check the wiring harness connection.
2. Replace the harness if it has visible damage.
3. Replace the RH side air bag (satellite) sensor.
4. Replace the diagnosis sensor unit.
5. Replace the related harness.
SUPPLEMENTAL RESTRAINT SYSTEM (SRS)
Trouble Diagnoses without CONSULT-II (Cont’d)
RS-64
Page 3098 of 3189
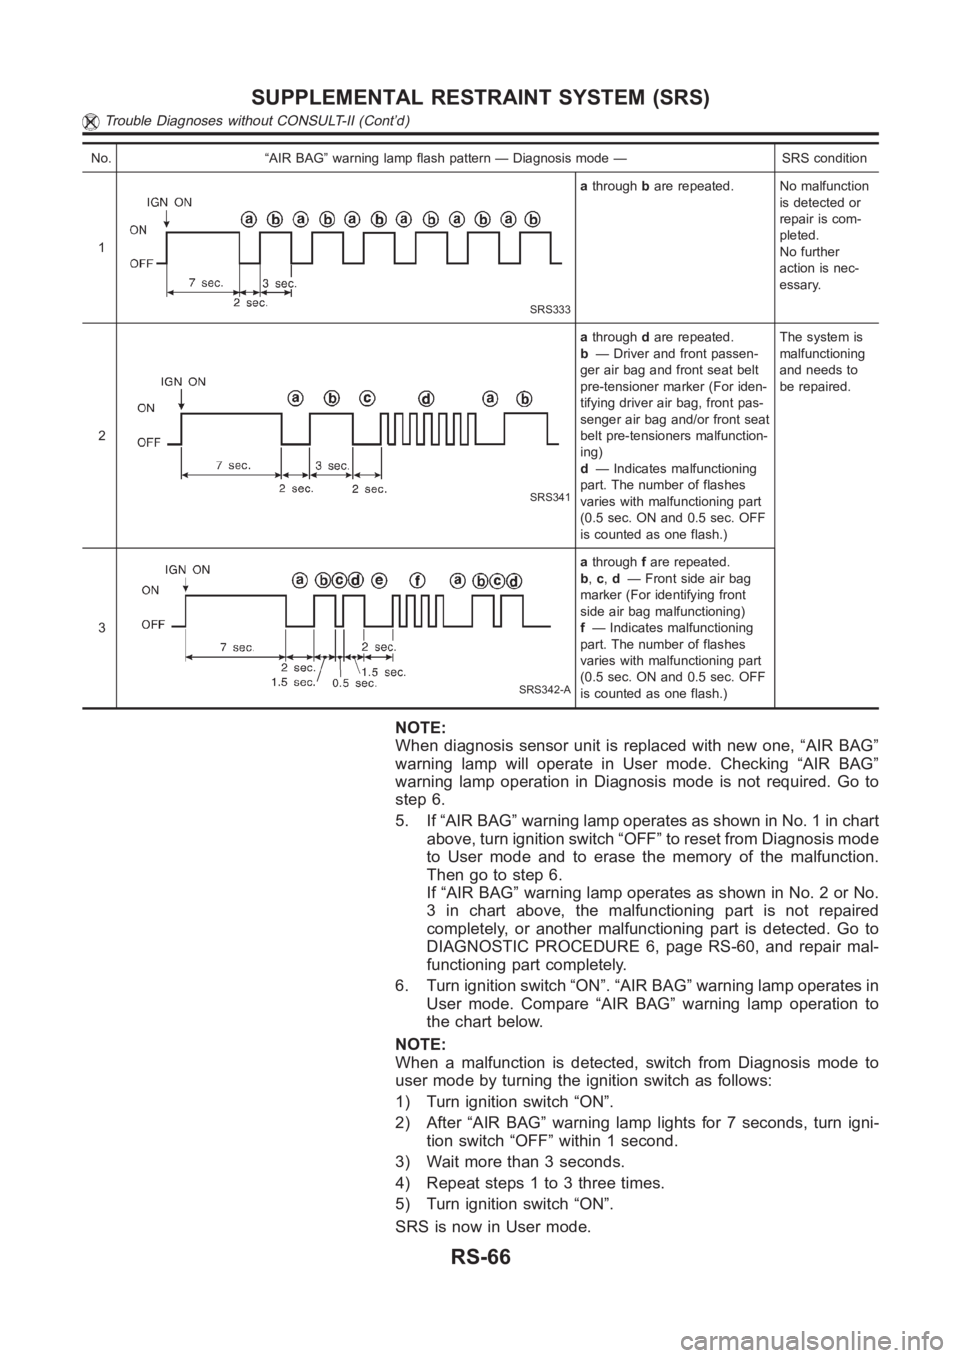
No. “AIR BAG” warning lamp flash pattern — Diagnosis mode — SRS condition
1
SRS333
athroughbare repeated. No malfunction
is detected or
repair is com-
pleted.
No further
action is nec-
essary.
2
SRS341
athroughdare repeated.
b— Driver and front passen-
ger air bag and front seat belt
pre-tensioner marker (For iden-
tifying driver air bag, front pas-
senger air bag and/or front seat
belt pre-tensioners malfunction-
ing)
d— Indicates malfunctioning
part. The number of flashes
varies with malfunctioning part
(0.5 sec. ON and 0.5 sec. OFF
is counted as one flash.)The system is
malfunctioning
and needs to
be repaired.
3
SRS342-A
athroughfare repeated.
b,c,d— Front side air bag
marker (For identifying front
side air bag malfunctioning)
f— Indicates malfunctioning
part. The number of flashes
varies with malfunctioning part
(0.5 sec. ON and 0.5 sec. OFF
is counted as one flash.)
NOTE:
When diagnosis sensor unit is replaced with new one, “AIR BAG”
warning lamp will operate in User mode. Checking “AIR BAG”
warning lamp operation in Diagnosis mode is not required. Go to
step 6.
5. If “AIR BAG” warning lamp operates as shown in No. 1 in chart
above, turn ignition switch “OFF” to reset from Diagnosis mode
to User mode and to erase the memory of the malfunction.
Then go to step 6.
If “AIR BAG” warning lamp operates as shown in No. 2 or No.
3 in chart above, the malfunctioning part is not repaired
completely, or another malfunctioning part is detected. Go to
DIAGNOSTIC PROCEDURE 6, page RS-60, and repair mal-
functioning part completely.
6. Turn ignition switch “ON”. “AIR BAG” warning lamp operates in
User mode. Compare “AIR BAG” warning lamp operation to
the chart below.
NOTE:
When a malfunction is detected, switch from Diagnosis mode to
user mode by turning the ignition switch as follows:
1) Turn ignition switch “ON”.
2) After “AIR BAG” warning lamp lights for 7 seconds, turn igni-
tion switch “OFF” within 1 second.
3) Wait more than 3 seconds.
4) Repeat steps 1 to 3 three times.
5) Turn ignition switch “ON”.
SRS is now in User mode.
SUPPLEMENTAL RESTRAINT SYSTEM (SRS)
Trouble Diagnoses without CONSULT-II (Cont’d)
RS-66
Page 3103 of 3189
Collision Diagnosis=NJRS0033FOR FRONTAL COLLISIONNJRS0033S07To repair the SRS, perform the following steps.
When SRS (except the side air bag) is activated in a collision:
1) Replace the diagnosis sensor unit.
2) Remove the air bag modules (except the side air bag module) and front seatbelt pre-tensioner assem-
blies.
3) Check the SRS components using the table shown below:
Replace any SRS components showing visible signs of damage (dents, cracksand deformation).
4) Install new air bag modules (except the side air bag module) and front seat belt pre-tensioner assemblies.
5) Conduct self-diagnosis using CONSULT-II or “AIR BAG” warning lamp. Refer to “SRS Operation Check”
for details (RS-49). Ensure entire SRS operation properly.
When SRS is not activated in a collision:
1) Check the SRS components using the table shown below:
Replace any SRS components showing visible signs of damage (dents, cracksand deformation).
2) Conduct self-diagnosis using CONSULT-II or “AIR BAG” warning lamp. Refer to “SRS Operation Check”
for details (RS-49). Ensure entire SRS operation properly.
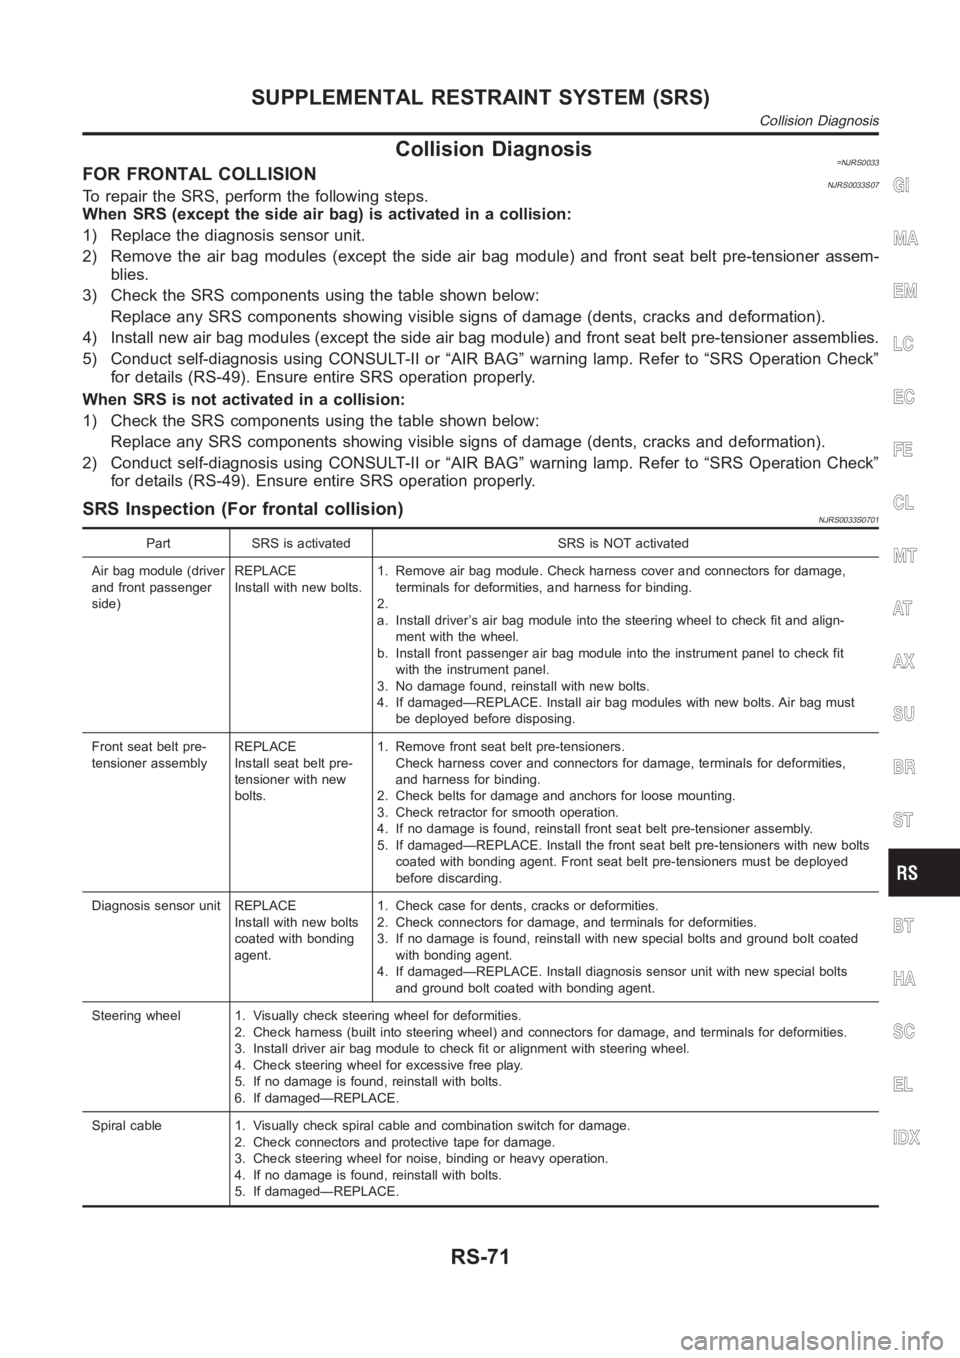
SRS Inspection (For frontal collision)NJRS0033S0701
Part SRS is activated SRS is NOT activated
Air bag module (driver
and front passenger
side)REPLACE
Install with new bolts.1. Remove air bag module. Check harness cover and connectors for damage,
terminals for deformities, and harness for binding.
2.
a. Install driver’s air bag module into the steering wheel to check fit and align-
ment with the wheel.
b. Install front passenger air bag module into the instrument panel to checkfit
with the instrument panel.
3. No damage found, reinstall with new bolts.
4. If damaged—REPLACE. Install air bag modules with new bolts. Air bag must
be deployed before disposing.
Front seat belt pre-
tensioner assemblyREPLACE
Install seat belt pre-
tensioner with new
bolts.1. Remove front seat belt pre-tensioners.
Check harness cover and connectors for damage, terminals for deformities,
and harness for binding.
2. Check belts for damage and anchors for loose mounting.
3. Check retractor for smooth operation.
4. If no damage is found, reinstall front seat belt pre-tensioner assembly.
5. If damaged—REPLACE. Install the front seat belt pre-tensioners with new bolts
coated with bonding agent. Front seat belt pre-tensioners must be deployed
before discarding.
Diagnosis sensor unit REPLACE
Install with new bolts
coated with bonding
agent.1. Check case for dents, cracks or deformities.
2. Check connectors for damage, and terminals for deformities.
3. If no damage is found, reinstall with new special bolts and ground bolt coated
with bonding agent.
4. If damaged—REPLACE. Install diagnosis sensor unit with new special bolts
and ground bolt coated with bonding agent.
Steering wheel 1. Visually check steering wheel for deformities.
2. Check harness (built into steering wheel) and connectors for damage, and terminals for deformities.
3. Install driver air bag module to check fit or alignment with steering wheel.
4. Check steering wheel for excessive free play.
5. If no damage is found, reinstall with bolts.
6. If damaged—REPLACE.
Spiral cable 1. Visually check spiral cable and combination switch for damage.
2. Check connectors and protective tape for damage.
3. Check steering wheel for noise, binding or heavy operation.
4. If no damage is found, reinstall with bolts.
5. If damaged—REPLACE.
GI
MA
EM
LC
EC
FE
CL
MT
AT
AX
SU
BR
ST
BT
HA
SC
EL
IDX
SUPPLEMENTAL RESTRAINT SYSTEM (SRS)
Collision Diagnosis
RS-71
Page 3104 of 3189
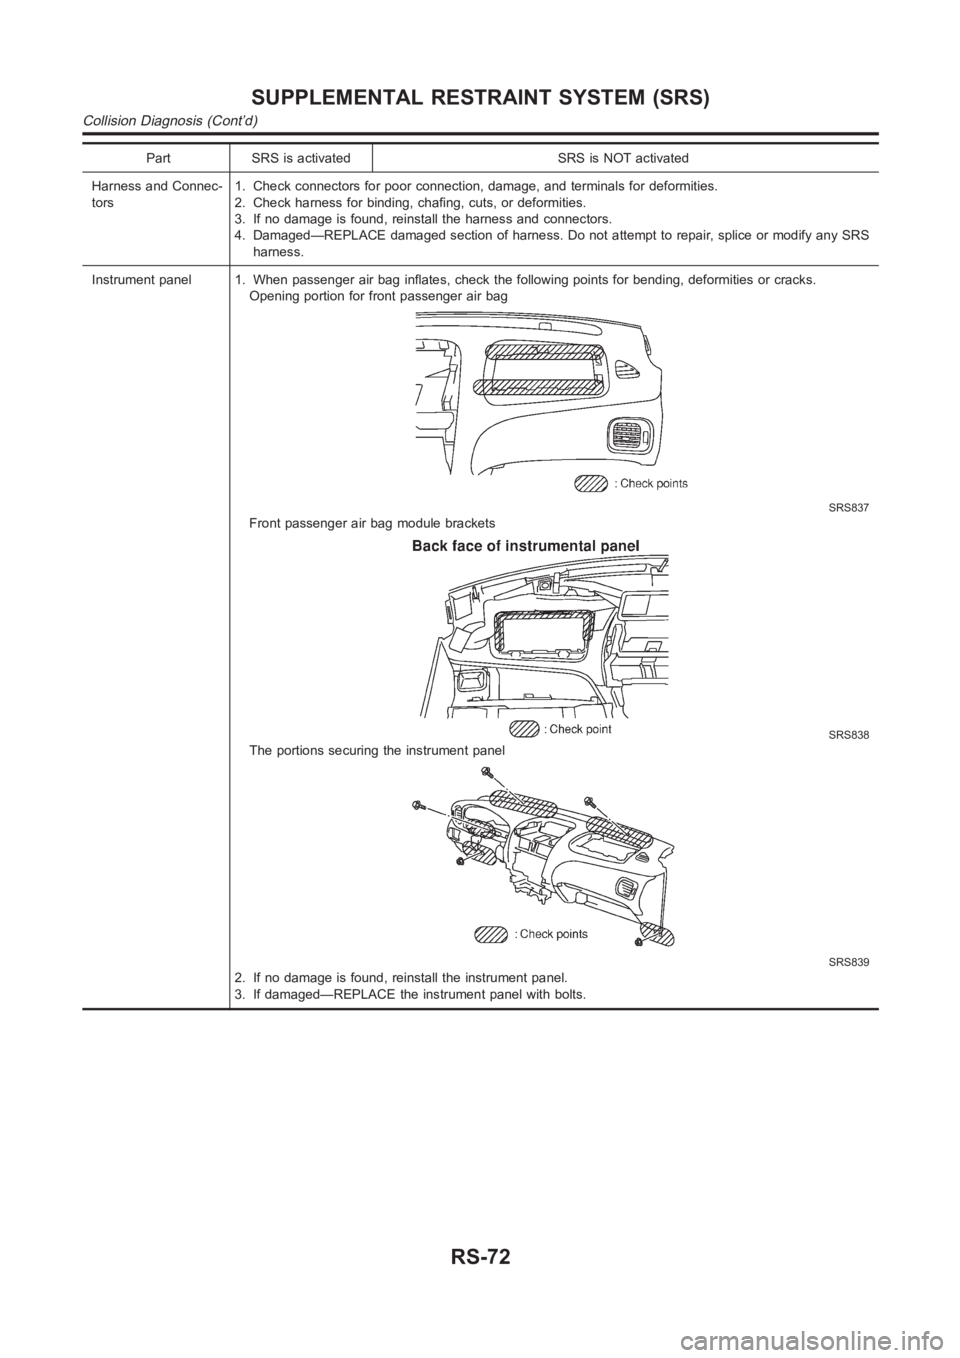
Part SRS is activated SRS is NOT activated
Harness and Connec-
tors1. Check connectors for poor connection, damage, and terminals for deformities.
2. Check harness for binding, chafing, cuts, or deformities.
3. If no damage is found, reinstall the harness and connectors.
4. Damaged—REPLACE damaged section of harness. Do not attempt to repair, splice or modify any SRS
harness.
Instrument panel 1. When passenger air bag inflates, check the following points for bending, deformities or cracks.
Opening portion for front passenger air bag
SRS837
Front passenger air bag module brackets
SRS838
The portions securing the instrument panel
SRS839
2. If no damage is found, reinstall the instrument panel.
3. If damaged—REPLACE the instrument panel with bolts.
SUPPLEMENTAL RESTRAINT SYSTEM (SRS)
Collision Diagnosis (Cont’d)
RS-72
Page 3105 of 3189
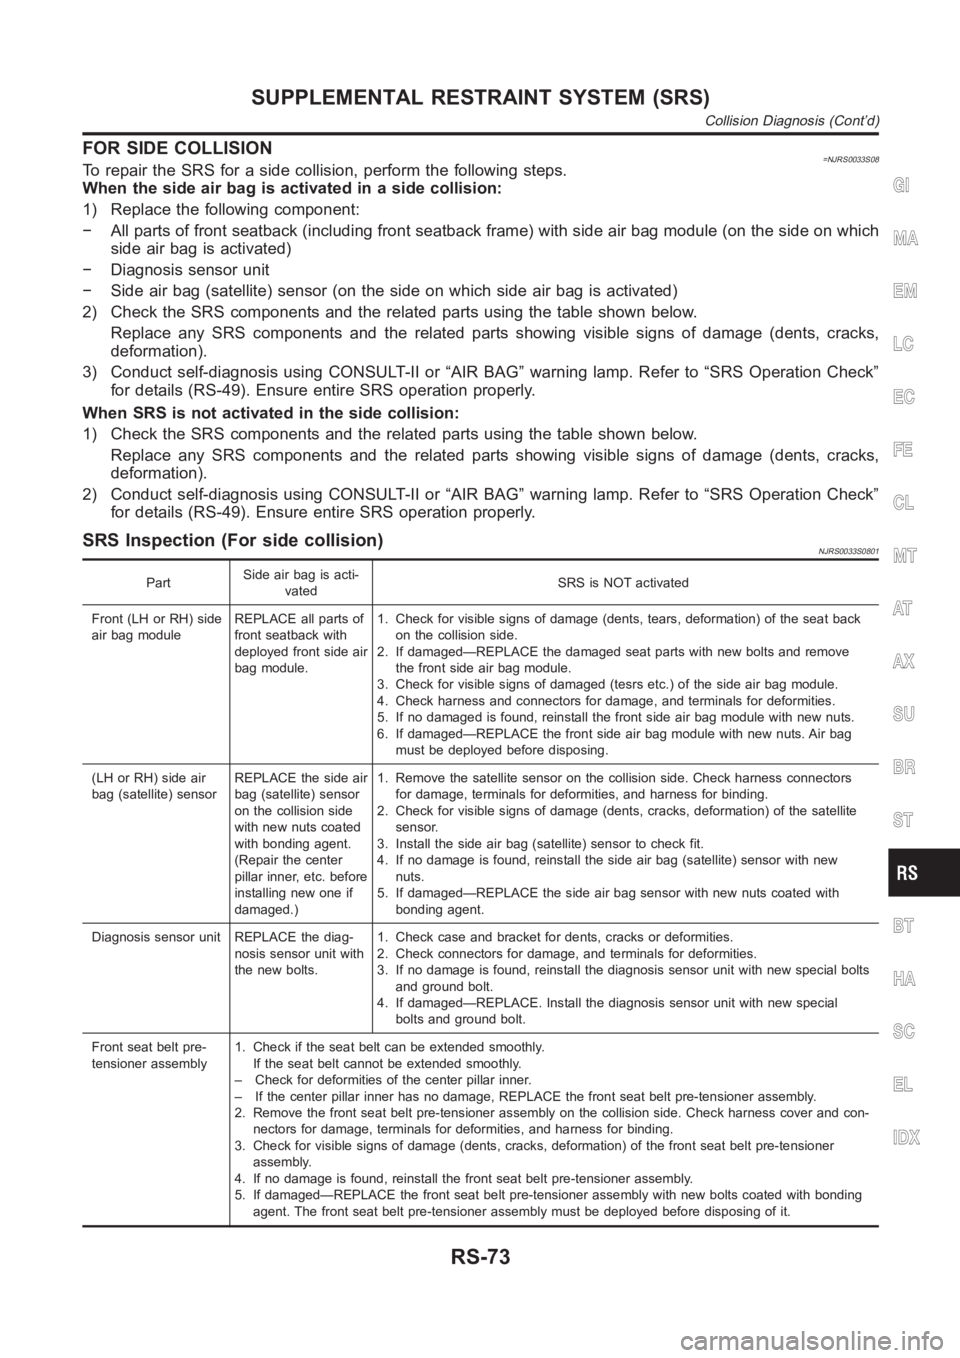
FOR SIDE COLLISION=NJRS0033S08To repair the SRS for a side collision, perform the following steps.
When the side air bag is activated in a side collision:
1) Replace the following component:
− All parts of front seatback (including front seatback frame) with side air bag module (on the side on which
side air bag is activated)
− Diagnosis sensor unit
− Side air bag (satellite) sensor (on the side on which side air bag is activated)
2) Check the SRS components and the related parts using the table shown below.
Replace any SRS components and the related parts showing visible signs of damage (dents, cracks,
deformation).
3) Conduct self-diagnosis using CONSULT-II or “AIR BAG” warning lamp. Refer to “SRS Operation Check”
for details (RS-49). Ensure entire SRS operation properly.
When SRS is not activated in the side collision:
1) Check the SRS components and the related parts using the table shown below.
Replace any SRS components and the related parts showing visible signs of damage (dents, cracks,
deformation).
2) Conduct self-diagnosis using CONSULT-II or “AIR BAG” warning lamp. Refer to “SRS Operation Check”
for details (RS-49). Ensure entire SRS operation properly.
SRS Inspection (For side collision)NJRS0033S0801
PartSide air bag is acti-
vatedSRS is NOT activated
Front (LH or RH) side
air bag moduleREPLACE all parts of
front seatback with
deployed front side air
bag module.1. Check for visible signs of damage (dents, tears, deformation) of the seatback
on the collision side.
2. If damaged—REPLACE the damaged seat parts with new bolts and remove
the front side air bag module.
3. Check for visible signs of damaged (tesrs etc.) of the side air bag module.
4. Check harness and connectors for damage, and terminals for deformities.
5. If no damaged is found, reinstall the front side air bag module with new nuts.
6. If damaged—REPLACE the front side air bag module with new nuts. Air bag
must be deployed before disposing.
(LH or RH) side air
bag (satellite) sensorREPLACE the side air
bag (satellite) sensor
on the collision side
with new nuts coated
with bonding agent.
(Repair the center
pillar inner, etc. before
installing new one if
damaged.)1. Remove the satellite sensor on the collision side. Check harness connectors
for damage, terminals for deformities, and harness for binding.
2. Check for visible signs of damage (dents, cracks, deformation) of the satellite
sensor.
3. Install the side air bag (satellite) sensor to check fit.
4. If no damage is found, reinstall the side air bag (satellite) sensor withnew
nuts.
5. If damaged—REPLACE the side air bag sensor with new nuts coated with
bonding agent.
Diagnosis sensor unit REPLACE the diag-
nosis sensor unit with
the new bolts.1. Check case and bracket for dents, cracks or deformities.
2. Check connectors for damage, and terminals for deformities.
3. If no damage is found, reinstall the diagnosis sensor unit with new special bolts
and ground bolt.
4. If damaged—REPLACE. Install the diagnosis sensor unit with new special
bolts and ground bolt.
Front seat belt pre-
tensioner assembly1. Check if the seat belt can be extended smoothly.
If the seat belt cannot be extended smoothly.
– Check for deformities of the center pillar inner.
– If the center pillar inner has no damage, REPLACE the front seat belt pre-tensioner assembly.
2. Remove the front seat belt pre-tensioner assembly on the collision side. Check harness cover and con-
nectors for damage, terminals for deformities, and harness for binding.
3. Check for visible signs of damage (dents, cracks, deformation) of the front seat belt pre-tensioner
assembly.
4. If no damage is found, reinstall the front seat belt pre-tensioner assembly.
5. If damaged—REPLACE the front seat belt pre-tensioner assembly with newbolts coated with bonding
agent. The front seat belt pre-tensioner assembly must be deployed beforedisposing of it.
GI
MA
EM
LC
EC
FE
CL
MT
AT
AX
SU
BR
ST
BT
HA
SC
EL
IDX
SUPPLEMENTAL RESTRAINT SYSTEM (SRS)
Collision Diagnosis (Cont’d)
RS-73
Page 3106 of 3189
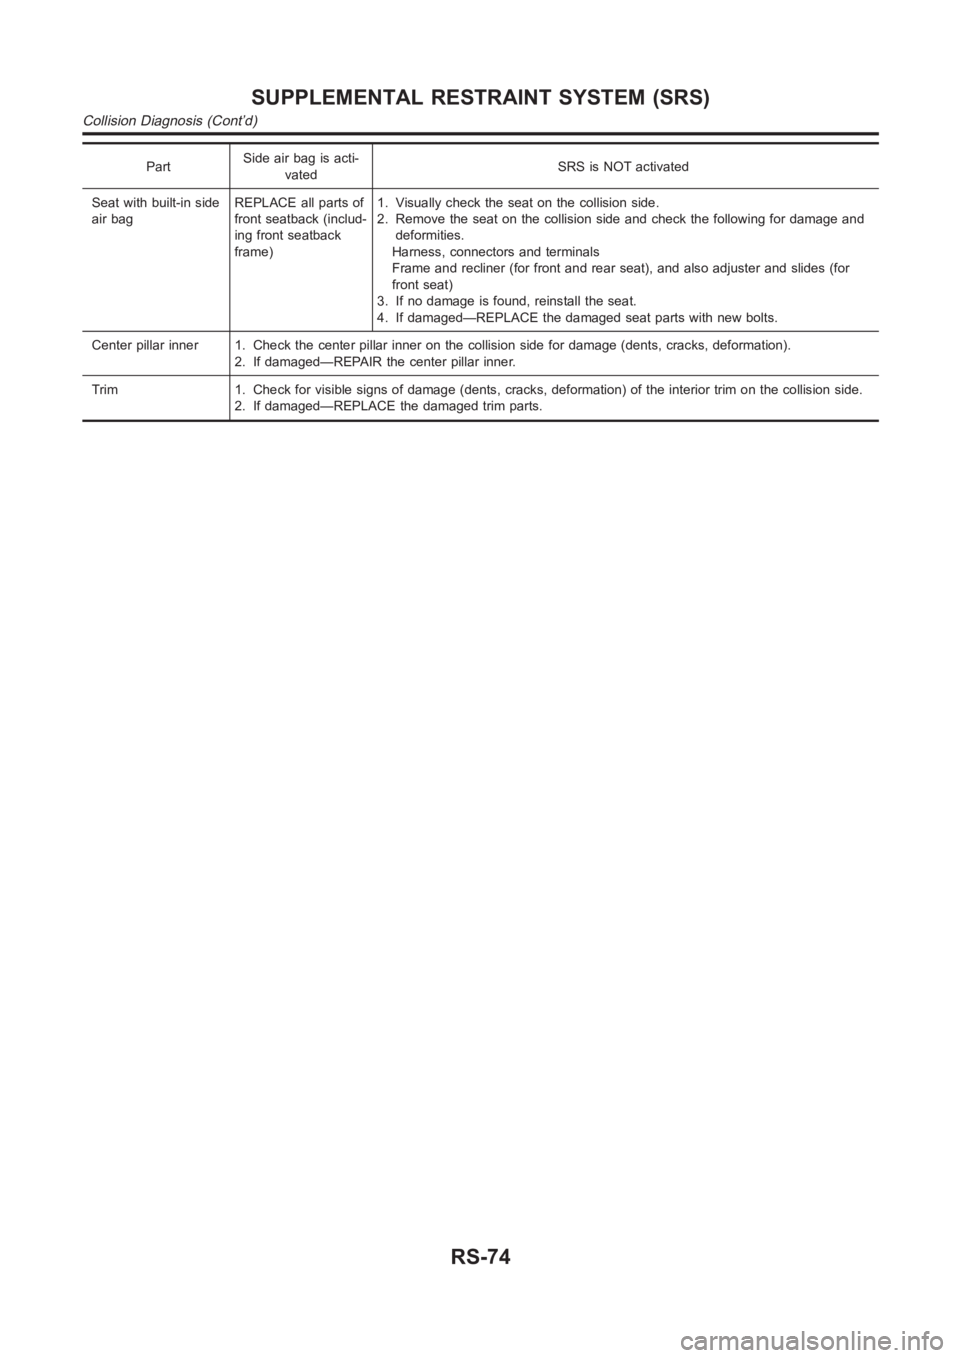
PartSide air bag is acti-
vatedSRS is NOT activated
Seat with built-in side
air bagREPLACE all parts of
front seatback (includ-
ing front seatback
frame)1. Visually check the seat on the collision side.
2. Remove the seat on the collision side and check the following for damage and
deformities.
Harness, connectors and terminals
Frame and recliner (for front and rear seat), and also adjuster and slides (for
front seat)
3. If no damage is found, reinstall the seat.
4. If damaged—REPLACE the damaged seat parts with new bolts.
Center pillar inner 1. Check the center pillar inner on the collision side for damage (dents, cracks, deformation).
2. If damaged—REPAIR the center pillar inner.
Trim 1. Check for visible signs of damage (dents, cracks, deformation) of the interior trim on the collision side.
2. If damaged—REPLACE the damaged trim parts.
SUPPLEMENTAL RESTRAINT SYSTEM (SRS)
Collision Diagnosis (Cont’d)
RS-74
Page 3108 of 3189
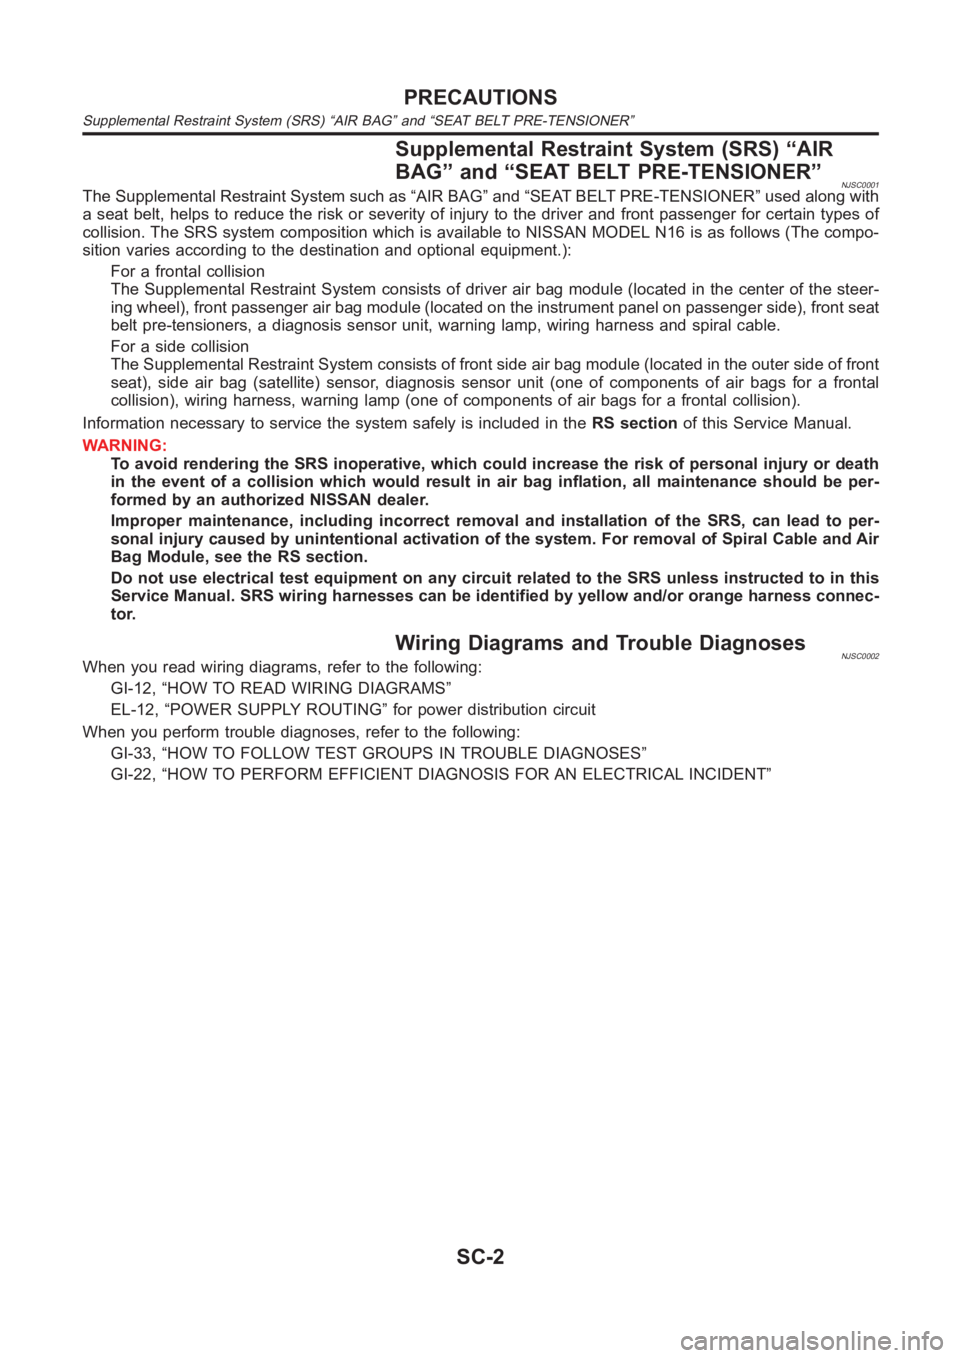
Supplemental Restraint System (SRS) “AIR
BAG” and “SEAT BELT PRE-TENSIONER”
NJSC0001The Supplemental Restraint System such as “AIR BAG” and “SEAT BELT PRE-TENSIONER” used along with
a seat belt, helps to reduce the risk or severity of injury to the driver and front passenger for certain types of
collision. The SRS system composition which is available to NISSAN MODEL N16 is as follows (The compo-
sition varies according to the destination and optional equipment.):
For a frontal collision
The Supplemental Restraint System consists of driver air bag module (located in the center of the steer-
ing wheel), front passenger air bag module (located on the instrument panel on passenger side), front seat
belt pre-tensioners, a diagnosis sensor unit, warning lamp, wiring harness and spiral cable.
For a side collision
The Supplemental Restraint System consists of front side air bag module (located in the outer side of front
seat), side air bag (satellite) sensor, diagnosis sensor unit (one of components of air bags for a frontal
collision), wiring harness, warning lamp (one of components of air bags for a frontal collision).
Information necessary to service the system safely is included in theRS sectionof this Service Manual.
WARNING:
To avoid rendering the SRS inoperative, which could increase the risk of personal injury or death
in the event of a collision which would result in air bag inflation, all maintenance should be per-
formed by an authorized NISSAN dealer.
Improper maintenance, including incorrect removal and installation of the SRS, can lead to per-
sonal injury caused by unintentional activation of the system. For removalofSpiralCableandAir
Bag Module, see the RS section.
Do not use electrical test equipment on any circuit related to the SRS unless instructed to in this
Service Manual. SRS wiring harnesses can be identified by yellow and/or orange harness connec-
tor.
Wiring Diagrams and Trouble DiagnosesNJSC0002When you read wiring diagrams, refer to the following:
GI-12, “HOW TO READ WIRING DIAGRAMS”
EL-12, “POWER SUPPLY ROUTING” for power distribution circuit
When you perform trouble diagnoses, refer to the following:
GI-33, “HOW TO FOLLOW TEST GROUPS IN TROUBLE DIAGNOSES”
GI-22, “HOW TO PERFORM EFFICIENT DIAGNOSIS FOR AN ELECTRICAL INCIDENT”
PRECAUTIONS
Supplemental Restraint System (SRS) “AIR BAG” and “SEAT BELT PRE-TENSIONER”
SC-2