2003 Mercury Sable brake
[x] Cancel search: brakePage 51 of 216

Heated outside mirrors(if equipped)
Both mirrors are heated
automatically to remove ice, mist
and fog when the rear window
defrost is activated.
Do not remove ice from the
mirrors with a scraper or
attempt to readjust the mirror
glass if it is frozen in place.
These actions could cause damage to the glass and mirrors.
POWER ADJUSTABLE FOOT PEDALS (IF EQUIPPED)
The accelerator and brake pedal
should only be adjusted when the
vehicle is stopped and the gearshift
lever is in the P(Park) position.
Press and hold the rocker control
(located on the instrument panel) to adjust accelerator and brake pedal.
•Press the right side of the control to adjust the pedals toward you.
•Press the left side of the control to adjust the pedals away from you.
The adjustment allows for approximately 76 mm (3 inches) of maximum
travel.
Never adjust the accelerator and brake pedal with feet on the
pedals while the vehicle is moving.
SPEED CONTROL (IF EQUIPPED)
With speed control set, you can maintain a speed of 48 km/h (30 mph)
or more without keeping your foot on the pedal. Speed control does not
work at speeds below 48 km/h (30 mph).
Do not use the speed control in heavy traffic or on roads that
are winding, slippery or unpaved.
Driver Controls
51
Page 52 of 216

Setting speed control
The controls for using your speed
control are located on the steering
wheel for your convenience.
1. Press the ON control and release
it.
2. Accelerate to the desired speed.
3. Press the SET + control and
release it.
4. Take your foot off the accelerator
pedal.
5. The indicator light on the
instrument cluster will turn on.
Note:
•Vehicle speed may vary momentarily when driving up and down a
steep hill.
•If the vehicle speed increases above the set speed on a downhill, you
may want to apply the brakes to reduce the speed.
•If the vehicle speed decreases more than 16 km/h (10 mph) below
your set speed on an uphill, your speed control will disengage.
•If the vehicle speed decreases to 40 km/h (25 mph) or less, your
speed control will disengage
Disengaging speed control
To disengage the speed control:
•Depress the brake pedal
Disengaging the speed control will not erase previous set speed.
Resuming a set speed
Press the RES (resume) control and
release it. This will automatically
return the vehicle to the previously
set speed. The RES control will not
work if the vehicle speed is not
faster than 48 km/h (30 mph).
OFF
ON
Driver Controls
52
Page 53 of 216

Increasing speed while using speed control
There are three ways to set a higher
speed:
•Press and hold the SET + control
until you get to the desired
speed, then release the control.
•Press and release the SET + control to operate the Tap-Up function.
Each tap will increase the set speed by 1.6 km/h (1 mph).
•Use the accelerator pedal to get to the desired speed. When the
vehicle reaches that speed press and release the SET + control.
Reducing speed while using speed control
There are three ways to reduce a
set speed:
•Press and hold the CST - control
until you get to the desired
speed, then release the control.
•Press and release the CST -
control to operate the Tap-Down function. Each tap will decrease the
set speed by 1.6 km/h (1 mph).
•Depress the brake pedal until the
desired vehicle speed is reached,
press the SET + control.
Turning off speed control
There are two ways to turn off the speed control:
•Press the speed control OFF
control.
•Turn OFF the ignition.
Note:When you turn off the speed
control or the ignition, your speed
control set speed memory is erased.
OFF
ON
Driver Controls
53
Page 54 of 216

Indicator light
This light comes on when either the
SET or RES controls are pressed. It
turns off when the speed control
OFF control is pressed, the brake is applied or the ignition is turned to
the OFF position.
MOON ROOF (IF EQUIPPED)
Push up on the control to raise the
moon roof to the vent position.
Push the front portion of the control
rearward to open the moon roof.
To close, press and hold the front
portion of the control.
Do not let children play with the moon roof. They may seriously
hurt themselves.
CENTER CONSOLE
Your vehicle may be equipped with a variety of console features. These
include:
•Utility compartment
•Bin mat (snap-in)
•Cupholders (front and rear)
•Coin holder slots
•Compact disc changer (if equipped)
•Tissue holder
•Rear A/C vent
•Rear ashtray (see your Ford, Lincoln Mercury dealer to obtain rear
ashtray
Use only soft cups in the cupholder. Hard objects can injure you
in a collision.
CRUISE
Driver Controls
54
Page 55 of 216

If your vehicle is equipped with the column shift and a bench seat, it has
a center console in the center front seating position.
The center console has similar features as the full console. To open the
storage compartment, raise the armrest and pull the strap on the seat up
and toward the front of the vehicle. The rear seat area is provided with
dual cupholders.
CELL PHONE USE
The use of Mobile Communications Equipment has become increasingly
important in the conduct of business and personal affairs. However,
drivers must not compromise their own or others’safety when using
such equipment. Mobile Communications can enhance personal safety
and security when appropriately used, particularly in emergency
situations. Safety must be paramount when using mobile communications
equipment to avoid negating these benefits.
Mobile Communication Equipment includes, but is not limited to cellular
phones, pagers, portable email devices, in vehicle communications
systems, telematics devices and portable two-way radios.
A driver’s first responsibility is the safe operation of the vehicle.
The most important thing you can do to prevent a crash is to
avoid distractions and pay attention to the road. Wait until it is safe to
operate Mobile Communications Equipment.
POSITIVE RETENTION FLOOR MAT
Position the driver floor mat so that
the eyelet is over the pointed end of
the retention post and rotate
forward to lock in. Make sure that
the mat does not interfere with the
operation of the accelerator or the
brake pedal. To remove the floor
mat, reverse the installation
procedure.
Driver Controls
55
Page 81 of 216

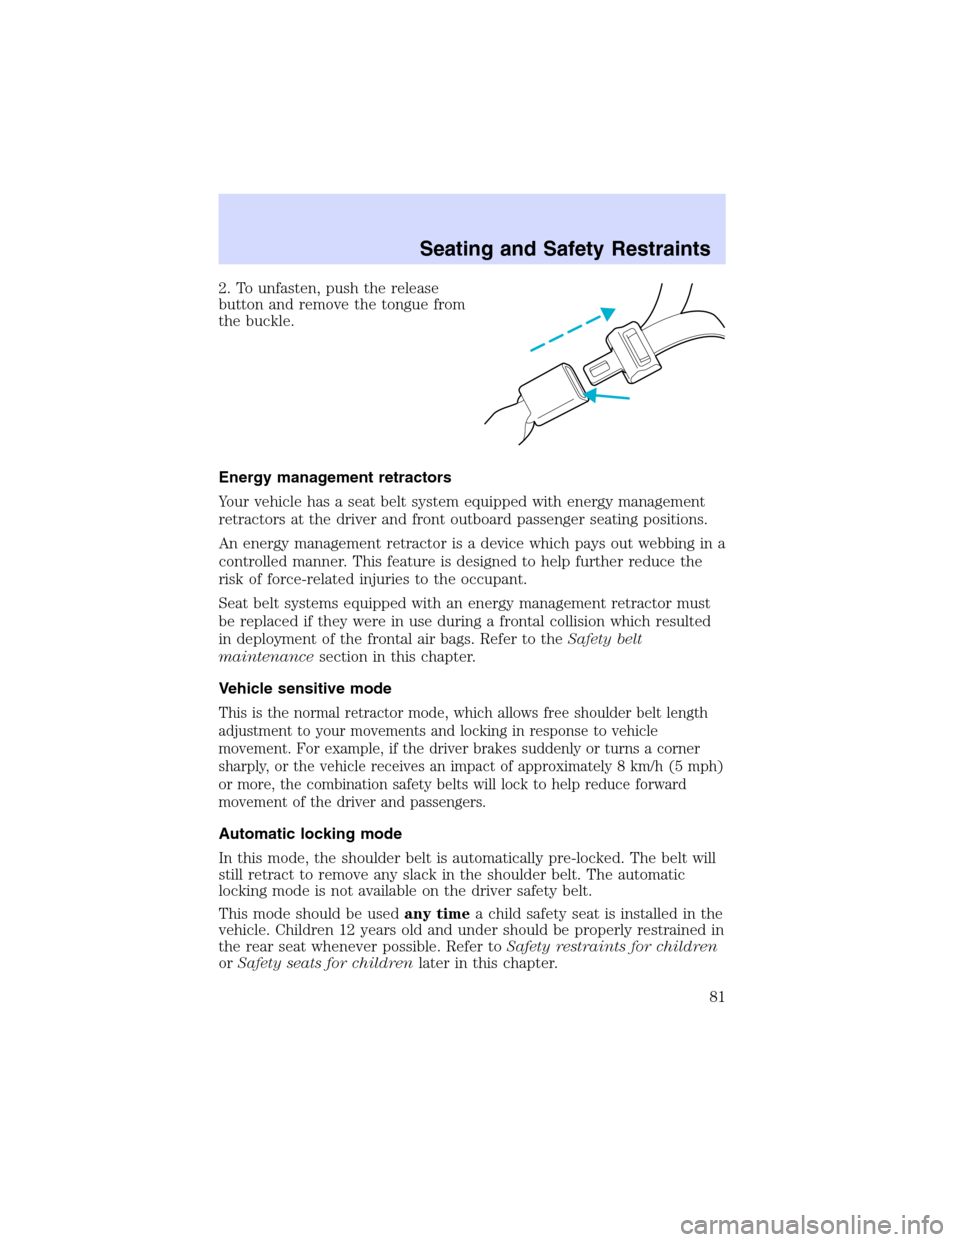
2. To unfasten, push the release
button and remove the tongue from
the buckle.
Energy management retractors
Your vehicle has a seat belt system equipped with energy management
retractors at the driver and front outboard passenger seating positions.
An energy management retractor is a device which pays out webbing in a
controlled manner. This feature is designed to help further reduce the
risk of force-related injuries to the occupant.
Seat belt systems equipped with an energy management retractor must
be replaced if they were in use during a frontal collision which resulted
in deployment of the frontal air bags. Refer to theSafety belt
maintenancesection in this chapter.
Vehicle sensitive mode
This is the normal retractor mode, which allows free shoulder belt length
adjustment to your movements and locking in response to vehicle
movement. For example, if the driver brakes suddenly or turns a corner
sharply, or the vehicle receives an impact of approximately 8 km/h (5 mph)
or more, the combination safety belts will lock to help reduce forward
movement of the driver and passengers.
Automatic locking mode
In this mode, the shoulder belt is automatically pre-locked. The belt will
still retract to remove any slack in the shoulder belt. The automatic
locking mode is not available on the driver safety belt.
This mode should be usedany timea child safety seat is installed in the
vehicle. Children 12 years old and under should be properly restrained in
the rear seat whenever possible. Refer toSafety restraints for children
orSafety seats for childrenlater in this chapter.
Seating and Safety Restraints
81
Page 86 of 216

To fasten the belt, pull the combination lap and shoulder belt from the
retractor so that the shoulder belt portion of the safety belt crosses your
shoulder and chest. Be sure the belt is not twisted. If the belt is twisted,
remove the twist. Insert the tongue into the proper buckle for your
seating position until you hear a snap and feel it latch. Make sure the
tongue is securely fastened to the buckle by pulling on the tongue.
The lap belt should fit snugly and as low as possible around the
hips, not across the waist.
Front and rear seat occupants, including pregnant women,
should wear safety belts for optimum protection in an accident.
Each seating position in your vehicle has a specific safety belt
assembly which is made up of one buckle and one tongue that
are designed to be used as a pair. 1) Use the shoulder belt on the
outside shoulder only. Never wear the shoulder belt under the arm. 2)
Never swing the safety belt around your neck over the inside shoulder.
3) Never use a single belt for more than one person.
Due to folding rear seats, sometimes the buckles and tongues toward the
center of the vehicle may be hidden by the rear edge of the seat cushion.
Pull them out so they will be accessible.
While you are fastened in the seat belt, the shoulder belt adjusts to your
movement. However, if you brake hard, turn hard or your vehicle
receives an impact of 8 km/h (5 mph) or more, the safety belt will
become locked and help reduce your forward movement.
To unfasten the belt, push the red release button on the end of the
buckle. This allows the tongue to unlatch from the buckle. While the belt
retracts, guide the tongue to its original position to prevent it from
striking you or the vehicle.
Safety belt warning light and indicator chime
The safety belt warning light illuminates in the instrument cluster and a
chime sounds to remind the occupants to fasten their safety belts.
Seating and Safety Restraints
86
Page 89 of 216

Reasons given... Consider...
“I have an air bag”Air bags offer greater protection when
used with safety belts. Frontal airbags
are not designed to inflate in rear and
side crashes or rollovers.
“I’d rather be thrown clear”Not a good idea.Peoplewho are
ejected are 40 times more likely
to DIE.Safety belts help prevent
ejection, WE CAN’T“PICK OUR
CRASH”.
Do not sit on top of a buckled safety belt to avoid the Belt
Minder chime. Sitting on the safety belt will increase the risk of
injury in an accident. To disable (one-time) or deactivate the Belt
Minder feature please follow the directions stated below.
One time disable
Anytime the safety belt is buckled and then unbuckled during an ignition
ON cycle, BeltMinder will be disabled for that ignition cycle only. The
safety belt needs to be latched for a minimum of 3 seconds before belt
minder is disabled.
Deactivating/activating the BeltMinder feature
Read steps1-9thoroughly before proceeding with the
deactivation/activation programming procedure.
The BeltMinder feature can be deactivated/activated by performing the
following procedure:
Before following the procedure, make sure that:
•The parking brake is set
•The gearshift is in P (Park) (automatic transmission)
•The ignition switch is in the OFF position
•All vehicle doors are closed
•The driver’s safety belt is unbuckled
•The parklamps/headlamps are in OFF position (If vehicle is equipped
with Autolamps, this will not affect the procedure.)
Seating and Safety Restraints
89