Page 19 of 304
19 At a glance
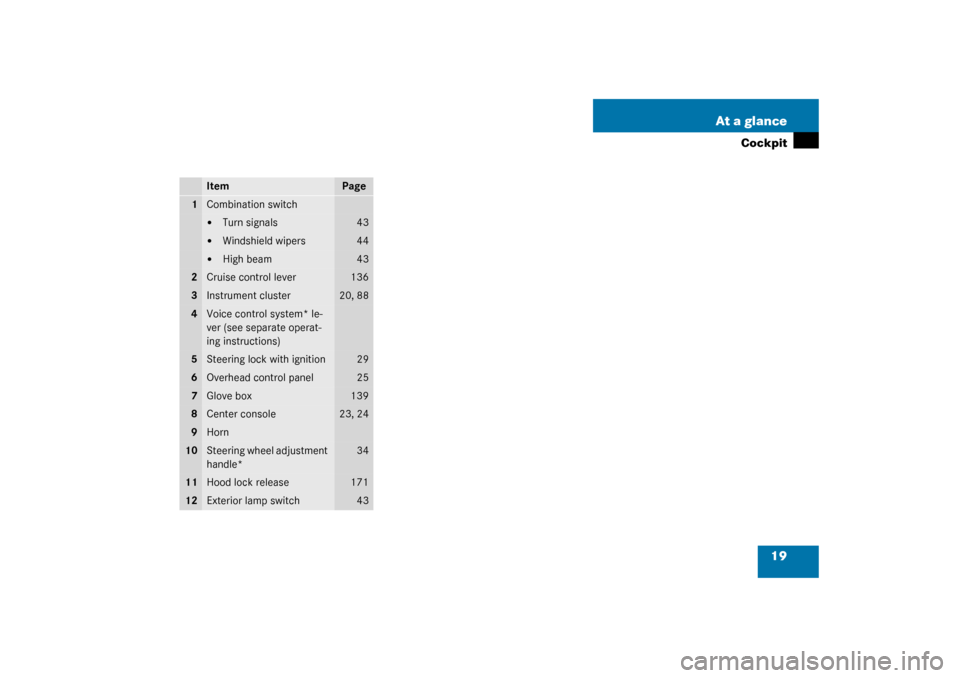
Cockpit
Item
Page
1
Combination switch�
Turn signals
43
�
Windshield wipers
44
�
High beam
43
2
Cruise control lever
136
3
Instrument cluster
20, 88
4
Voice control system* le-
ver (see separate operat-
ing instructions)
5
Steering lock with ignition
29
6
Overhead control panel
25
7
Glove box
139
8
Center console
23, 24
9
Horn
10
Steering wheel adjustment
handle*
34
11
Hood lock release
171
12
Exterior lamp switch
43
Page 29 of 304

29 Getting started
Unlocking
Steering lock positionsSteering lock0For removing key
The steering is locked when the key is
removed from the steering lock. If nec-
essary, move steering wheel slightly to
allow the locking mechanism to en-
gage.
1Power supply to some electrical con-
sumers, such as seat adjustment
2Ignition (power supply for all electrical
consumers) and driving position
3Starting position
Warning!
G
When leaving the vehicle, always remove the
key from the steering lock and lock the vehi-
cle. Do not leave children unattended in the
vehicle, or with access to an unlocked vehi-
cle. Unsupervised use of vehicle equipment
may cause an accident and/or serious per-
sonal injury.iThe key can only be withdrawn in
position0.
If necessary, move steering wheel
slightly to allow the key to be turned
clockwise to position1.
Vehicles with automatic transmission:
The key can only be removed from the
steering lock with the gear selector
lever in positionP.
!To prevent accelerated battery dis-
charge and a possible dead battery,
always remove the key from the
steering lock.
Page 30 of 304

30 Getting startedAdjusting
AdjustingSeats
The seats can be adjusted either manually
or electrically, depending on the vehicle’s
equipment.Warning!
G
All seat, head restraint, steering wheel, and
rear view mirror adjustments, as well as fas-
tening of seat belts, must be done before
the vehicle is put into motion.
Warning!
G
Do not adjust the driver’s seat while driving.
Adjusting the seat while driving could cause
the driver to lose control of the vehicle.
Never ride in a moving vehicle with the seat
back reclined. Sitting in an excessively re-
clined position can be dangerous. You could
slide under the seat belt in a collision. If you
slide under it, the belt would apply force at
the abdomen or neck. That could cause se-
rious or fatal injuries. The seat back and seat
belts provide the best restraint when the
wearer is in an upright position and belts are
properly positioned on the body. Your seat
must be adjusted so that you can correctly
fasten your seat belt (
�page 37).
Never place hands under the seat or near
any moving parts while a seat is being ad-
justed.
Warning!
G
When leaving the vehicle, always remove the
key from the steering lock and lock your ve-
hicle.
The power seats* can also be operated with
the driver’s or passenger door open. Do not
leave children unattended in the vehicle, or
with access to an unlocked vehicle. Unsu-
pervised use of vehicle equipment may
cause an accident and/or serious personal
injury.
Page 32 of 304

32 Getting startedAdjusting�
Let go of handle4. The seat should
make an audible click.
Backrest tilt
�
Turn handwheel2 forward or backward
until your arms are slightly angled
when holding the steering wheel.Head restraint height
�
Adjust the height of the head restraints
by pulling them upwards manually.
�
For a lower position, press release
button1 and push down on the head
restraints manually.
More information can be found in the
“Controls in detail” section (
�page 82).Power seat*
�
Switch on the ignition by turning the
key in the steering lock to position2.
or
�
Open the driver’s or passenger door.
The seat adjustment switches are located
on the outer sides of the seats.
1Seat height
2Seat fore and aft adjustment
3Seat cushion tilt
4Backrest tilt
iWhen moving the seat, be sure that
there are no items in the footwell or
behind the seats. Otherwise you could
damage the seats.
Warning!
G
For your protection, drive only with properly
positioned head restraints.
Adjust head restraint to support the back of
the head approximately at ear level.
Do not drive the vehicle without the seat
head restraints. Head restraints are intend-
ed to help reduce injuries during an acci-
dent.
Page 33 of 304

33 Getting started
Adjusting
Seat height�
Press the switch up or down in the di-
rection of arrow1.
Seat fore and aft adjustment
�
Press the switch forward or backward
in the direction of arrow2.
Adjust to a comfortable seating position
that still allows you to reach the
accelerator / brake pedal safely. The posi-
tion should be as far to the rear as possi-
ble, consistent with ability to properly
operate controls.
Seat cushion tilt
�
Press the switch up or down in the di-
rection of arrow3 until your upper legs
are lightly supported.Backrest tilt
�
Press the switch forward or backward
in the direction of arrow4 until your
arms are slightly angled when holding
the steering wheel.
Head restraint height
5Release button
�
Adjust the height of the head restraints
by pulling them upwards manually.
�
For a lower position, press release
button5 and push down on the head
restraints manually.
More information can be found in the
“Controls in detail” section (
�page 82).
iWhen moving the seat, be sure that
there are no items in the footwell or
behind the seats. Otherwise you could
damage the seats.
Warning!
G
For your protection, drive only with properly
positioned head restraints.
Adjust head restraint to support the back of
the head approximately at ear level.
Do not drive the vehicle without the seat
head restraints. Head restraints are intend-
ed to help reduce injuries during an acci-
dent.
Page 34 of 304

34 Getting startedAdjustingTelescoping steering column* Steering wheel adjustment
1Adjustment handle
�
To unlock the steering column, pull out
handle1 as far as it will go.
�
Move the steering wheel to the desired
position.
�
Push handle1 back to its original posi-
tion to relock the steering wheel. You
should hear an audible click.
The steering wheel is again fixed into
place.
Warning!
G
Do not adjust the steering wheel while driv-
ing. Adjusting the steering wheel while driv-
ing, or driving without the adjustment
locked could cause the driver to lose control
of the vehicle.
When leaving the vehicle, always remove the
key from the steering lock and lock your ve-
hicle.
Do not leave children unattended in the ve-
hicle, or with access to an unlocked vehicle.
Unsupervised use of vehicle equipment may
cause an accident and/or serious personal
injury.
!Do not drive the vehicle until you have
properly locked the steering column.
If the indicator lamp
_
comes on
while the engine is running, the steer-
ing column is not locked properly
(
�page 200).
Page 43 of 304

43 Getting started
Driving
Switching on headlampsExterior lamp switch1Off
2Low beam headlamps on�
Turn the switch to
B
.More information can be found in the
“Controls in detail” section (
�page 83).
Turn signals and high beam
The combination switch is on the left of the
steering column.Combination switch1Turn signals, right
2Turn signals, left�
Press the combination switch up1 or
down2.
Warning!
G
Vehicles with automatic transmission: It is
dangerous to shift the selector lever out ofP
orN if the engine speed is higher than idle
speed. If your foot is not firmly on the brake
pedal, the vehicle could accelerate quickly
forward or in reverse. You could lose control
of the vehicle and hit someone or some-
thing. Only shift into gear when the engine is
idling normally and when your right foot is
firmly on the brake pedal.!Simultaneously depressing the acceler-
ator pedal and applying the brake re-
duces engine performance and causes
premature brake and drivetrain wear.
Warning!
G
On slippery road surfaces, never downshift
in order to obtain braking action. This could
result in drive wheel slip and reduced vehi-
cle control. Your vehicle’s ABS will not pre-
vent this type of loss of control.
Page 47 of 304

47 Getting started
Parking and locking
Parking and locking
You have now completed your first drive.
You have properly stopped and parked
your vehicle. End your drive as follows.
Parking brake
1Brake lever
2Release button�
Pull up brake lever1 firmly.
When the engine is running, the indica-
tor lamp
;
(USA only) or
3
(Canada only) in the instrument cluster
will be illuminated.
Warning!
G
Wait until the vehicle is stationary before re-
moving the key from the starter switch. The
vehicle cannot be steered when the key is
removed.Warning!
G
With the engine not running, there is no
power assistance for the brake and steering
system. In this case, it is important to keep
in mind that a considerably higher degree of
effort is necessary to stop or steer the vehi-
cle.
Warning!
G
Do not park this vehicle in areas where com-
bustible materials such as grass, hay or
leaves can come into contact with the hot
exhaust system, as these materials could be
ignited and cause a vehicle fire.
To reduce the risk of personal injury as a re-
sult of vehicle movement, before turning off
the engine and leaving the vehicle always:�
Keep right foot on brake pedal.
�
Pull up the brake lever firmly.
�
Move the selector lever to positionP
(manual transmission: first or reverse
gear).
�
Slowly release brake pedal.
�
When parked on an incline, turn front
wheels towards the road curb.
�
Turn the key to steering lock position0
and remove.