Page 76 of 304

76 Controls in detailLocking and unlocking
Checking the batteries�
Press button
‹
or
Œ
longer than
1second.
The battery check lamp4 lights up
briefly to indicate that the key batteries
are in order.
Warning!
G
When leaving the vehicle, always remove the
key from the steering lock and lock the vehi-
cle. Do not leave children unattended in the
vehicle, or with access to an unlocked vehi-
cle. It is possible for children to open a
locked door from the inside, which could re-
sult in an accident and/or serious injury.
!If you can no longer lock or unlock the
vehicle with the remote control, then
either the batteries in the remote con-
trol are discharged, the remote control
is malfunctioning, or the vehicle battery
is drained.�
Check the batteries in the remote
control and replace them if neces-
sary (
�page 212)
or
�
Synchronize the remote control
(�page 213)
or
�
Use the folding key to unlock the
doors (
�page 210) and the trunk
(
�page 210) as required. Lock the
vehicle using the folding key
(�page 211).
If the remote control is malfunctioning,
contact an authorized Mercedes-Benz
Center.
!If battery check lamp4 does not light
up briefly during the check, then the re-
mote control batteries are discharged.
Replace the batteries (
�page 212).
You can obtain the required batteries
at any authorized Mercedes-Benz
Center.
Page 77 of 304

77 Controls in detail
Locking and unlocking
Loss of remote control with folding key
If you lose a remote control or the folding
key, you should do the following:�
Have the remote control deactivated
by an authorized Mercedes-Benz
Center.
�
Report the loss of the remote control or
the folding key immediately to your car
insurance company.
�
If necessary have the mechanical lock
replaced.
Your authorized Mercedes-Benz Center
will be glad to supply you with a replace-
ment.
Opening the trunk
The handle is located above the rear
license plate recess.
1Trunk lid lock
2Handle�
Pull handle2 and lift the trunk lid.
The trunk can also be opened from the in-
side in an emergency, see trunk lid emer-
gency release (
�page 78).
Closing the trunk
The recess is located on the inner side of
the trunk lid.
1Recess�
Lower trunk lid by pulling firmly on
recess1.
iThe vehicle must be unlocked.
Warning!
G
To prevent possible personal injury, always
keep hands and fingers away from the trunk
opening when closing the trunk lid.
Be especially careful when small children
are around.
Page 78 of 304

78 Controls in detailLocking and unlockingOpening the doors from the inside
You can open a locked door from the in-
side. Open door only when conditions are
safe to do so.
1Inside door handle�
Pull on door handle1.If a door was locked, the locking knob
will move up.
Trunk lid emergency release
The handle for the trunk lid emergency
release is located in the trunk lid.
1Handle�
Pull handle1 in direction of arrow to
open the trunk lid.
Automatic central locking
Factory setting
The doors and the trunk automatically lock
when the ignition is switched on and the
left front wheel turns at vehicle speeds of
approximately 9 mph (15 km/h) or more.
You can open a locked door from the in-
side. Open door only when conditions are
safe to do so.
Warning!
G
Only drive with the trunk closed as, among
other dangers such as visibility blockage,
exhaust fumes may enter the vehicle interi-
or.
iThe anti-theft alarm system is triggered
when the trunk is opened from the
inside and the vehicle was previously
centrally locked.
iThe doors unlock automatically after an
accident if the force of the impact ex-
ceeds a preset threshold.
To prevent the vehicle door locks from
locking, deactivate the automatic cen-
tral locking when the vehicle�
is pushed or
�
is on a test stand
Page 80 of 304

80 Controls in detailLocking and unlockingLocking and unlocking from the inside
You can lock or unlock the vehicle from in-
side using the central locking switch. This
can be useful, for example, if you want to
unlock the passenger door from the inside
or want to lock the vehicle before starting
to drive.Locking
�
Press upper part1 of central locking
switch (
�page 79).
If all the doors are closed, the vehicle
locks.
Unlocking
�
Press lower part2 of central locking
switch (
�page 79).
The vehicle unlocks if not previously
centrally locked with the remote con-
trol.
iYou can open a locked door from the
inside. Open door only when conditions
are safe to do so.
If you have locked the vehicle with the
remote control, the central locking
switch does not work.
Warning!
G
When leaving the vehicle, always remove the
key from the steering lock and lock the vehi-
cle. Do not leave children unattended in the
vehicle, or with access to an unlocked vehi-
cle. Unsupervised use of vehicle equipment
may cause an accident and/or serious per-
sonal injury.
Page 82 of 304
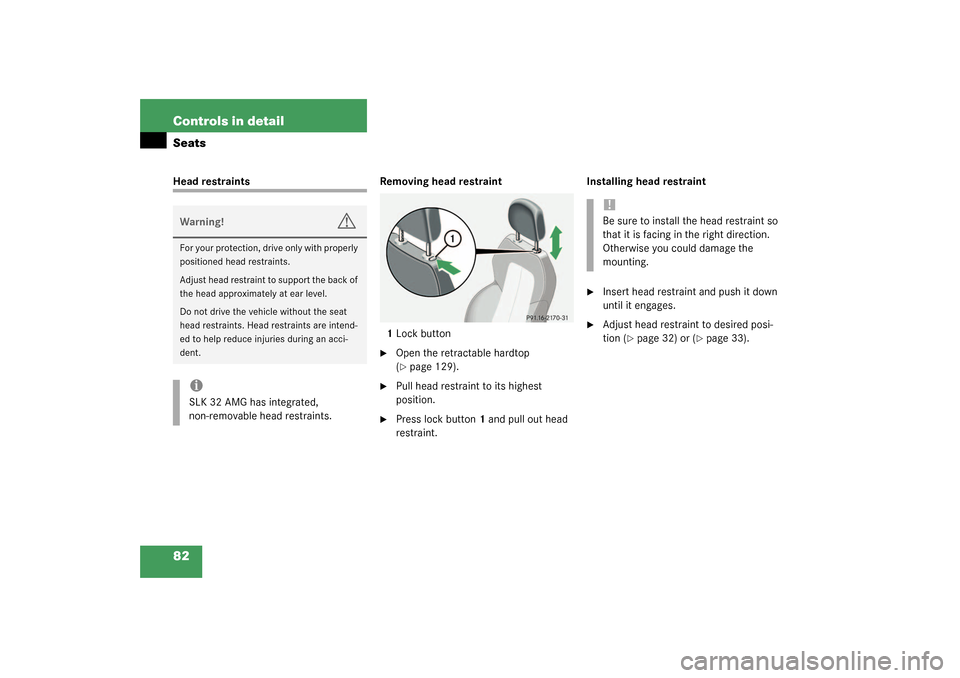
82 Controls in detailSeatsHead restraints Removing head restraint
1Lock button
�
Open the retractable hardtop
(�page 129).
�
Pull head restraint to its highest
position.
�
Press lock button1 and pull out head
restraint.Installing head restraint
�
Insert head restraint and push it down
until it engages.
�
Adjust head restraint to desired posi-
tion (
�page 32) or (
�page 33).
Warning!
G
For your protection, drive only with properly
positioned head restraints.
Adjust head restraint to support the back of
the head approximately at ear level.
Do not drive the vehicle without the seat
head restraints. Head restraints are intend-
ed to help reduce injuries during an acci-
dent.iSLK 32 AMG has integrated,
non-removable head restraints.
!Be sure to install the head restraint so
that it is facing in the right direction.
Otherwise you could damage the
mounting.
Page 83 of 304
.
Exterior lamp switch
The exterior la")
83 Controls in detail
Lighting
Lighting
For notes on how to switch on the head-
lamps and use the turn signals, see the
“Getting started” section (
�page 43).
Exterior lamp switch
The exterior lamp switch is located on the
dashboard to the left of the steering wheel.Exterior lamp switch
M
Off
C
Parking lamps (also side marker
lamps, tail lamps, license plate
lamps, instrument panel lamps)
Canada only: When engine is run-
ning, the low beam is also switched
on.
B
Low beam plus parking lamps or
high beam headlamps (combination
switch pushed forward).
ˆ
Standing lamps, right (turn left one
stop)
‚
Standing lamps, left (turn left two
stops)Daytime running lamp mode (Canada
only)
Vehicles with automatic transmission
When the engine is running and the
selector lever is in driving position, the low
beam headlamps are automatically
switched on.
When you shift from a driving position to
positionN orP, the low beam switches off
(2 seconds delay).
Vehicles with manual transmission
With the engine running, the low beam
headlamps are automatically switched on.
iIf you remove the key and open the
driver’s door while the parking lamps or
low beam headlamps are switched on,
then a warning sounds.
iWith the daytime running lamp mode
activated and the engine running, the
low beam headlamps cannot be
switched off manually.
Page 85 of 304
85 Controls in detail
Lighting
Switching on high beams�
Turn exterior lamp switch to
position
B
�
Push the combination switch in
direction1.
The high beam symbol is illuminated on
the instrument cluster.
High beam flasher
�
Pull the combination switch briefly in
direction2.
Hazard warning flasher
The hazard warning flasher can be activat-
ed with the ignition switched on or off. It is
activated automatically when an airbag is
deployed.
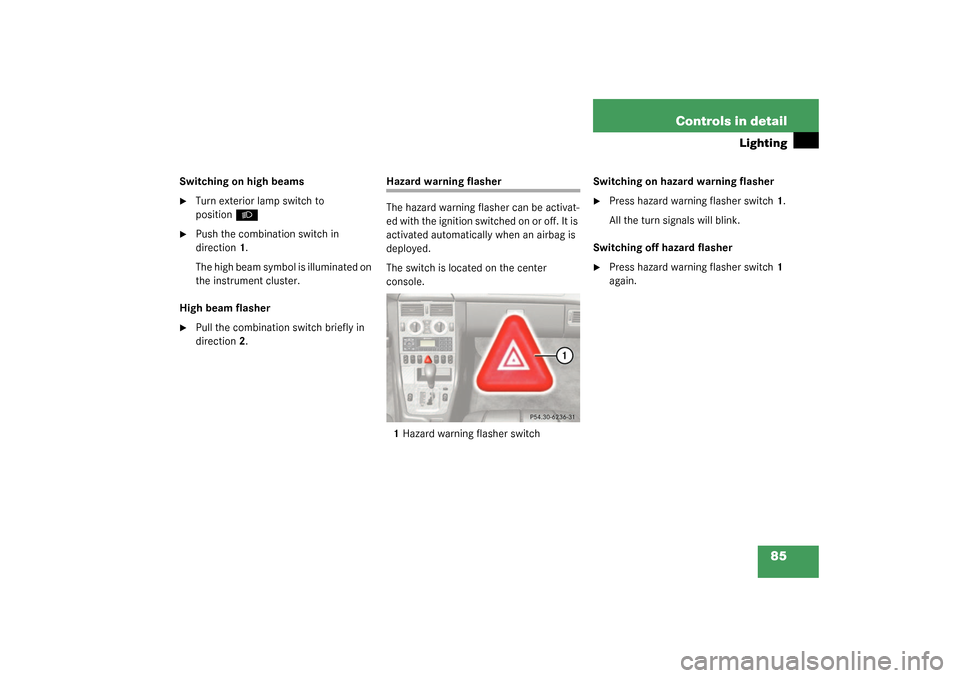
The switch is located on the center
console.
1Hazard warning flasher switchSwitching on hazard warning flasher
�
Press hazard warning flasher switch1.
All the turn signals will blink.
Switching off hazard flasher
�
Press hazard warning flasher switch1
again.
Page 89 of 304
 once
with key in steering lock position2
(
�page 29) until the trip odometer is
reset
or
�
Press the left kn")
89 Controls in detail
Instrument cluster
Trip odometer�
Press the left knob3 (
�page 20) once
with key in steering lock position2
(
�page 29) until the trip odometer is
reset
or
�
Press the left knob3 (
�page 20) twice
with key removed or in steering lock
position0 or1 (
�page 29) until the
trip odometer is reset.
Tachometer
The red marking on the tachometer
(�page 20) denotes excessive engine
speed.
To help protect the engine, the fuel supply
is interrupted if the engine is operated
within the red marking.
Warning!
G
Driving when your engine is badly overheat-
ed can cause some fluids which may have
leaked into the engine compartment to
catch fire. You could be seriously burned.
Steam from an overheated engine can cause
serious burns and can occur just by opening
the engine hood. Stay away from the engine
if you see or hear steam coming from it.
Turn off the engine, get out of the vehicle
and do not stand near the vehicle until it
cools down.
iAvoid driving at excessive engine
speeds, as it may result in serious en-
gine damage that is not covered by the
Mercedes-Benz Limited Warranty.