Page 76 of 304

76 Controls in detailLocking and unlocking
Checking the batteries�
Press button
‹
or
Œ
longer than
1second.
The battery check lamp4 lights up
briefly to indicate that the key batteries
are in order.
Warning!
G
When leaving the vehicle, always remove the
key from the steering lock and lock the vehi-
cle. Do not leave children unattended in the
vehicle, or with access to an unlocked vehi-
cle. It is possible for children to open a
locked door from the inside, which could re-
sult in an accident and/or serious injury.
!If you can no longer lock or unlock the
vehicle with the remote control, then
either the batteries in the remote con-
trol are discharged, the remote control
is malfunctioning, or the vehicle battery
is drained.�
Check the batteries in the remote
control and replace them if neces-
sary (
�page 212)
or
�
Synchronize the remote control
(�page 213)
or
�
Use the folding key to unlock the
doors (
�page 210) and the trunk
(
�page 210) as required. Lock the
vehicle using the folding key
(�page 211).
If the remote control is malfunctioning,
contact an authorized Mercedes-Benz
Center.
!If battery check lamp4 does not light
up briefly during the check, then the re-
mote control batteries are discharged.
Replace the batteries (
�page 212).
You can obtain the required batteries
at any authorized Mercedes-Benz
Center.
Page 83 of 304
.
Exterior lamp switch
The exterior la")
83 Controls in detail
Lighting
Lighting
For notes on how to switch on the head-
lamps and use the turn signals, see the
“Getting started” section (
�page 43).
Exterior lamp switch
The exterior lamp switch is located on the
dashboard to the left of the steering wheel.Exterior lamp switch
M
Off
C
Parking lamps (also side marker
lamps, tail lamps, license plate
lamps, instrument panel lamps)
Canada only: When engine is run-
ning, the low beam is also switched
on.
B
Low beam plus parking lamps or
high beam headlamps (combination
switch pushed forward).
ˆ
Standing lamps, right (turn left one
stop)
‚
Standing lamps, left (turn left two
stops)Daytime running lamp mode (Canada
only)
Vehicles with automatic transmission
When the engine is running and the
selector lever is in driving position, the low
beam headlamps are automatically
switched on.
When you shift from a driving position to
positionN orP, the low beam switches off
(2 seconds delay).
Vehicles with manual transmission
With the engine running, the low beam
headlamps are automatically switched on.
iIf you remove the key and open the
driver’s door while the parking lamps or
low beam headlamps are switched on,
then a warning sounds.
iWith the daytime running lamp mode
activated and the engine running, the
low beam headlamps cannot be
switched off manually.
Page 85 of 304
85 Controls in detail
Lighting
Switching on high beams�
Turn exterior lamp switch to
position
B
�
Push the combination switch in
direction1.
The high beam symbol is illuminated on
the instrument cluster.
High beam flasher
�
Pull the combination switch briefly in
direction2.
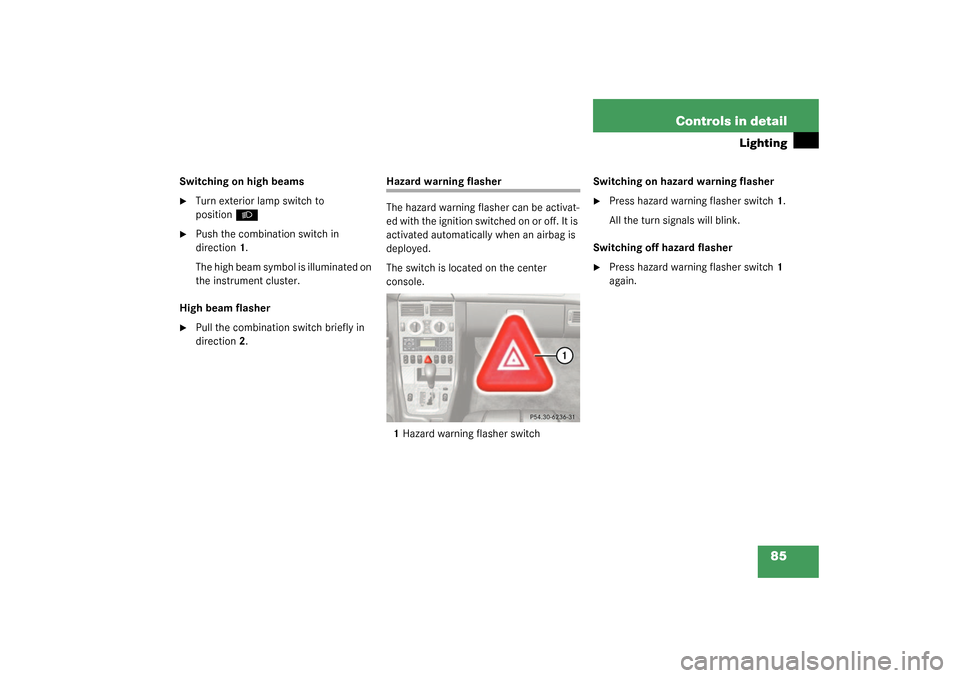
Hazard warning flasher
The hazard warning flasher can be activat-
ed with the ignition switched on or off. It is
activated automatically when an airbag is
deployed.
The switch is located on the center
console.
1Hazard warning flasher switchSwitching on hazard warning flasher
�
Press hazard warning flasher switch1.
All the turn signals will blink.
Switching off hazard flasher
�
Press hazard warning flasher switch1
again.
Page 99 of 304
 and for adjusting the rear view
mirrors (
�page 35) is found in the “Get-
ting started” sect")
99 Controls in detail
Good visibility
Good visibility
Information on the windshield wipers
(�page 44) and for adjusting the rear view
mirrors (
�page 35) is found in the “Get-
ting started” section.
Rear view mirror
Automatic antiglare rear view mirror
The reflection brightness of the exterior
rear view mirror on the driver’s side and
the inside rear view mirror will respond au-
tomatically to glare when�
the ignition is switched on, and
�
incoming light from headlamps falls on
the sensor in the inside rear view mir-
ror.
The rear view mirror will not react if
�
reverse gear is engaged
�
the interior lighting is turned on
�
the wind screen is installed
(�page 134)
Warning!
G
The automatic antiglare function does not
react if incoming light is not aimed directly
at sensors in the inside rear view mirror.
The inside rear view mirror and the exterior
rear view mirror on the driver’s side do not
react, for example, if the wind screen is in-
stalled.
Glare can endanger you and others.
Warning!
G
In the case of an accident, liquid electrolyte
may escape from the mirror housing if the
mirror glass breaks.
Electrolyte has an irritating effect. Do not al-
low the liquid to come into contact with
eyes, skin, clothing, or the respiratory sys-
tem. In case it does, immediately flush af-
fected area with water, and seek medical
help if necessary.
Page 105 of 304

105 Controls in detail
Climate control
Air recirculation mode
Switch to air recirculation mode to prevent
unpleasant odors from entering the vehicle
from the outside. This setting cuts off the
intake of outside air and recirculates the
air in the passenger compartment.
Activating�
Press button
Ð
(�page 102).
The indicator lamp on the
Ð
button
comes on.Deactivating
�
Press button
Ð
(�page 102).
The indicator lamp on the
Ð
button
goes out.
The air recirculation mode is deactivated
automatically:
�
after five minutes if the outside temper-
ature is below approximately 41°F
(5 °C)
�
after five minutes if the air conditioning
is turned off
�
after 30 minutes if the outside temper-
ature is above approximately 41°F
(5 °C)
At outside temperatures above 79°F
(26 °C), the system will not automatically
switch back to outside air. A quantity of
outside air is added after approximately
30 minutes.
Rear window defroster
The rear window defroster uses a large
amount of power. To keep the battery
drain to a minimum, switch off the defrost-
er as soon as the rear window is clear. The
defroster is automatically deactivated af-
ter a maximum of 12 minutes.
Activating�
Switch on the ignition.
�
Press button
F
(�page 102).
The indicator lamp on the button lights
up.
Deactivating
�
Press button
F
(�page 102) again.
The indicator lamp on the button goes
out.
Warning!
G
When the outside temperature is below
41°F (5°C), only switch to air recirculation
mode for short periods to prevent window
fogging.iThe air recirculation mode is activated
automatically at high outside temper-
tures.
Page 106 of 304

106 Controls in detailClimate control
Air conditioning
The air conditioning is operational while
the engine is running and cools the interior
air to the temperature set by the operator.Deactivating
It is possible to deactivate the air condi-
tioning (cooling) function of the climate
control system. The air in the vehicle will
then no longer be cooled or dehumidified.
�
Press buttonAC
OFF
(�page 102).
The indicator lamp on the
AC
OFF
button lights up.
Warning!
G
Any accumulation of snow and ice should be
removed from the rear window before driv-
ing. Visibility could otherwise be impaired,
endangering you and others.!If the rear window defroster switches
off too soon and the indicator lamp
starts blinking, this means that too
many electrical consumers are operat-
ing simultaneously and there is insuffi-
cient voltage in the battery. The system
responds automatically by deactivating
the rear window defroster.
As soon as the battery has sufficient
voltage, the rear window defroster au-
tomatically turns itself back on.
iCondensation may drip out from under-
neath the vehicle. This is normal and
not an indication of a malfunction.
Warning!
G
While driving, deactivate the air conditioning
only temporarily to prevent window fogging.
Page 121 of 304

121 Controls in detail
Audio system
CD mode
General notes on CD mode
Should excessively high temperatures oc-
cur while the audio system is in CD mode, TEMP HIGH
will appear in the display and
muting will take place. The unit will then
switch back to radio mode until the tem-
perature has decreased to a safe operating
level.
Should excessively low temperatures oc-
cur while the audio system is in CD mode,
TEMP LOW
will be displayed, but the CD will
still be played. It will be sensitive to skip-
ping if you are driving over rough roads.
Handle CDs carefully to prevent interfer-
ence during playback.
Avoid fingerprints and dust on CDs. Do not
write on the CDs or apply any label to the
CDs.
Clean CDs from time to time with a com-
mercially available cleaning cloth. No sol-
vents, anti-static sprays, etc. should be
used. Replace the CD in its container after use.
Protect CDs from heat and direct sunlight.
Only use CDs which bear the label shown
and that conform to the compact disc dig-
ital audio standard (IEC 60908).
Use of CDs which do not meet this stan-
dard may cause damage to the CD chang-
er. Do not play single-CDs (80 mm) with an
adapter.
Warning!
G
The CD changer* is a Class 1 laser product.
There is a danger of invisible laser radiation
if the cover is opened or damaged.
Do not remove the cover. The CD changer*
does not contain any parts which can be ser-
viced by the user. For safety reasons, have
any service work which may be necessary
performed only by qualified personnel.
Page 140 of 304
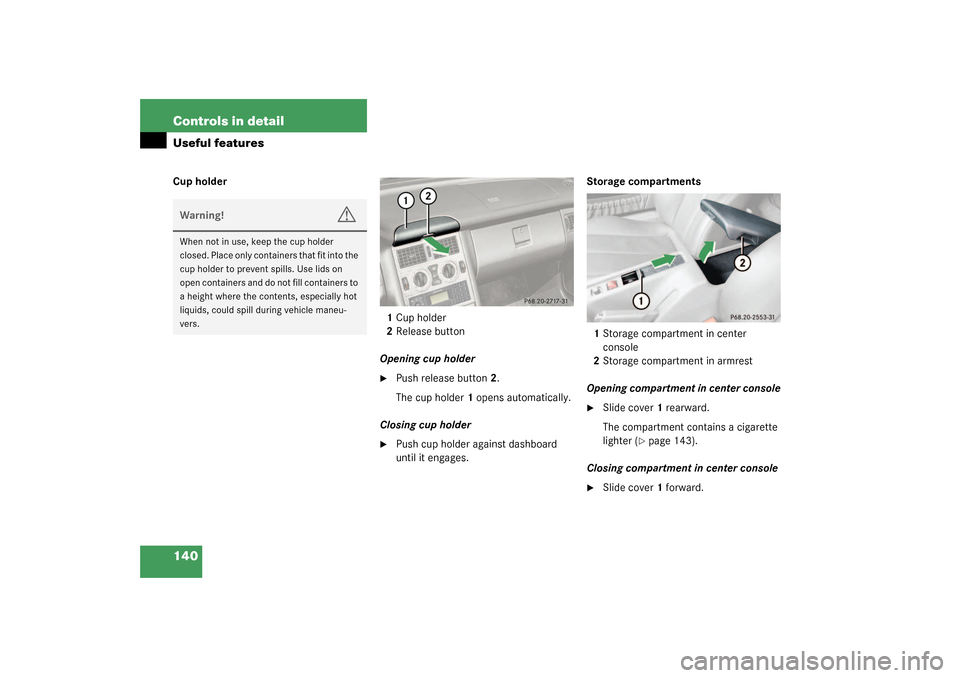
140 Controls in detailUseful featuresCup holder
1Cup holder
2Release button
Opening cup holder
�
Push release button2.
The cup holder1 opens automatically.
Closing cup holder
�
Push cup holder against dashboard
until it engages.Storage compartments
1Storage compartment in center
console
2Storage compartment in armrest
Opening compartment in center console
�
Slide cover1 rearward.
The compartment contains a cigarette
lighter (
�page 143).
Closing compartment in center console
�
Slide cover1 forward.
Warning!
G
When not in use, keep the cup holder
closed. Place only containers that fit into the
cup holder to prevent spills. Use lids on
open containers and do not fill containers to
a height where the contents, especially hot
liquids, could spill during vehicle maneu-
vers.