Page 176 of 304

176 OperationEngine compartmentTransmission fluid level
The transmission fluid level does not need
to be checked. If you notice transmission
fluid loss or gear shifting malfunctions,
have an authorized Mercedes-Benz Center
check the transmission.Coolant
The engine coolant is a mixture of water
and anticorrosion/antifreeze. To check
the coolant level, the vehicle must be
parked on level ground and the engine
must be cool.
The coolant expansion tank is located on
the passenger side of the engine compart-
ment.
SLK 230 Kompressor1Coolant expansion tank
2Float in the filler neck�
Using a rag, turn the cap to the left to
the first detent position. Allow any ex-
cess pressure to escape.
�
Continue turning the cap to the left and
remove it.
The coolant level is correct if float2
can be seen at the top through the filler
neck.
Warning!
G
In order to avoid any possibly serious burns:�
Use extreme caution when opening the
hood if there are any signs of steam or
coolant leaking from the cooling system,
or if the coolant temperature gauge indi-
cates that the coolant is overheated.
�
Do not remove pressure cap on coolant
reservoir if engine temperature is above
194°F (90°C). Allow engine to cool
down before removing cap. The coolant
reservoir contains hot fluid and is under
pressure.
�
Using a rag, slowly open the cap approx-
imately ½ turn to relieve excess pres-
sure. If opened immediately, scalding
hot fluid and steam will be blown out un-
der pressure.
�
Do not spill antifreeze on hot engine
parts. Antifreeze contains ethylene gly-
col which may burn if it comes into con-
tact with hot engine parts.
��
Page 223 of 304
223 Practical hints
Replacing bulbs
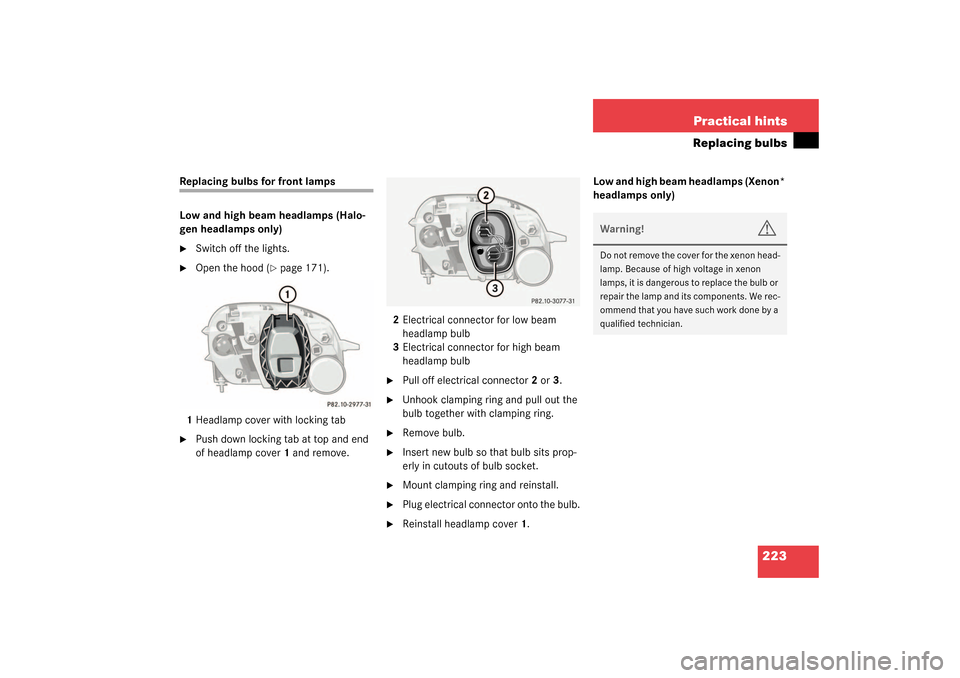
Replacing bulbs for front lamps
Low and high beam headlamps (Halo-
gen headlamps only)�
Switch off the lights.
�
Open the hood (
�page 171).
1Headlamp cover with locking tab
�
Push down locking tab at top and end
of headlamp cover1 and remove.2Electrical connector for low beam
headlamp bulb
3Electrical connector for high beam
headlamp bulb
�
Pull off electrical connector2 or3.
�
Unhook clamping ring and pull out the
bulb together with clamping ring.
�
Remove bulb.
�
Insert new bulb so that bulb sits prop-
erly in cutouts of bulb socket.
�
Mount clamping ring and reinstall.
�
Plug electrical connector onto the bulb.
�
Reinstall headlamp cover1.Low and high beam headlamps (Xenon*
headlamps only)
Warning!
G
Do not remove the cover for the xenon head-
lamp. Because of high voltage in xenon
lamps, it is dangerous to replace the bulb or
repair the lamp and its components. We rec-
ommend that you have such work done by a
qualified technician.
Page 224 of 304
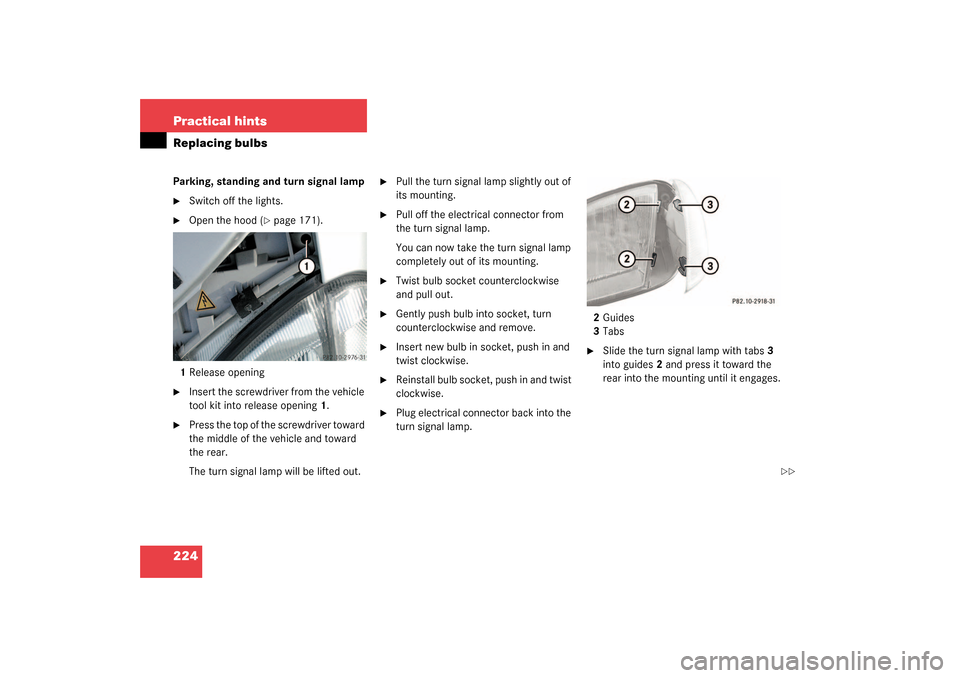
224 Practical hintsReplacing bulbsParking, standing and turn signal lamp�
Switch off the lights.
�
Open the hood (
�page 171).
1Release opening
�
Insert the screwdriver from the vehicle
tool kit into release opening1.
�
Press the top of the screwdriver toward
the middle of the vehicle and toward
the rear.
The turn signal lamp will be lifted out.
�
Pull the turn signal lamp slightly out of
its mounting.
�
Pull off the electrical connector from
the turn signal lamp.
You can now take the turn signal lamp
completely out of its mounting.
�
Twist bulb socket counterclockwise
and pull out.
�
Gently push bulb into socket, turn
counterclockwise and remove.
�
Insert new bulb in socket, push in and
twist clockwise.
�
Reinstall bulb socket, push in and twist
clockwise.
�
Plug electrical connector back into the
turn signal lamp.2Guides
3Tabs
�
Slide the turn signal lamp with tabs3
into guides2 and press it toward the
rear into the mounting until it engages.
��
Page 226 of 304
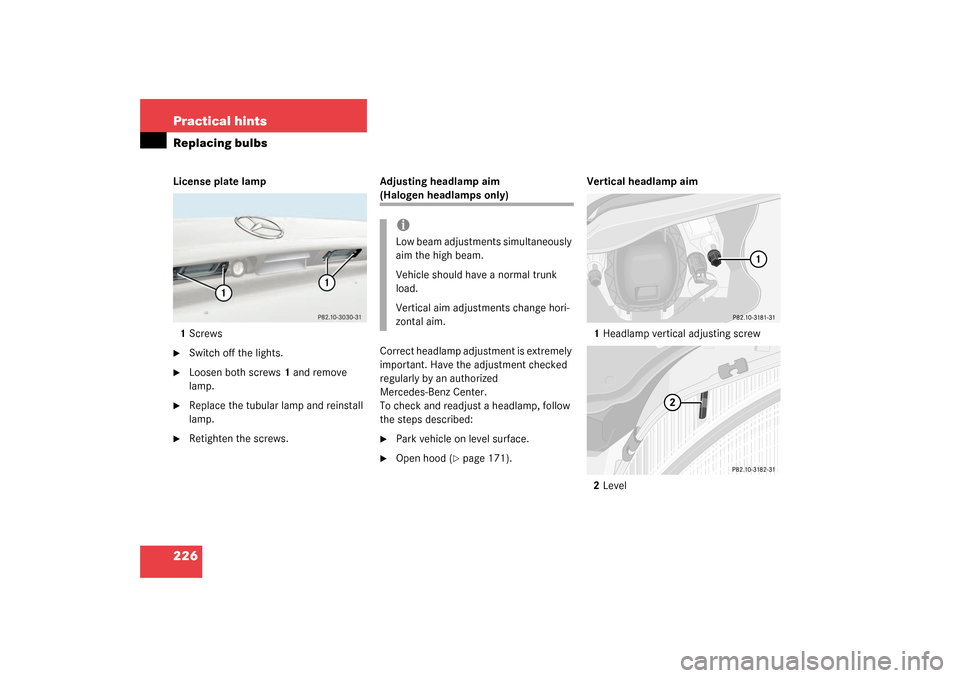
226 Practical hintsReplacing bulbsLicense plate lamp
1Screws�
Switch off the lights.
�
Loosen both screws1 and remove
lamp.
�
Replace the tubular lamp and reinstall
lamp.
�
Retighten the screws.Adjusting headlamp aim
(Halogen headlamps only)
Correct headlamp adjustment is extremely
important. Have the adjustment checked
regularly by an authorized
Mercedes-Benz Center.
To check and readjust a headlamp, follow
the steps described:�
Park vehicle on level surface.
�
Open hood (
�page 171).Vertical headlamp aim
1Headlamp vertical adjusting screw
2Level
iLow beam adjustments simultaneously
aim the high beam.
Vehicle should have a normal trunk
load.
Vertical aim adjustments change hori-
zontal aim.
Page 228 of 304

228 Practical hintsReplacing wiper blades
Replacing wiper bladesRemoving�
Fold the wiper arm forward.
�
Press safety tab down1.
�
Push wiper blade downward2 and re-
move.Replacing wiper blade insert
�
Place wiper blade on firm support.
�
Press down both tabs.
�
Slide (in direction of arrow) the wiper
blade insert out of the retainer claws.
�
Slide (in direction of arrow) the new
wiper blade insert into retainer claws
until tabs are engaged.
Installing�
Slide wiper blade onto wiper arm until
it locks in place.
Warning!
G
For safety reasons, remove key from steer-
ing lock before replacing a wiper blade, oth-
erwise the motor could suddenly turn on and
cause injury.
!Never open the hood when the wiper
arm is folded forward.
Do not allow the wiper arms to contact
the windshield glass without a wiper
blade inserted.
Make certain that the wiper blades are
properly installed. Improperly installed
wiper blades may cause windshield
damage.
For your convenience, we recommend
that you have this work carried out by
an authorized Mercedes-Benz Center.
Page 246 of 304
.
�
Disconnect the battery negative
lead3.
�
Remove the cover2 from the positive
t")
246 Practical hintsBatteryDisconnecting the battery�
Turn off all electrical consumers.
�
Open the hood (
�page 171).
�
Disconnect the battery negative
lead3.
�
Remove the cover2 from the positive
terminal.
�
Disconnect the battery positive lead.
Removing the battery�
Remove the screw on the swivel bar.
�
Remove the swivel bar. Take out the
battery.
Charging and reinstalling battery�
Charge battery in accordance with the
instructions of the battery charger
manufacturer.
�
Reinstall the charged battery. Follow
the previously described steps in re-
verse order.
Reconnecting the battery�
Turn off all electrical consumers.
�
Connect the positive lead and fasten its
cover2.
�
Connect the negative lead3.
Batteries contain materials that can harm
the environment if disposed of improperly.
Large 12-volt storage batteries contain
lead. Recycling of batteries is the preferred
method of disposal. Many states require
sellers of batteries to accept old batteries
for recycling.Warning!
G
Never charge a battery while still installed in
the vehicle. Gases may escape during charg-
ing and cause explosions that may result in
paint damage, corrosion or personal injury.!Never invert the terminal connections!!The battery, its filler caps and the vent
tube must always be securely installed
when the vehicle is in operation.
iThe following procedures must be car-
ried out following any interruption of
battery power (e.g. due to reconnec-
tion):�
Set the clock (
�page 90).
�
Resynchronize the ESP
(�page 195).
�
Re-enter the radio code (see radio
operating instructions).
�
Resynchronize side windows
(�page 128).
Page 290 of 304
 98
Emergency operations
Closing hardtop 215
Opening hardtop 215
Remote door unlock 151")
290 IndexEmergency calls
Initiating an emergency call 147
With Tele Aid 146
Emergency operation (Limp Home
Mode) 98
Emergency operations
Closing hardtop 215
Opening hardtop 215
Remote door unlock 151
Unlocking the vehicle 210
Emergency release for trunk lid 78
Emergency tensioning device see
ETD 60, 280
Emission control 167
Emission control label 258
Engine
Compartment 171
Starting with automatic
transmission* 41
Starting with manual
transmission 40
Starting with the key 40, 41
Technical data 260
Turning off with the key 48
Engine cleaning 189
Engine compartment 171Hood 171
Engine malfunction indicator lamp 21,
199
Engine number 280
Engine oil 172, 271
Adding 175
Additives 271
Checking level 172
Consumption 172
Filler neck 175
Viscosity 280
Engine oil level see Oil level 170
ESP 22, 68, 280
Switching off 70
Switching on 70
Warning lamp 194
ETD 280
Safety guidelines 55
ETD (Emergency tensioning device) 60
Exterior lamp switch 83
Exterior rear view mirrors
Adjusting 35
F
Fastening the seat belts 37
Fine adjustment
Cruise control 138First aid kit 206
Flat tire 229
Lowering the vehicle 242
Mounting the spare wheel 238
Preparing the vehicle 229
Spare wheel 207
TIREFIT 208, 209
Flexible Service System (FSS) 185, 280
Fog lamp, rear 84, 222
Fog lamps
Replacing bulbs 221
Fog lamps, front
Replacing bulbs 222
Switching on 84
Front airbags 56
Front lamps
Replacing bulbs 221, 223
Switching on 83
Front seats
Heater* 81
FSS (Flexible Service System) 185, 280
Page 292 of 304

292 IndexHeadliner
Cleaning 192
Heated seats* 81
Height adjustment
Head restraints 32
Telescoping steering column* 34
High beam flasher 44, 85
High beam headlamps
Replacing bulbs 221, 223
Switching on 85
High mounted brake lamp 222
Hood 171
Closing 172
Opening 171
Hydroplaning 163
I
Identification labels 258
Certification label 258
Vehicle Identification Number
(VIN) 258
Ignition 29
Switching on 40, 41
Immobilizer 71
Activating 71
Deactivating 71
Infant and child restraint systems 60Information
About service and warranty 8
Button for Tele Aid 149
Inside rear view mirror
Adjusting 35
Installing
Towing eye bolt 252
Wiper blades 228
Instrument cluster 20, 88, 280
Cleaning 191
Coolant temperature gauge 88
Illumination 88
Lamps in 201
Outside temperature indicator 90
Instruments and controls see Cockpit 18
Integrated remote control
Canadian programming 154
Erasing memory 155
Hand-held transmitter 153
Operating 155
Rolling code programming 154
Interior lighting 86
Activating automatic control 86
Automatic control 86
Deactivating automatic control 86
Manual control 87Manual operation 87
Interior storage spaces 139
Cup holder 140
Glove box 139
Parcel net in front passenger
footwell 141
Storage compartment in armrest 141
Storage compartment in center
console 140
J
Jack 206
Jump starting 247
K
Key 210
Positions in steering lock 29
Remote control 74
Starting the engine 40, 41
Key positions in steering lock 29
Key, Remote control
Loss of 77
Keys 74
Kickdown 98, 280
L
Labels, identification 258
Lamp bulbs, exterior 221