Page 19 of 304
19 At a glance
Cockpit
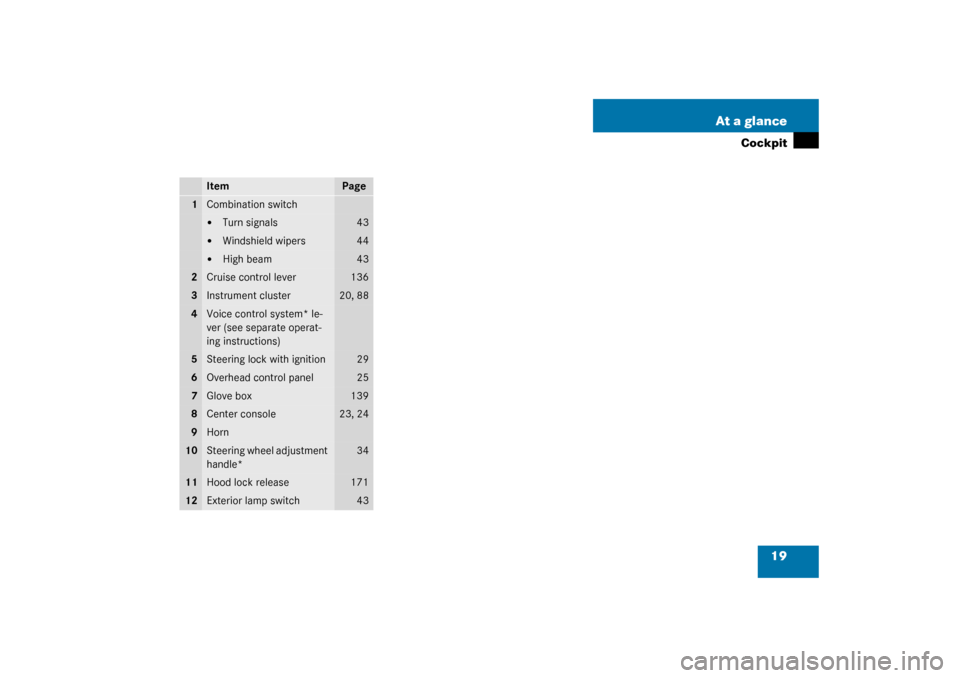
Item
Page
1
Combination switch�
Turn signals
43
�
Windshield wipers
44
�
High beam
43
2
Cruise control lever
136
3
Instrument cluster
20, 88
4
Voice control system* le-
ver (see separate operat-
ing instructions)
5
Steering lock with ignition
29
6
Overhead control panel
25
7
Glove box
139
8
Center console
23, 24
9
Horn
10
Steering wheel adjustment
handle*
34
11
Hood lock release
171
12
Exterior lamp switch
43
Page 29 of 304

29 Getting started
Unlocking
Steering lock positionsSteering lock0For removing key
The steering is locked when the key is
removed from the steering lock. If nec-
essary, move steering wheel slightly to
allow the locking mechanism to en-
gage.
1Power supply to some electrical con-
sumers, such as seat adjustment
2Ignition (power supply for all electrical
consumers) and driving position
3Starting position
Warning!
G
When leaving the vehicle, always remove the
key from the steering lock and lock the vehi-
cle. Do not leave children unattended in the
vehicle, or with access to an unlocked vehi-
cle. Unsupervised use of vehicle equipment
may cause an accident and/or serious per-
sonal injury.iThe key can only be withdrawn in
position0.
If necessary, move steering wheel
slightly to allow the key to be turned
clockwise to position1.
Vehicles with automatic transmission:
The key can only be removed from the
steering lock with the gear selector
lever in positionP.
!To prevent accelerated battery dis-
charge and a possible dead battery,
always remove the key from the
steering lock.
Page 32 of 304

32 Getting startedAdjusting�
Let go of handle4. The seat should
make an audible click.
Backrest tilt
�
Turn handwheel2 forward or backward
until your arms are slightly angled
when holding the steering wheel.Head restraint height
�
Adjust the height of the head restraints
by pulling them upwards manually.
�
For a lower position, press release
button1 and push down on the head
restraints manually.
More information can be found in the
“Controls in detail” section (
�page 82).Power seat*
�
Switch on the ignition by turning the
key in the steering lock to position2.
or
�
Open the driver’s or passenger door.
The seat adjustment switches are located
on the outer sides of the seats.
1Seat height
2Seat fore and aft adjustment
3Seat cushion tilt
4Backrest tilt
iWhen moving the seat, be sure that
there are no items in the footwell or
behind the seats. Otherwise you could
damage the seats.
Warning!
G
For your protection, drive only with properly
positioned head restraints.
Adjust head restraint to support the back of
the head approximately at ear level.
Do not drive the vehicle without the seat
head restraints. Head restraints are intend-
ed to help reduce injuries during an acci-
dent.
Page 35 of 304

35 Getting started
Adjusting
Mirrors
Adjust the inside and exterior rear view
mirrors before driving so that you have a
good view of the road and traffic condi-
tions.Inside rear view mirror
�
Manually adjust the inside rear view
mirror.
Exterior rear view mirrorThe switch is located on the center
console.
1Driver’s side mirror
2Passenger side mirror
�
Make sure that the ignition is switched
on.
All the lights in the instrument cluster
light up.
Warning!
G
In the case of an accident, liquid electrolyte
may escape the mirror housing if the mirror
glass breaks.
Electrolyte has an irritating effect. Do not al-
low the liquid to come into contact with
eyes, skin, clothing, or the respiratory sys-
tem. In case it does, immediately flush af-
fected area with water, and seek medical
help if necessary.
Warning!
G
Exercise care when using the passenger
side exterior rear view mirror. The mirror
surface is convex (outwardly curved surface
for a wider field of view). Objects in mirror
are closer than they appear. Check your in-
side rear view mirror or glance over your
shoulder before changing lanes. !Electrolyte drops coming into contact
with the vehicle paint finish can only be
completely removed while in their liq-
uid state and by applying plenty of wa-
ter.
��
Page 44 of 304
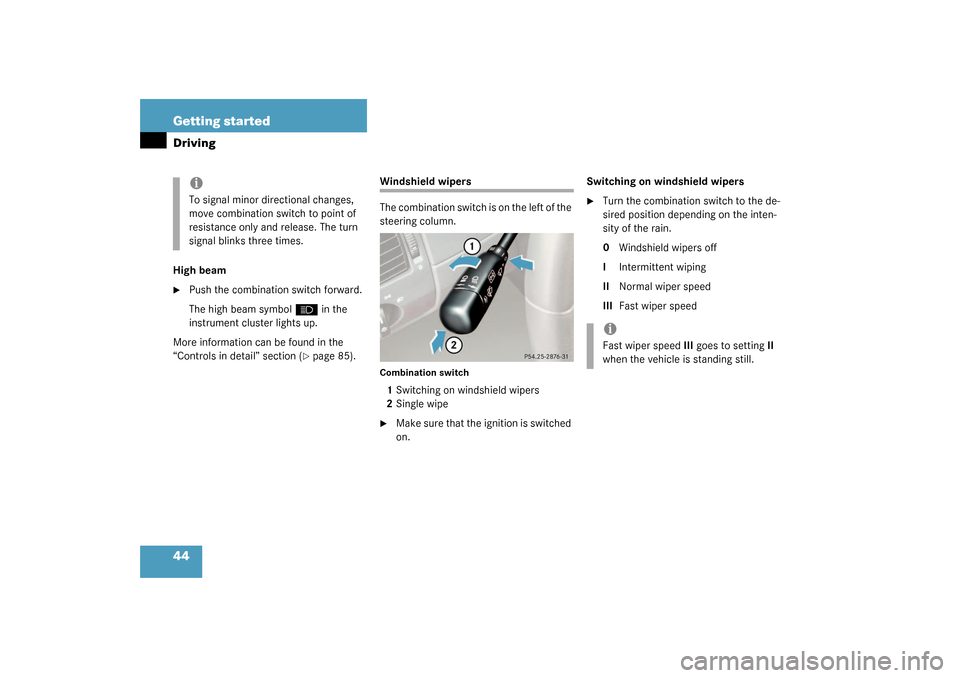
44 Getting startedDrivingHigh beam�
Push the combination switch forward.
The high beam symbol
A
in the
instrument cluster lights up.
More information can be found in the
“Controls in detail” section (
�page 85).
Windshield wipers
The combination switch is on the left of the
steering column.Combination switch1Switching on windshield wipers
2Single wipe�
Make sure that the ignition is switched
on.Switching on windshield wipers
�
Turn the combination switch to the de-
sired position depending on the inten-
sity of the rain.
0Windshield wipers off
IIntermittent wiping
IINormal wiper speed
IIIFast wiper speed
iTo signal minor directional changes,
move combination switch to point of
resistance only and release. The turn
signal blinks three times.
iFast wiper speedIII goes to settingII
when the vehicle is standing still.
Page 45 of 304

45 Getting started
Driving
Single wipe�
Press switch briefly in the direction of
arrow2.
The windshield wipers wipe one time
without washer fluid.
Wiping with windshield washer fluid
�
Push switch in the direction of arrow2
past the resistance point.
The windshield wiper operates with
washer fluid.
Problems while driving
The engine runs erratically and misfires�
An ignition cable may be damaged.
�
The engine electronics may not be op-
erating properly.
�
Unburned gasoline may have entered
the catalytic converter and damaged it.
�
Give very little gas.
�
Have the problem repaired by an au-
thorized Mercedes-Benz Center as
soon as possible.
!If leaves, snow, etc. block the wind-
shield wipers, switch off the wipers.�
For safety reasons, withdraw the
key from the steering lock. Remove
blockage.
�
Turn the windshield wipers on
again.
If windshield wipers fail to function at
all in switch positionI,
�
set the combination switch to the
next highest wiper speed.
�
have the windshield wipers
checked at the nearest authorized
Mercedes-Benz Center.
Page 72 of 304

72 Safety and SecurityAnti-theft systemsTow-away alarm
Once the tow-away alarm is armed, a visual
and audible alarm will be triggered when
someone attempts to raise the vehicle.
Arming tow-away alarm
When you lock your vehicle, the tow-away
alarm is automatically armed after about
30 seconds.
When you unlock your vehicle, the
tow-away protection disarms automatical-
ly.Disarming tow-away alarm
To prevent triggering the tow-away alarm
feature, switch off the tow-away alarm be-
fore towing the vehicle, or when parking on
a surface subject to movement, such as a
ferry or auto train.
1Tow-away alarm off switch
2Indicator lampThe switch is located on the center con-
sole.
�
Turn off the ignition and remove the
key.
�
Press upper half1 of the switch.
Indicator lamp2 in the switch lights up
briefly.
�
Lock your vehicle with the key or re-
mote control.
The tow-away alarm remains disarmed un-
til you lock your vehicle again.
iThe tow-away protection alarm is trig-
gered, for example, if the vehicle is lift-
ed on one side.
If the alarm stays on for more than
20 seconds, an emergency call is initi-
ated automatically by the Tele Aid sys-
tem provided Tele Aid service was
subscribed to and properly activated,
and that necessary cellular service and
GPS coverage are available.
iYou cannot disarm the tow-away alarm
if the ignition is turned on.
Page 78 of 304

78 Controls in detailLocking and unlockingOpening the doors from the inside
You can open a locked door from the in-
side. Open door only when conditions are
safe to do so.
1Inside door handle�
Pull on door handle1.If a door was locked, the locking knob
will move up.
Trunk lid emergency release
The handle for the trunk lid emergency
release is located in the trunk lid.
1Handle�
Pull handle1 in direction of arrow to
open the trunk lid.
Automatic central locking
Factory setting
The doors and the trunk automatically lock
when the ignition is switched on and the
left front wheel turns at vehicle speeds of
approximately 9 mph (15 km/h) or more.
You can open a locked door from the in-
side. Open door only when conditions are
safe to do so.
Warning!
G
Only drive with the trunk closed as, among
other dangers such as visibility blockage,
exhaust fumes may enter the vehicle interi-
or.
iThe anti-theft alarm system is triggered
when the trunk is opened from the
inside and the vehicle was previously
centrally locked.
iThe doors unlock automatically after an
accident if the force of the impact ex-
ceeds a preset threshold.
To prevent the vehicle door locks from
locking, deactivate the automatic cen-
tral locking when the vehicle�
is pushed or
�
is on a test stand