Page 84 of 304
84 Controls in detailLightingFor nighttime driving you should turn the
exterior lamp switch to position
B
to
permit activation of the high beam head-
lamps.
Switching on front fog lamps
�
Check that the low beam headlamps
are switched on.
�
Pull out exterior lamp switch to first
stop.
The green indicator lamp
‡
in the
lamp switch lights up.Switching on rear fog lamp
�
Check that the low beam headlamps
are switched on.
�
Pull out exterior lamp switch to second
stop.
The yellow indicator lamp
†
in the
lamp switch lights up.
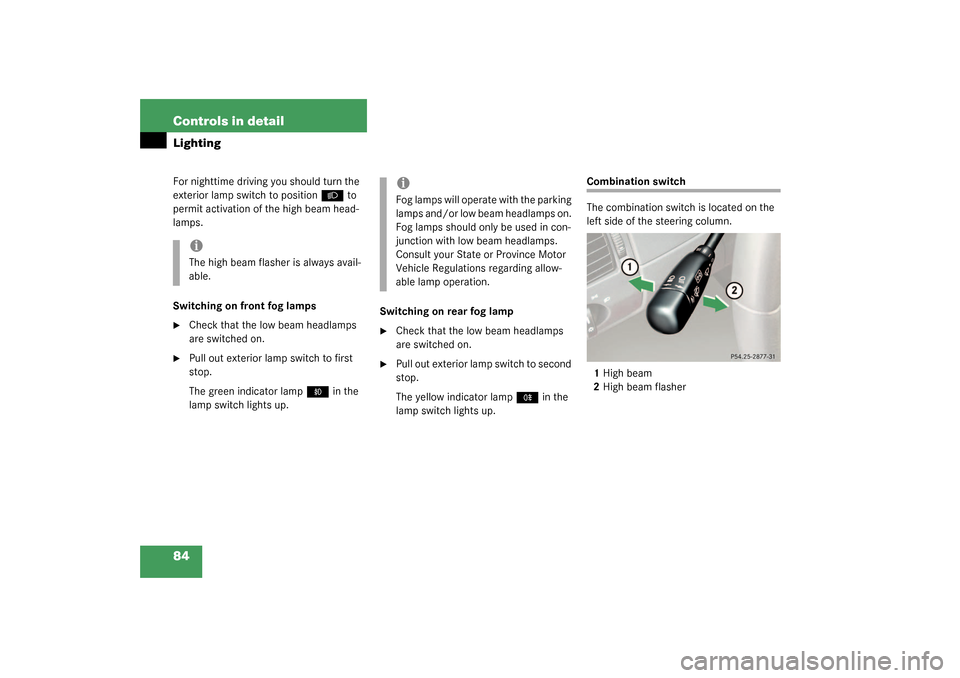
Combination switch
The combination switch is located on the
left side of the steering column.
1High beam
2High beam flasher
iThe high beam flasher is always avail-
able.
iFog lamps will operate with the parking
lamps and/or low beam headlamps on.
Fog lamps should only be used in con-
junction with low beam headlamps.
Consult your State or Province Motor
Vehicle Regulations regarding allow-
able lamp operation.
Page 105 of 304

105 Controls in detail
Climate control
Air recirculation mode
Switch to air recirculation mode to prevent
unpleasant odors from entering the vehicle
from the outside. This setting cuts off the
intake of outside air and recirculates the
air in the passenger compartment.
Activating�
Press button
Ð
(�page 102).
The indicator lamp on the
Ð
button
comes on.Deactivating
�
Press button
Ð
(�page 102).
The indicator lamp on the
Ð
button
goes out.
The air recirculation mode is deactivated
automatically:
�
after five minutes if the outside temper-
ature is below approximately 41°F
(5 °C)
�
after five minutes if the air conditioning
is turned off
�
after 30 minutes if the outside temper-
ature is above approximately 41°F
(5 °C)
At outside temperatures above 79°F
(26 °C), the system will not automatically
switch back to outside air. A quantity of
outside air is added after approximately
30 minutes.
Rear window defroster
The rear window defroster uses a large
amount of power. To keep the battery
drain to a minimum, switch off the defrost-
er as soon as the rear window is clear. The
defroster is automatically deactivated af-
ter a maximum of 12 minutes.
Activating�
Switch on the ignition.
�
Press button
F
(�page 102).
The indicator lamp on the button lights
up.
Deactivating
�
Press button
F
(�page 102) again.
The indicator lamp on the button goes
out.
Warning!
G
When the outside temperature is below
41°F (5°C), only switch to air recirculation
mode for short periods to prevent window
fogging.iThe air recirculation mode is activated
automatically at high outside temper-
tures.
Page 106 of 304

106 Controls in detailClimate control
Air conditioning
The air conditioning is operational while
the engine is running and cools the interior
air to the temperature set by the operator.Deactivating
It is possible to deactivate the air condi-
tioning (cooling) function of the climate
control system. The air in the vehicle will
then no longer be cooled or dehumidified.
�
Press buttonAC
OFF
(�page 102).
The indicator lamp on the
AC
OFF
button lights up.
Warning!
G
Any accumulation of snow and ice should be
removed from the rear window before driv-
ing. Visibility could otherwise be impaired,
endangering you and others.!If the rear window defroster switches
off too soon and the indicator lamp
starts blinking, this means that too
many electrical consumers are operat-
ing simultaneously and there is insuffi-
cient voltage in the battery. The system
responds automatically by deactivating
the rear window defroster.
As soon as the battery has sufficient
voltage, the rear window defroster au-
tomatically turns itself back on.
iCondensation may drip out from under-
neath the vehicle. This is normal and
not an indication of a malfunction.
Warning!
G
While driving, deactivate the air conditioning
only temporarily to prevent window fogging.
Page 222 of 304

222 Practical hintsReplacing bulbsRear lamps Notes on bulb replacement
�
Use only 12-volt bulbs of the same type
and with the specified watt rating.
�
Switch lights off before changing a bulb
to prevent short circuits.
�
Always use a clean lint-free cloth when
handling bulbs.
�
Your hands should be dry and free of oil
and grease.
�
If the newly installed bulb does not light
up, visit an authorized Mercedes-Benz
Center.
�
Have the LEDs and bulbs for the follow-
ing lamps replaced by an authorized
Mercedes-Benz Center.�
Additional turn signals in the
exterior rear view mirrors
�
High mounted brake lamp
�
Xenon* lamps
�
Front fog lamps
Lamp
Type
7
Brake lamp
1154 / 32 cp
8
High mounted brake
lamp
LED
9
Backup lamp
1154 / 32 cp
10
Turn signal lamp
1156 NA
11
Tail, parking, stand-
ing and side marker
lamp
67 / 4 cp
12
License plate lamps
C5W
13
Rear fog lamp,
driver’s side
1155 / 32 cp
Warning!
G
Keep bulbs out of reach of children.
Bulbs and bulb sockets can be very hot.
Allow the lamp to cool down before
changing a bulb.
Halogen lamps contain pressurized gas.
A bulb can explode if you:�
touch or move it when hot
�
drop the bulb
�
scratch the bulb
Wear eye and hand protection.
Because of high voltage in xenon lamps, it is
dangerous to replace the bulb or repair the
lamp and its components. We recommend
that you have such work done by a qualified
technician.
Page 225 of 304

225 Practical hints
Replacing bulbs
Side marker lamp bulb�
Switch off the lights.
�
Carefully slide lamp towards front.
�
Remove rear end first.
�
Twist bulb socket counterclockwise
and pull out.
�
Gently push bulb into socket, turn
counterclockwise and remove.
�
Insert new bulb in socket, push in and
twist clockwise.
�
Reinstall bulb socket, push in and twist
clockwise.
�
To reinstall lamp, set rear end in
bumper and let front end snap into
place.
Replacing bulbs for rear lamps
Tail lamp assemblies
1Brake lamp
2Turn signal lamp
3Tail, parking and standing lamp, side
marker
4Backup lamp
5Rear fog lamp (driver’s side)
�
Switch off the lights.
�
Open trunk lid (
�page 77).
�
Remove cover in right side panel.
�
Remove first aid kit (
�page 206).
Remove cover in left side panel.
�
Turn bulb socket counterclockwise and
pull out.
�
Gently push bulb into socket, turn
counterclockwise and remove.
�
Insert new bulb in socket, push in and
turn clockwise.
�
Reinstall bulb socket, push in and turn
clockwise.
�
Close cover.