Page 84 of 304
84 Controls in detailLightingFor nighttime driving you should turn the
exterior lamp switch to position
B
to
permit activation of the high beam head-
lamps.
Switching on front fog lamps
�
Check that the low beam headlamps
are switched on.
�
Pull out exterior lamp switch to first
stop.
The green indicator lamp
‡
in the
lamp switch lights up.Switching on rear fog lamp
�
Check that the low beam headlamps
are switched on.
�
Pull out exterior lamp switch to second
stop.
The yellow indicator lamp
†
in the
lamp switch lights up.
Combination switch
The combination switch is located on the
left side of the steering column.
1High beam
2High beam flasher
iThe high beam flasher is always avail-
able.
iFog lamps will operate with the parking
lamps and/or low beam headlamps on.
Fog lamps should only be used in con-
junction with low beam headlamps.
Consult your State or Province Motor
Vehicle Regulations regarding allow-
able lamp operation.
Page 88 of 304

88 Controls in detailInstrument cluster
Instrument clusterA full view illustration of the instrument
cluster can be found in the “At a glance”
section of this manual (
�page 20).
The instrument cluster is activated when
you
�
open the driver’s door
�
turn the key in steering lock to
position2 (
�page 29)
�
press the left knob3 (
�page 20)
Instrument cluster illumination
Instrument lamps
To brighten illumination�
Turn knob3 (
�page 20) clockwise.
The instrument lamps will brighten.
To dim illumination
�
Turn knob3 counterclockwise.
The instrument lamps will dim.
Display illumination
�
Press knob3.
With key removed or in steering lock
position0 or1 (
�page 29), the display
is illuminated for a short time.
Coolant temperature gauge
Under normal driving conditions, the cool-
ant temperature may rise to 248°F
(120°C). The coolant temperature may
climb to the red marking:�
at high outside temperatures
�
during stop-and-go city traffic
�
when driving on hilly terrain
The engine should not be operated with
the coolant temperature in the red zone.
Doing so may cause serious engine dam-
age which is not covered by the
Mercedes-Benz Limited Warranty.
Page 89 of 304

89 Controls in detail
Instrument cluster
Trip odometer�
Press the left knob3 (
�page 20) once
with key in steering lock position2
(
�page 29) until the trip odometer is
reset
or
�
Press the left knob3 (
�page 20) twice
with key removed or in steering lock
position0 or1 (
�page 29) until the
trip odometer is reset.
Tachometer
The red marking on the tachometer
(�page 20) denotes excessive engine
speed.
To help protect the engine, the fuel supply
is interrupted if the engine is operated
within the red marking.
Warning!
G
Driving when your engine is badly overheat-
ed can cause some fluids which may have
leaked into the engine compartment to
catch fire. You could be seriously burned.
Steam from an overheated engine can cause
serious burns and can occur just by opening
the engine hood. Stay away from the engine
if you see or hear steam coming from it.
Turn off the engine, get out of the vehicle
and do not stand near the vehicle until it
cools down.
iAvoid driving at excessive engine
speeds, as it may result in serious en-
gine damage that is not covered by the
Mercedes-Benz Limited Warranty.
Page 91 of 304

91 Controls in detail
Manual transmission
Manual transmission
Information for driving with a manual
transmission is found in the “Getting start-
ed” section (
�page 40).
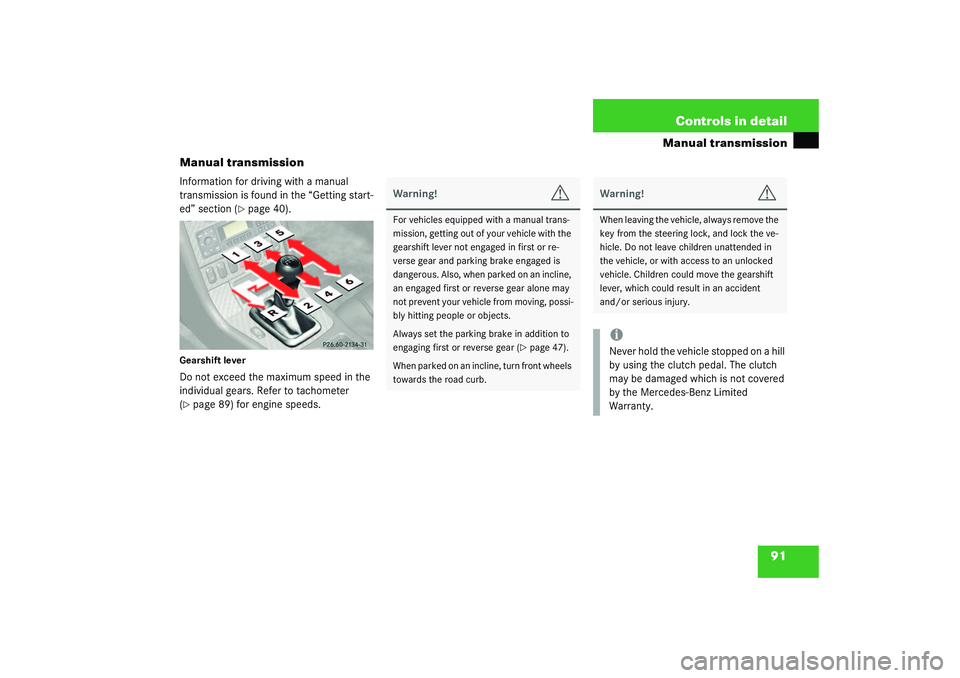
Gearshift leverDo not exceed the maximum speed in the
individual gears. Refer to tachometer
(�page 89) for engine speeds.
Warning!
G
For vehicles equipped with a manual trans-
mission, getting out of your vehicle with the
gearshift lever not engaged in first or re-
verse gear and parking brake engaged is
dangerous. Also, when parked on an incline,
an engaged first or reverse gear alone may
not prevent your vehicle from moving, possi-
bly hitting people or objects.
Always set the parking brake in addition to
engaging first or reverse gear (
�page 47).
When parked on an incline, turn front wheels
towards the road curb.
Warning!
G
When leaving the vehicle, always remove the
key from the steering lock, and lock the ve-
hicle. Do not leave children unattended in
the vehicle, or with access to an unlocked
vehicle. Children could move the gearshift
lever, which could result in an accident
and/or serious injury.iNever hold the vehicle stopped on a hill
by using the clutch pedal. The clutch
may be damaged which is not covered
by the Mercedes-Benz Limited
Warranty.
Page 96 of 304

96 Controls in detailAutomatic transmission*Gear selector lever position
Effect
P
Park position
Selector position when the vehicle
is parked. Only place selector lever
in positionP when vehicle is
stopped. The park position is not in-
tended to serve as a brake when
the vehicle is parked. Rather, the
driver should always set the park-
ing brake in addition to placing the
selector lever in positionP to se-
cure the vehicle.
The key can only be removed from
the steering lock with the selector
lever in positionP. With the key re-
moved the selector lever is locked
in positionP.
Effect
R
Reverse gear
Place selector lever in positionR only
when vehicle is stopped.
N
Neutral
No power is transmitted from the en-
gine to the drive axle. When the
brakes are released, the vehicle can
be moved freely (pushed or towed).
To avoid damage to the transmission,
never engageN while driving.
If the ESP is deactivated or malfunc-
tioning:
Only move selector lever toN if the
vehicle is in danger of skidding (e.g.
on icy roads).
D
Drive
The transmission shifts automatical-
ly. All five forward gears are avail-
able.
!Coasting the vehicle, or driving for any
other reason with selector lever inN
can result in transmission damage that
is not covered by the Mercedes-Benz
Limited Warranty.Warning!
G
Getting out of your vehicle with the selector
lever not fully engaged in positionP is dan-
gerous. Also, positionP alone is not intend-
ed to or capable of preventing your vehicle
from moving, possibly hitting people or ob-
jects.
Always set the parking brake in addition to
shifting to positionP (
�page 47).
When parked on an incline, turn front wheels
towards the road curb.
Page 97 of 304

97 Controls in detail
Automatic transmission*
Program mode selector switch
1Program mode selector switch
S Standard For regular driving
W Winter For winter driving
�
Press the program mode selector
switch.
Select
Wfor comfortable driving:
�
The vehicle starts out in second
gear (both forward and reverse) for
gentler starts. This does not apply if
full throttle is applied or gear
range1 is selected.
�
Traction and driving stability are im-
proved on icy roads.
�
Upshifts occur earlier even when
you give more gas. The engine then
operates at lower rpms and the
wheels are less likely to spin.
�
The power transmission ratio for se-
lector lever positionR changes de-
pending on the program mode
selected (
W or
S).
Warning!
G
When leaving the vehicle, always remove the
key from the steering lock, and lock the ve-
hicle. Do not leave children unattended in
the vehicle, or with access to an unlocked
vehicle. Children could move the selector le-
ver from positionP, which could result in an
accident and/or serious injury.
!Never change the program mode when
the selector lever is out of positionP. It
could result in a change of driving char-
acteristics for which you may not be
prepared.
Page 107 of 304

107 Controls in detail
Climate control
Activating
Moist air can fog up the windows. You can
dehumidify the air with the air condition-
ing.�
PressAC
OFF
again (
�page 102).
The indicator lamp on
theAC
OFF
button goes out.
The air conditioning uses the refrigerant
R134a. This refrigerant is free of CFCs
which are harmful to the ozone layer.
Residual heat
With the engine switched off, it is possible
to continue to heat or ventilate the interior
for up to 30 minutes. This feature makes
use of the residual heat produced by the
engine.
Activating�
Turn the key in the steering lock to
position1 or remove it from the steer-
ing lock.
�
Press button
Ð
(�page 102).
The indicator lamp on button
Ð
comes on.
Deactivating
�
Press button
Ð
(�page 102).
The indicator lamp on button
Ð
goes out.The residual heat is automatically turned
off:
�
when the ignition is switched on
�
after about 30 minutes
�
if the battery voltage dropsiHow long the system will provide heat-
ing depends on the coolant tempera-
ture and the temperature set by the
operator. The blower will run at speed
setting 1 regardless of the air distribu-
tion control setting.
Page 115 of 304

115 Controls in detail
Audio system
Button and soft key operation
In these instructions, the alpha-numeric
keypad (right side of radio face) and the
function buttons (left side of radio face)
are referred to as “buttons” and the four
keys under the display are referred to as
“soft keys”.Operation
Switching on and off�
Press control knob
a
.
The radio is switched off when you turn the
key in the steering lock to position0 or re-
move it from the steering lock. The radio is
switched on again when you turn the key in
the steering lock to position1 or2.Adjusting the volume
�
Turn the control knob.
Turning the knob clockwise will in-
crease the volume, counterclockwise
will decrease the volume.
Audio functions
The AUD
key is used to select the BASS,
TREBLE and BALANCE functions. Settings
for bass and treble are stored separately
for the cassette and CD modes. Tone level
settings are identified by the vertical bars.
The center (flat) setting is shown by one
longer bar in the center of the display.Bass
�
Press the
AUD
key repeatedly until
BASS
appears in the display.
Treble
�
Press the
AUD
key repeatedly until
TRE-
BLE
appears in the display.
�
Press the +key to increase or the -key
to decrease the level.
iDo not press directly on the radio dis-
play face.
iThe radio can also be switched on even
if the key is not inserted in the steering
lock, but will switch itself off automati-
cally after one hour to conserve vehicle
battery power.