Page 83 of 304

83 Controls in detail
Lighting
Lighting
For notes on how to switch on the head-
lamps and use the turn signals, see the
“Getting started” section (
�page 43).
Exterior lamp switch
The exterior lamp switch is located on the
dashboard to the left of the steering wheel.Exterior lamp switch
M
Off
C
Parking lamps (also side marker
lamps, tail lamps, license plate
lamps, instrument panel lamps)
Canada only: When engine is run-
ning, the low beam is also switched
on.
B
Low beam plus parking lamps or
high beam headlamps (combination
switch pushed forward).
ˆ
Standing lamps, right (turn left one
stop)
‚
Standing lamps, left (turn left two
stops)Daytime running lamp mode (Canada
only)
Vehicles with automatic transmission
When the engine is running and the
selector lever is in driving position, the low
beam headlamps are automatically
switched on.
When you shift from a driving position to
positionN orP, the low beam switches off
(2 seconds delay).
Vehicles with manual transmission
With the engine running, the low beam
headlamps are automatically switched on.
iIf you remove the key and open the
driver’s door while the parking lamps or
low beam headlamps are switched on,
then a warning sounds.
iWith the daytime running lamp mode
activated and the engine running, the
low beam headlamps cannot be
switched off manually.
Page 91 of 304

91 Controls in detail
Manual transmission
Manual transmission
Information for driving with a manual
transmission is found in the “Getting start-
ed” section (
�page 40).
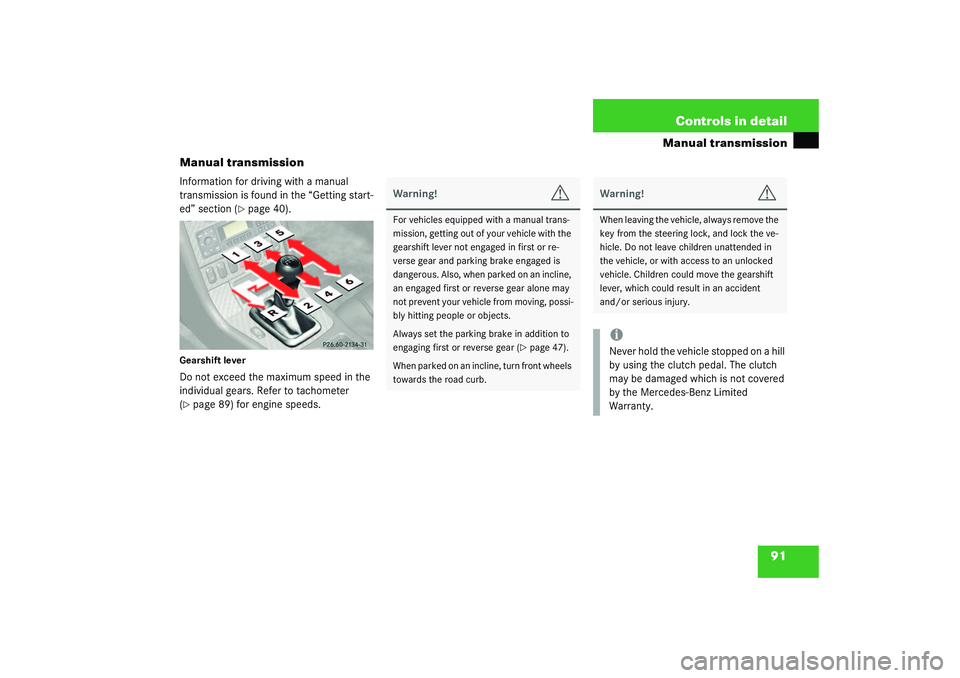
Gearshift leverDo not exceed the maximum speed in the
individual gears. Refer to tachometer
(�page 89) for engine speeds.
Warning!
G
For vehicles equipped with a manual trans-
mission, getting out of your vehicle with the
gearshift lever not engaged in first or re-
verse gear and parking brake engaged is
dangerous. Also, when parked on an incline,
an engaged first or reverse gear alone may
not prevent your vehicle from moving, possi-
bly hitting people or objects.
Always set the parking brake in addition to
engaging first or reverse gear (
�page 47).
When parked on an incline, turn front wheels
towards the road curb.
Warning!
G
When leaving the vehicle, always remove the
key from the steering lock, and lock the ve-
hicle. Do not leave children unattended in
the vehicle, or with access to an unlocked
vehicle. Children could move the gearshift
lever, which could result in an accident
and/or serious injury.iNever hold the vehicle stopped on a hill
by using the clutch pedal. The clutch
may be damaged which is not covered
by the Mercedes-Benz Limited
Warranty.
Page 92 of 304
92 Controls in detailManual transmission
Shifting into reverse�
Stop the vehicle completely.
�
Pull gearshift lever up and shift in
Rreverse.
Warning!
G
On slippery road surfaces as well as high en-
gine speeds, never downshift in order to ob-
tain braking action. This could result in drive
wheel slip and reduced vehicle control. Your
vehicle’s ABS will not prevent this type of
loss of control.!Downshifting gears leading to overrev-
ving the engine can result in engine
damage that is not covered by the
Mercedes-Benz Limited Warranty.
Do not exceed the engine speed limits
(�page 89).
Page 138 of 304

138 Controls in detailDriving systemsSetting stored speed
(“Resume” function)�
Briefly push the cruise control lever to
position4.
Cruise control will resume the last pre-
viously set speed.
�
Remove your foot from the accelerator
pedal.Setting a higher speed
�
Lift the cruise control lever to
position1 and hold it up until the de-
sired speed is reached.
�
Release the cruise control lever.
The new speed is set.
Setting a lower speed
�
Depress the cruise control lever to
position2 and hold it down until the
desired speed is reached.
�
Release the cruise control lever.
The new speed is set.Fine adjustment in 1 mph (1 km/h) in-
crements
Faster
�
Briefly tip the cruise control lever in the
direction of arrow1.
Slower
�
Briefly tip the cruise control lever in the
direction of arrow2.
Warning!
G
The speed stored in memory should only be
set again if prevailing road conditions per-
mit. Possible acceleration or deceleration
differences arising from returning to preset
speed could cause an accident and/or seri-
ous injury to you and others.
iDepressing the accelerator pedal does
not deactivate cruise control. After
brief acceleration (e.g. for passing),
cruise control will resume the last
speed set.
iVehicles with automatic transmission:
When you use the cruise control lever
to decelerate, the transmission will au-
tomatically downshift if the engine’s
braking power does not brake the vehi-
cle sufficiently.
Vehicles with manual transmission:
The set cruise controlled speed is
switched off when declutching exceeds
4 seconds during downshifting a gear.
Page 142 of 304
142 Controls in detailUseful featuresAshtray
1Cover plate
Opening ashtray�
Briefly touch cover plate1.
The ashtray opens automatically.Removing ashtray insert
�
Secure vehicle from movement by
setting the parking brake. Move the
selector lever to positionP (manual
transmission: in first gear).
�
Pull ashtray past detent.
�
Hold left and right side2 of ashtray
insert and pull up.Reinstalling the ashtray insert
�
Place the ashtray insert into the
ashtray frame.
�
Push the ashtray insert down until it
engages.
Coin holder
�
Open the ashtray.
�
Pull at the top of cover plate1 and fold
it under3.
Warning!
G
Remove front ashtray only with vehicle
standing still. Set the parking brake to se-
cure vehicle from movement. Move gear
selector lever to positionP (manual trans-
mission: in first gear). With gear selector le-
ver in positionP (manual transmission: in
first gear) turn off the engine.
Page 161 of 304

161 Operation
Driving instructions
After hard braking, it is advisable to drive
on for some time, rather than immediately
parking, so that the air stream will cool
down the brakes faster.Driving off
Apply the brakes to test them briefly after
driving off. Perform this procedure only
when the road is clear of other traffic.
Warm up the engine smoothly. Do not
place full load on the engine until the oper-
ating temperature has been reached.
When starting off on a slippery surface, do
not allow one drive wheel to spin for an ex-
tended period with the ESP switched off.
Doing so may cause serious damage to the
drivetrain which is not covered by the
Mercedes-Benz Limited Warranty.
Parking
All checks and service work on the
brake system should be carried out by
an authorized Mercedes-Benz Center.
Install only brake pads and brake fluid
recommended by Mercedes-Benz.
Warning!
G
If other than recommended brake pads are
installed, or other than recommended brake
fluid is used, the braking properties of the
vehicle can be degraded to an extent that
safe braking is substantially impaired. This
could result in an accident.!When driving down long and steep
grades, relieve the load on the brakes
by shifting into a lower gear to use the
engine’s braking power. This helps pre-
vent overheating of the brakes and re-
duces brake pad wear.
!Simultaneously depressing the acceler-
ator pedal and applying the brake re-
duces engine performance and causes
premature brake and drivetrain wear.
Warning!
G
Do not park this vehicle in areas where com-
bustible materials such as grass, hay or
leaves can come into contact with the hot
exhaust system, as these materials could be
ignited and cause a vehicle fire.
To reduce the risk of personal injury as a re-
sult of vehicle movement, before turning off
the engine and leaving the vehicle always:�
Keep right foot on brake pedal.
�
Firmly depress parking brake pedal.
�
Move the selector lever to positionP
(manual transmission: first or reverse
gear).
�
Slowly release brake pedal.
�
When parked on an incline, turn front
wheels towards the road curb.
�
Turn the key to steering lock position0.
�
Take the key and lock vehicle when
leaving.
Page 164 of 304

164 OperationDriving instructionsVehicles with Sport Package*
Your vehicle is factory equipped with
“Y”-rated tires, which have a speed rating
of 186 mph (300 km / h).
Despite of the tire speed rating, local
speed limits should be obeyed. Use pru-
dent driving speeds appropriate to prevail-
ing conditions.Winter driving instructions
The most important rule for slippery or icy
roads is to drive sensibly and to avoid
abrupt acceleration, braking and steering
maneuvers. Do not use the cruise control
system under such conditions.When the vehicle is in danger of skidding,
move selector lever to positionN or de-
clutch in case of manual transmission. Try
to keep the vehicle under control by cor-
rective steering action.
Road salts and chemicals can adversely af-
fect braking efficiency. Increased pedal
force may become necessary to produce
the normal brake effect.
We therefore recommend depressing the
brake pedal periodically when traveling at
length on salt-strewn roads. This can bring road salt impaired braking
efficiency back to normal. Be very careful
that you carry out these braking maneu-
vers without endangering any other road
users.
If the vehicle is parked after being driven
on salt-treated roads, the braking efficien-
cy should be tested as soon as possible af-
ter driving is resumed while observing the
safety rules in the previous paragraph.
iInformation on driving with snow
chains (
�page 184).
Warning!
G
On slippery road surfaces, never downshift
in order to obtain braking action. This could
result in drive wheel slip and reduced vehi-
cle control. Your vehicle’s ABS will not pre-
vent this type of loss of control.
Warning!
G
If the vehicle becomes stuck in snow, make
sure that snow is kept clear of the exhaust
pipe and from around the vehicle with the
engine running. Otherwise, deadly carbon
monoxide (CO) gases may enter vehicle in-
terior resulting in unconsciousness and
death.
To assure sufficient fresh air ventilation,
open a window slightly on the side of the ve-
hicle not facing the wind.
Page 214 of 304
214 Practical hintsUnlocking/locking in an emergencyManually unlocking the transmission selector lever
In the case of power failure, the transmis-
sion selector lever can be manually un-
locked, e.g. to tow the vehicle.
1Pin�
Insert a pin1, e.g. ball point pen, into
the covered opening below positionD
of the shift pattern.
�
Perform the following two steps simul-
taneously:�
Push pin1 down.
�
Move selector lever from
positionP.
�
Remove pin1.iAfter removing the pin from the open-
ing, the cover will not close fully. Only
after moving the selector lever to
positionsD+ andD- does the cover re-
turn to its closed position.
The selector lever is locked again when
moving it to positionP.