238 Practical hintsFlat tire�
Visit an authorized Mercedes-Benz
Center as soon as possible to obtain a
new TIREFIT kit.
�
Bring used TIREFIT materials to an au-
thorized Mercedes-Benz Center for
proper disposal.
�
Replace your TIREFIT container every
four years. Replacement containers are
available at your authorized
Mercedes-Benz Center.
Mounting the spare wheel
More information on spare wheels with
collapsible tires can be found in the “Tech-
nical data” section (
�page 265).Preparing the vehicle
Prepare the vehicle as described under
“Preparing the vehicle” on page
(
�page 229).
�
Turn pump holder counterclockwise to
loosen (
�page 207).
�
Take the spare wheel out of wheel well.
Lifting the vehicle
�
Prevent the vehicle from rolling away
by blocking wheels with wheel chocks
(not included) or other sizable objects.
When changing wheel on a level surface:
�
Place one chock in front of and one be-
hind the wheel that is diagonally oppo-
site to the wheel being changed.
When changing wheel on a hill:
�
Place chocks on the downhill side
blocking both wheels of the other axle.
�
Take the vehicle tool kit and the jack
out of the trunk.
Warning!
G
Do not exceed vehicle speed of 50 mph
(80 km/h). A TIREFIT repair is not designed
to operate at higher speeds.
The sticker must be attached on the instru-
ment cluster where it will be easily seen by
the driver.
Vehicle handling characteristics may
change. Adapt your driving accordingly.
Warning!
G
The dimensions of the spare wheel are dif-
ferent from those of the road wheels. As a
result, the vehicle handling characteristics
change when driving with a spare wheel
mounted. Adapt your driving style accord-
ingly.
The spare wheel is for temporary use only.
When driving with spare wheel mounted, en-
sure proper tire pressure and do not exceed
vehicle speed of 50 mph (80 km/h).
Drive to the nearest Mercedes-Benz Center
as soon as possible to have the spare wheel
replaced with a regular road wheel.
Never operate the vehicle with more than
one spare wheel mounted.
��
239 Practical hints
Flat tire
�
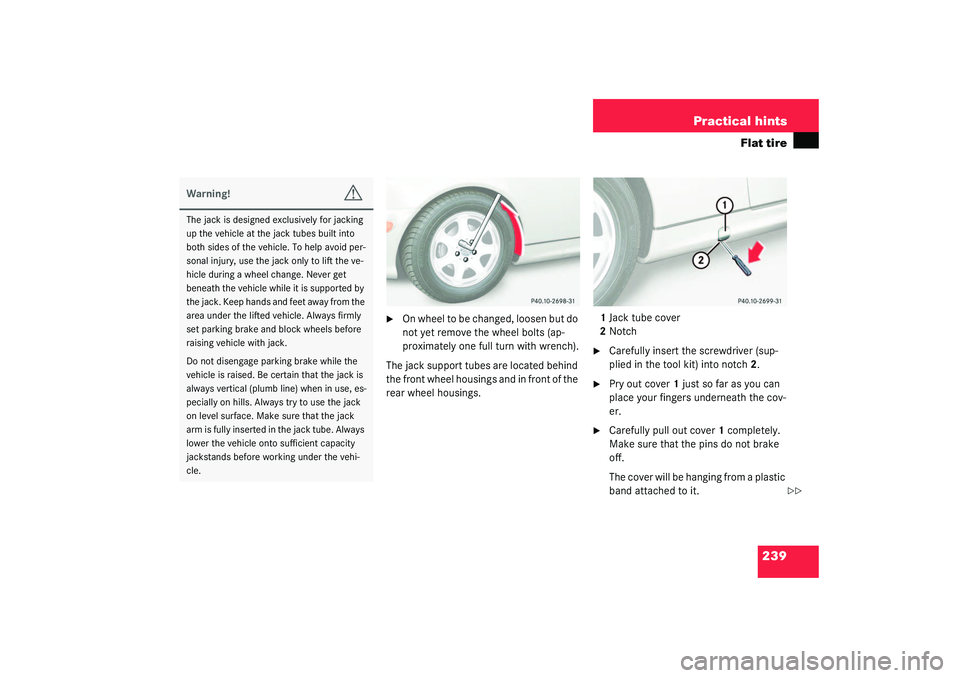
On whee l to b e change d, loos en b ut do
not yet remove the wheel bolts (ap-
proximately one full turn with wrench).
The jack support tubes are located behind
the front wheel housings and in front of the
rear wheel housings.1Jack tube cover
2Notch
�
Carefully insert the screwdriver (sup-
plied in the tool kit) into notch2.
�
Pry out cover1 just so far as you can
place your fingers underneath the cov-
er.
�
Carefully pull out cover1 completely.
Make sure that the pins do not brake
off.
The cover will be hanging from a plastic
band attached to it.
Warning!
G
The jack is designed exclusively for jacking
up the vehicle at the jack tubes built into
both sides of the vehicle. To help avoid per-
sonal injury, use the jack only to lift the ve-
hicle during a wheel change. Never get
beneath the vehicle while it is supported by
the jack. Keep hands and feet away from the
area under the lifted vehicle. Always firmly
set parking brake and block wheels before
raising vehicle with jack.
Do not disengage parking brake while the
vehicle is raised. Be certain that the jack is
always vertical (plumb line) when in use, es-
pecially on hills. Always try to use the jack
on level surface. Make sure that the jack
arm is fully inserted in the jack tube. Always
lower the vehicle onto sufficient capacity
jackstands before working under the vehi-
cle.
��
287 Index
Battery discharged
Jump starting 247
Battery, vehicle 178, 245
Charging 246
Disconnecting 246
Reconnecting 246
Reinstalling 246
Removing 246
Block heater 184
Bolts
For spare wheel 207
Brake assist system (BAS) 279
Brake fluid 170, 271
Brake lamp bulbs 222
Brake lamp, high mounted 222
Brakes 160
Warning lamp 198
Break-in period 158
Bulbs, replacing 221
Additional turn signals 221
Backup lamps 222
Brake lamps 222
Fog lamps 221
Front lamps 221
High beam 221
High mounted brake lamp 222License plate lamps 222, 226
Low beam 221
Parking lamps 221, 222, 224
Rear fog lamp 222
Rear fog lamps 225
Side marker lamps 221, 225
Standing lamps 221, 222, 224
Tail lamp assemblies 222, 225
Turn signal lamps 221, 222
Xenon* headlamps 223
Button
Audio system 115
C
CAC (Customer Assistance Center) 279
California
Important notice 9
Calling up
Service indicator 186
CAN system 279
Capacities
Fuels, coolants, lubricants, etc. 269
Cargo area see Cargo compartment 77
Cargo compartment
Trunk 77
Casette mode
Playing cassettes 118Catalytic converter 166
CD changer* 120, 209
CD mode 120
Center console 23
AIRBAG OFF indicator lamp 205
Lower part 24
Storage compartment 140
Upper part 23
Central locking
From inside 80
Unlocking from inside 80
Certification label 258
Changing CDs 120
Charging
Vehicle battery 246
CHECK ENGINE malfunction indicator
lamp 199
Checking
Coolant level 170, 176
Oil level 170, 172
Tire inflation pressure 170
Vehicle lighting 170
Checking engine oil level
Via engine oil level indicator 173
Via oil dipstick 173
301 Index
Vehicle jack 206
Wheel bolts 206
Wheel wrench 206
Vehicle washing 189
VIN (Vehicle Identification Number) 258,
283
Voice control system* 25, 283
Hands-free microphone 25
W
Warning sounds
Drivers seat belts 57
Parking brake 42
Warranty coverage 257
Washer fluid see Windshield washer fluid
Washing the vehicle 187
Wear pattern (tires) 182
Weights 268
Wheel change
Tightening torque 242
Wheels
Rotating 182
Tires and wheels 180
Wind screen 134, 283
Installing 134
Removing 135
Windows see Side windowsWindshield
Defogging 109
Refilling washer fluid 179
Replacing wiper blades 228
Washer fluid 179, 275
Washer system 275
Windshield washer fluid 275
Filler neck 179
Mixing ratio 275
Refilling 179
Wiping with 45
Windshield washer system 275
Windshield wipers 44
Fast wiper speed 44
Replacing wiper blades 228
Single wipe 45
Switching on 44
Wiping with windshield washer
fluid 45
Winter driving 183
Block heater 184
Snow chains 184
Tires 183
Transmission program mode 97
Winter driving instructions 164
Winter tires 183Wiper blades
Cleaning 190
Installing 228
Removing 228
Removing insert 228
Replacing 228
Wiping
And washing simultaneously 45
Interval 44
With windshield washer fluid 45
X
Xenon headlamps* 283

 258,
283
Voice control system* 25, 283
Hands-free microphone 25
W
Warning sounds
Dr")