Page 224 of 304
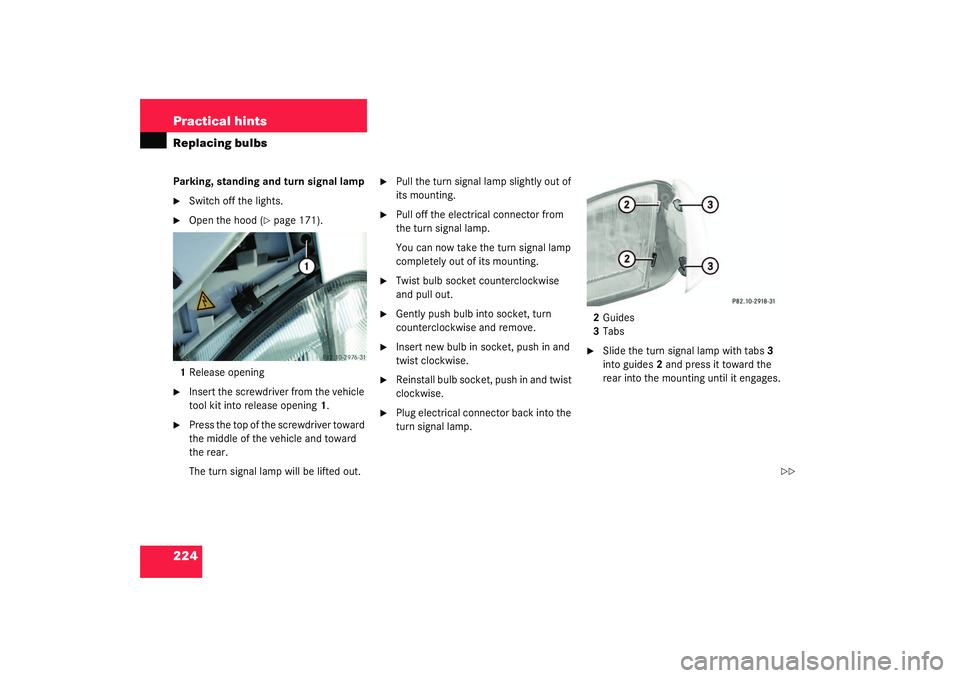
224 Practical hintsReplacing bulbsParking, standing and turn signal lamp�
Switch off the lights.
�
Open the hood (
�page 171).
1Release opening
�
Insert the screwdriver from the vehicle
tool kit into release opening1.
�
Press the top of the screwdriver toward
the middle of the vehicle and toward
the rear.
The turn signal lamp will be lifted out.
�
Pull the turn signal lamp slightly out of
its mounting.
�
Pull off the electrical connector from
the turn signal lamp.
You can now take the turn signal lamp
completely out of its mounting.
�
Twist bulb socket counterclockwise
and pull out.
�
Gently push bulb into socket, turn
counterclockwise and remove.
�
Insert new bulb in socket, push in and
twist clockwise.
�
Reinstall bulb socket, push in and twist
clockwise.
�
Plug electrical connector back into the
turn signal lamp.2Guides
3Tabs
�
Slide the turn signal lamp with tabs3
into guides2 and press it toward the
rear into the mounting until it engages.
��
Page 225 of 304

225 Practical hints
Replacing bulbs
Side marker lamp bulb�
Switch off the lights.
�
Carefully slide lamp towards front.
�
Remove rear end first.
�
Twist bulb socket counterclockwise
and pull out.
�
Gently push bulb into socket, turn
counterclockwise and remove.
�
Insert new bulb in socket, push in and
twist clockwise.
�
Reinstall bulb socket, push in and twist
clockwise.
�
To reinstall lamp, set rear end in
bumper and let front end snap into
place.
Replacing bulbs for rear lamps
Tail lamp assemblies
1Brake lamp
2Turn signal lamp
3Tail, parking and standing lamp, side
marker
4Backup lamp
5Rear fog lamp (driver’s side)
�
Switch off the lights.
�
Open trunk lid (
�page 77).
�
Remove cover in right side panel.
�
Remove first aid kit (
�page 206).
Remove cover in left side panel.
�
Turn bulb socket counterclockwise and
pull out.
�
Gently push bulb into socket, turn
counterclockwise and remove.
�
Insert new bulb in socket, push in and
turn clockwise.
�
Reinstall bulb socket, push in and turn
clockwise.
�
Close cover.
Page 226 of 304
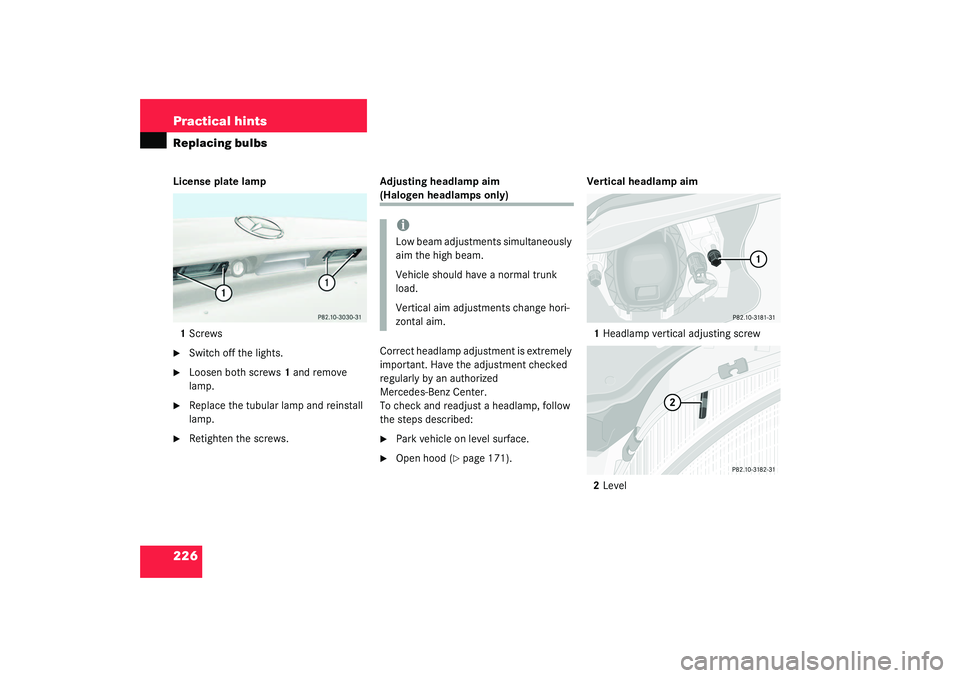
226 Practical hintsReplacing bulbsLicense plate lamp
1Screws�
Switch off the lights.
�
Loosen both screws1 and remove
lamp.
�
Replace the tubular lamp and reinstall
lamp.
�
Retighten the screws.Adjusting headlamp aim
(Halogen headlamps only)
Correct headlamp adjustment is extremely
important. Have the adjustment checked
regularly by an authorized
Mercedes-Benz Center.
To check and readjust a headlamp, follow
the steps described:�
Park vehicle on level surface.
�
Open hood (
�page 171).Vertical headlamp aim
1Headlamp vertical adjusting screw
2Level
iLow beam adjustments simultaneously
aim the high beam.
Vehicle should have a normal trunk
load.
Vertical aim adjustments change hori-
zontal aim.
Page 227 of 304
227 Practical hints
Replacing bulbs
�
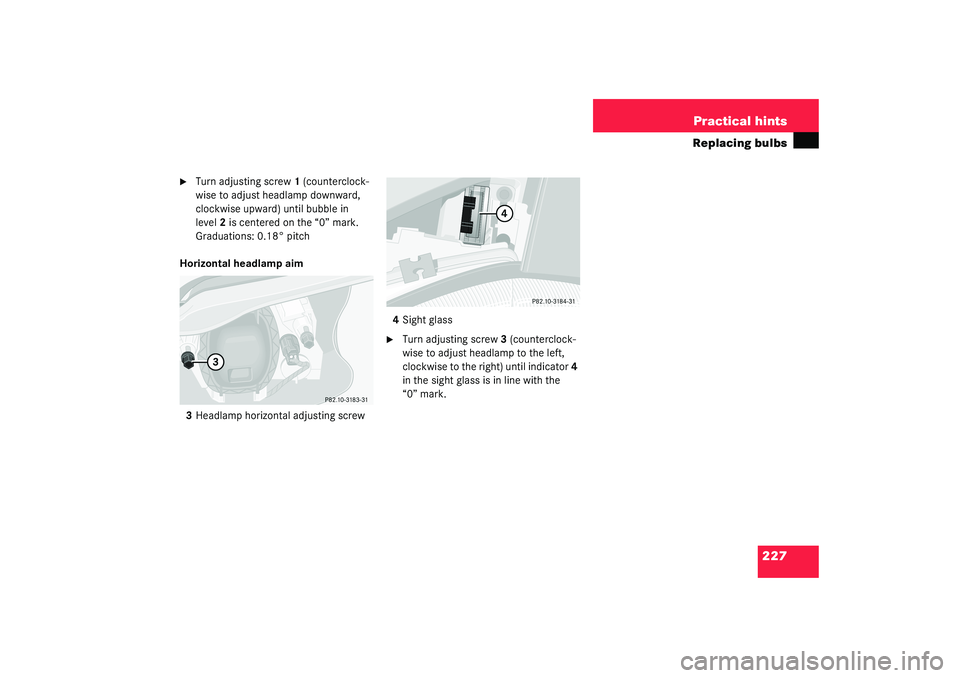
Turn adjusting screw1 (counterclock-
wise to adjust headlamp downward,
clockwise upward) until bubble in
level2 is centered on the “0” mark.
Graduations: 0.18° pitch
Horizontal headlamp aim
3Headlamp horizontal adjusting screw4Sight glass
�
Turn adjusting screw3 (counterclock-
wise to adjust headlamp to the left,
clockwise to the right) until indicator4
in the sight glass is in line with the
“0” mark.
Page 286 of 304
 279
Anticorrosion/antifreeze 274
Antiglare
Automatic 99
Antilock brake system (ABS) 279
Anti-theft alarm system")
286 IndexAlarm system
Anti-theft 71
Alignment bolt 240
Alignment bolt (vehicle tool kit) 279
Anticorrosion/antifreeze 274
Antiglare
Automatic 99
Antilock brake system (ABS) 279
Anti-theft alarm system
Arming 71
Canceling alarm 71
Disarming 71
Anti-theft systems 71
Anti-theft alarm system 71
Immobilizer 71
Tow-away alarm 72
Aquaplaning see Hydroplaning 163
Armrest
Storage compartment 141
Ashtray 142
ATF (automatic transmission fluid)* 176
Audio system
Audio and telephone, operation 111
Button and soft key operation 115
Cassette mode 118
CD mode 120Operating and display elements 112
Operating safety 111
Operation 115
Radio mode 116
Switching off 115
Switching on 115
Telephone operation 123
Audio systems 111
Automatic antiglare for rear view
mirror 99
Automatic central locking
Activating 79
Deactivating 79
Factory setting 78
Individual setting 79
Automatic lighting control
Activating 86
Deactivating 86
Automatic locking when driving 78
Automatic transmission* 93
Accelerator position 98
Emergency operation (Limp Home
Mode) 98
Fluid level 176
Gear ranges 95
Gear selector lever position 96Gear shifting malfunctions 98
Kickdown 98
Manual shifting 94
One-touch gearshifting 94
Program mode selector switch 97
Selector lever position 93
Starting with 41
Transmission fluid 176
Winter program mode 97
B
BabySmart
TM
Airbag deactivation system 62
Compatible child seats 62, 279
Self-test 63
BabySmart
TM airbag deactivation
system 279
Backrest tilt 31
Backup lamps 222, 225
Bulbs 222
BAS 68, 279
BAS/ESP
Malfunction indicator lamp 194
Batteries, Remote control
Check lamp 75
Batteries, remote control
Changing 212
Page 287 of 304

287 Index
Battery discharged
Jump starting 247
Battery, vehicle 178, 245
Charging 246
Disconnecting 246
Reconnecting 246
Reinstalling 246
Removing 246
Block heater 184
Bolts
For spare wheel 207
Brake assist system (BAS) 279
Brake fluid 170, 271
Brake lamp bulbs 222
Brake lamp, high mounted 222
Brakes 160
Warning lamp 198
Break-in period 158
Bulbs, replacing 221
Additional turn signals 221
Backup lamps 222
Brake lamps 222
Fog lamps 221
Front lamps 221
High beam 221
High mounted brake lamp 222License plate lamps 222, 226
Low beam 221
Parking lamps 221, 222, 224
Rear fog lamp 222
Rear fog lamps 225
Side marker lamps 221, 225
Standing lamps 221, 222, 224
Tail lamp assemblies 222, 225
Turn signal lamps 221, 222
Xenon* headlamps 223
Button
Audio system 115
C
CAC (Customer Assistance Center) 279
California
Important notice 9
Calling up
Service indicator 186
CAN system 279
Capacities
Fuels, coolants, lubricants, etc. 269
Cargo area see Cargo compartment 77
Cargo compartment
Trunk 77
Casette mode
Playing cassettes 118Catalytic converter 166
CD changer* 120, 209
CD mode 120
Center console 23
AIRBAG OFF indicator lamp 205
Lower part 24
Storage compartment 140
Upper part 23
Central locking
From inside 80
Unlocking from inside 80
Certification label 258
Changing CDs 120
Charging
Vehicle battery 246
CHECK ENGINE malfunction indicator
lamp 199
Checking
Coolant level 170, 176
Oil level 170, 172
Tire inflation pressure 170
Vehicle lighting 170
Checking engine oil level
Via engine oil level indicator 173
Via oil dipstick 173
Page 290 of 304
 98
Emergency operations
Closing hardtop 215
Opening hardtop 215
Remote door unlock 151")
290 IndexEmergency calls
Initiating an emergency call 147
With Tele Aid 146
Emergency operation (Limp Home
Mode) 98
Emergency operations
Closing hardtop 215
Opening hardtop 215
Remote door unlock 151
Unlocking the vehicle 210
Emergency release for trunk lid 78
Emergency tensioning device see
ETD 60, 280
Emission control 167
Emission control label 258
Engine
Compartment 171
Starting with automatic
transmission* 41
Starting with manual
transmission 40
Starting with the key 40, 41
Technical data 260
Turning off with the key 48
Engine cleaning 189
Engine compartment 171Hood 171
Engine malfunction indicator lamp 21,
199
Engine number 280
Engine oil 172, 271
Adding 175
Additives 271
Checking level 172
Consumption 172
Filler neck 175
Viscosity 280
Engine oil level see Oil level 170
ESP 22, 68, 280
Switching off 70
Switching on 70
Warning lamp 194
ETD 280
Safety guidelines 55
ETD (Emergency tensioning device) 60
Exterior lamp switch 83
Exterior rear view mirrors
Adjusting 35
F
Fastening the seat belts 37
Fine adjustment
Cruise control 138First aid kit 206
Flat tire 229
Lowering the vehicle 242
Mounting the spare wheel 238
Preparing the vehicle 229
Spare wheel 207
TIREFIT 208, 209
Flexible Service System (FSS) 185, 280
Fog lamp, rear 84, 222
Fog lamps
Replacing bulbs 221
Fog lamps, front
Replacing bulbs 222
Switching on 84
Front airbags 56
Front lamps
Replacing bulbs 221, 223
Switching on 83
Front seats
Heater* 81
FSS (Flexible Service System) 185, 280
Page 292 of 304

292 IndexHeadliner
Cleaning 192
Heated seats* 81
Height adjustment
Head restraints 32
Telescoping steering column* 34
High beam flasher 44, 85
High beam headlamps
Replacing bulbs 221, 223
Switching on 85
High mounted brake lamp 222
Hood 171
Closing 172
Opening 171
Hydroplaning 163
I
Identification labels 258
Certification label 258
Vehicle Identification Number
(VIN) 258
Ignition 29
Switching on 40, 41
Immobilizer 71
Activating 71
Deactivating 71
Infant and child restraint systems 60Information
About service and warranty 8
Button for Tele Aid 149
Inside rear view mirror
Adjusting 35
Installing
Towing eye bolt 252
Wiper blades 228
Instrument cluster 20, 88, 280
Cleaning 191
Coolant temperature gauge 88
Illumination 88
Lamps in 201
Outside temperature indicator 90
Instruments and controls see Cockpit 18
Integrated remote control
Canadian programming 154
Erasing memory 155
Hand-held transmitter 153
Operating 155
Rolling code programming 154
Interior lighting 86
Activating automatic control 86
Automatic control 86
Deactivating automatic control 86
Manual control 87Manual operation 87
Interior storage spaces 139
Cup holder 140
Glove box 139
Parcel net in front passenger
footwell 141
Storage compartment in armrest 141
Storage compartment in center
console 140
J
Jack 206
Jump starting 247
K
Key 210
Positions in steering lock 29
Remote control 74
Starting the engine 40, 41
Key positions in steering lock 29
Key, Remote control
Loss of 77
Keys 74
Kickdown 98, 280
L
Labels, identification 258
Lamp bulbs, exterior 221