Page 201 of 304

201 Practical hints
What to do if …?
Problem
Possible cause
Suggested solution
The fuel reserve and fuel cap placement
warning lamp:�
lights up while driving
The fuel level has gone below the reserve
mark.
�
Refuel at the next gas station
(�page 169).
�
blinks
The fuel cap is not closed tight.
�
Check the fuel cap.
A fuel system leak has been detected.
�
Have the fuel system checked as soon
as possible by an authorized
Mercedes-Benz Center
B
The yellow low engine coolant
level warning lamp remains lit af-
ter starting the engine or lights
up while driving.
The coolant level is too low.
�
Add coolant (
�page 176).
�
If you have to add coolant frequently,
have the cooling system checked by
an authorized Mercedes-Benz Center.
Warning!
G
Do not spill antifreeze on hot engine parts.
Antifreeze contains ethylene glycol which
may burn if it comes into contact with hot
engine parts. You can be seriously burned.
!Do not ignore the low engine coolant
level warning light. Extended driving
with the light illuminated may cause
serious engine damage not covered by
the Mercedes-Benz Limited Warranty.
Do not drive without sufficient amount
of coolant in the cooling system. The
engine will overheat, causing major
engine damage.
Page 206 of 304

206 Practical hintsWhere will I find ...?
Where will I find ...?First aid kit
The first aid kit is located on the left side of
the trunk.
1First aid kit�
Loosen the fastening strap.
�
Remove first aid kit1.
Vehicle tool kit
The following is included:�
Vehicle tool kit
�
Towing eye bolt
�
Wheel wrench
�
Alignment bolt
�
Vehicle jack
�
Wheel bolts
�
Special fuse puller
The jack is exclusively designed for lifting
the vehicle during a wheel change. Always
lower the vehicle on sufficient capacity
jackstands before working under the
vehicle.
iCheck expiration dates and contents
for completeness at least once a year
and replace missing/expired items.
Warning!
G
The jack is designed exclusively for jacking
up the vehicle at the jack tubes built into ei-
ther side of the vehicle. To help avoid per-
sonal injury, use the jack only to lift the
vehicle during a wheel change. Never get
beneath the vehicle while it is supported by
the jack. Keep hands and feet away from the
area under the lifted vehicle. Always firmly
set parking brake and block wheels before
raising vehicle with jack.
Do not disengage parking brake while the
vehicle is raised. Be certain that the jack is
always vertical (plumb line) when in use, es-
pecially on hills. Always try to use the jack
on level surface. Be sure that the jack arm is
fully inserted in the jack tube. Always lower
the vehicle onto sufficient capacity jack-
stands before working under the vehicle.
Page 208 of 304
208 Practical hintsWhere will I find ...?More information can be found in the
“Technical data” section (
�page 265).Vehicles with TIREFIT kit (SLK 32 AMG)
1Electric air pump
2TIREFIT kit
3Vehicle tool kit, jack, wheel wrenchThe electric air pump and TIREFIT kit are
located in the storage box under the trunk
floor cover.
The vehicle tool kit, jack and wheel wrench
are located below the rug on the right side.
�
Lift trunk floor cover.
�
Open storage box cover.
You can take out vehicle tool kit3 and
accessories.
�
Pull down the flap on the storage box.
�
Remove electric air pump1 and
TIREFIT kit2.
!Wheel bolts2 must be used when
mounting spare wheel rim size
41⁄2Bx15 H2.
The use of any wheel bolts other than
wheel bolts2 for spare wheel rim size
4
1⁄2Bx15 H2 can cause physical dam-
age to the vehicle.
Warning!
G
Be sure to use original length wheel bolts
when remounting the original wheel after it
has been repaired.
Page 212 of 304

212 Practical hintsUnlocking/locking in an emergencyChanging batteries in remote control
If the batteries in the remote control are
discharged, the vehicle can no longer be
locked or unlocked. It is recommended to
have the batteries replaced at an autho-
rized Mercedes-Benz Center.
Batteries contain materials that can harm
the environment if disposed of improperly.
Recycling of batteries is the preferred
method of disposal. Many states require
sellers of batteries to accept old batteries
for recycling.1Release button for key
2Battery cover
Replacement batteries: Lithium, type
CR 2025 or equivalent.
�
Press release button1 on the remote
control.
The key folds out.
�
Pull off battery cover2 in direction of
arrow.
�
Remove the batteries.
�
Insert new batteries with the plus (+)
side facing up.
�
Press battery cover onto housing until
it engages.
Warning!
G
Keep the batteries out of reach of children.
If a battery is swallowed, seek medical help
immediately.iWhen changing batteries, always re-
place both batteries.
When changing batteries, make sure
that new batteries are clean and free of
lint.
The required replacement batteries are
available at any Mercedes-Benz
Center.
iAfterwards, test the remote control to
see if it is functioning properly. If you
still cannot lock or unlock the vehicle,
synchronize the remote control
(�page 213).
Page 215 of 304

215 Practical hints
Opening/closing in an emergency
Opening/closing in an emergency
Raising retractable hardtop manually
If the retractable hardtop cannot be closed
automatically, make certain that all points
listed under the “Retractable hardtop” sec-
tion (
�page 129) were observed.
If the automatic operation still does not
function properly, you can close the re-
tractable hardtop manually.
This procedure should be performed with
great care by two persons.
�
Open doors or lower windows
(�page 127).
�
Set parking brake (
�page 47).
�
Remove key from steering lock
(�page 29).
�
Open trunk lid (
�page 77).
�
Open the right side trim panel in the
trunk.1Screw of hydraulic pump
2Control cable, right
3Hex-socket wrench
�
Remove hex-socket wrench3 from
cover.
�
Using wrench3 turn screw1 of the
hydraulic pump counterclockwise as
far as it will go.
!Manually closing the retractable hard-
top is a complicated and technically de-
manding procedure. Close the
retractable hardtop manually in emer-
gency cases only. Otherwise, visit an
authorized Mercedes-Benz Center.
Warning!
G
�
It is important that a second person
helps you. Otherwise, you could become
trapped or injured.
�
Remove any wristwatches or jewelry
such as rings or bracelets. Otherwise,
they could get caught in the vehicle
mechanism, causing personal injury to
yourself or damage to the vehicle.
�
Always use the grips provided. Other-
wise you could injure yourself.
��
Page 216 of 304
216 Practical hintsOpening/closing in an emergency�
Keep wrench with you for later use in
closing and locking the retractable
hardtop.
�
Pull the loop of right control cable2 out
of the opening.
�
Remove first aid kit (
�page 206).
�
Open the left side trim panel in the
trunk. 4Control cable, left
�
Pull the loop of left control cable4 out
of the opening.
!If you don’t turn screw1 of the hydrau-
lic pump to the left point of resistance,
the hydraulic pump could be damaged
by using the retractable hardtop
switch.
iIf you cannot find the control cable,
carefully insert a finger into the open-
ing to feel for the cable.
Warning!
G
At this point, the procedure needs to be
done by two people. Otherwise you could be
injured.
Page 217 of 304
217 Practical hints
Opening/closing in an emergency
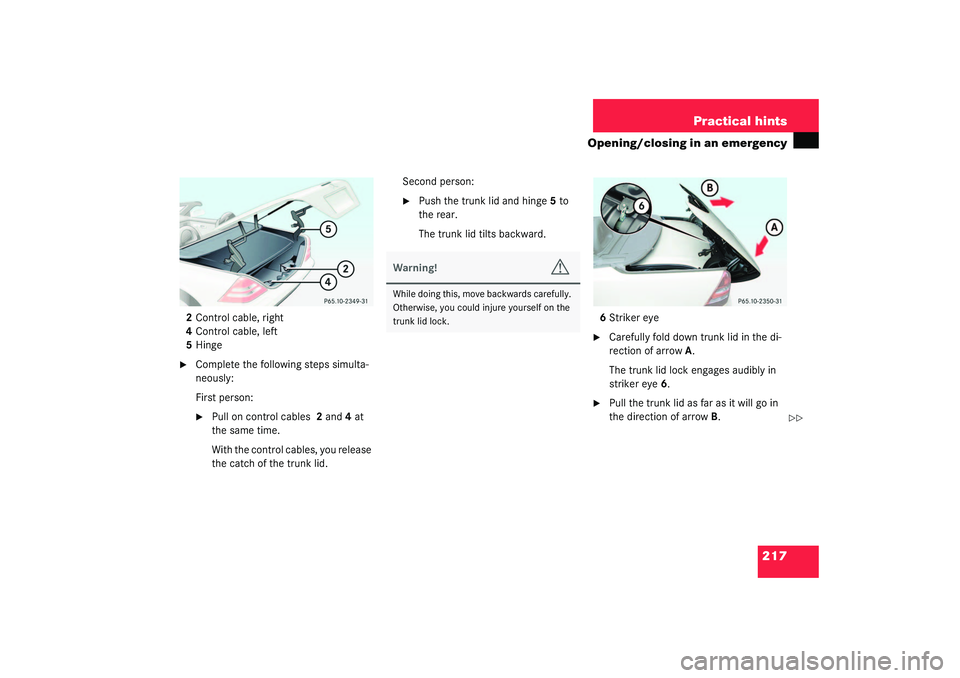
2Control cable, right
4Control cable, left
5Hinge�
Complete the following steps simulta-
neously:
First person:�
Pull on control cables 2 and4 at
the same time.
With the control cables, you release
the catch of the trunk lid.Second person:
�
Push the trunk lid and hinge5 to
the rear.
The trunk lid tilts backward.
6Striker eye
�
Carefully fold down trunk lid in the di-
rection of arrowA.
The trunk lid lock engages audibly in
striker eye6.
�
Pull the trunk lid as far as it will go in
the direction of arrowB.
��
Warning!
G
While doing this, move backwards carefully.
Otherwise, you could injure yourself on the
trunk lid lock.
Page 218 of 304

218 Practical hintsOpening/closing in an emergency7Bottom half of retractable hardtop�
Have each person stand on either side
of the trunk.
�
At the same time, reach from each side
of the trunk underneath the bottom
half of retractable hardtop7.
�
In a smooth motion, pull up on the re-
tractable hardtop in the direction of the
arrow until the bottom half of the re-
tractable hardtop is standing vertically.
8Pins for the retractable hardtop locking
mechanism
9Holes for the pins
�
Complete the next steps simultaneous-
ly. Have one person stand on each side
of the vehicle.�
Move the retractable hardtop with
one hand in the direction of the ar-
row.
�
With the other hand, guide pins8
belonging to the retractable hard-
top locking mechanism into corre-
sponding holes9 located in the
upper edges of the windshield.
Warning!
G
Do not place your hands near the upper
windshield area, trunk lid, or between roof
panels while the retractable hardtop is being
raised and locked. Serious personal injury
may occur.
��
Warning!
G
Do not place your hands in areas marked X.
Serious personal injury may occur.