Page 189 of 304

189 Operation
Vehicle care
Engine cleaning
Prior to cleaning the engine compartment,
make sure to protect electrical compo-
nents and connectors from contact with
water and cleaning agents.
Corrosion protection, such as MB Anticor-
rosion Wax should be applied to the engine
compartment after every engine cleaning.
Before applying, all control linkage bush-
ings and joints should be lubricated. The
poly-V-belt and all pulleys should be pro-
tected from any wax. Vehicle washing
Do not use hot water or wash your vehicle
in direct sunlight. Use only a mild car wash
detergent, such as Mercedes-Benz ap-
proved Car Shampoo.
Thoroughly spray the vehicle with a dif-
fused jet of water. Direct only a very weak
spray towards the ventilation intake. Use
plenty of water and rinse the sponge and
chamois frequently.
Rinse with clear water and thoroughly dry
with a chamois. Do not allow cleaning
agents to dry on the finish.
Due to the width of the vehicle, fold in out-
side mirrors prior to running the vehicle
through an automatic car wash to prevent
damage to the mirrors.
In the winter, thoroughly remove all traces
of road salt as soon as possible.
When washing the underbody, do not for-
get to clean the inner sides of the wheels.Ornamental moldings
For regular cleaning and care of very dirty
chrome-plated parts, use a chrome clean-
er.
Headlamps, tail lamps, turn signal
lenses
Use a mild car wash detergent, such as
Mercedes-Benz approved Car Shampoo,
with plenty of water.
To prevent scratches, never apply strong
force and use only a soft, non-scratchy
cloth when cleaning the lenses. Do not at-
tempt to wipe dirty lenses with a dry cloth
or sponge.
Page 221 of 304
221 Practical hints
Replacing bulbs
Replacing bulbs
Safe vehicle operation depends on proper
exterior lighting and signaling. It is there-
fore essential that all bulbs and lamp as-
semblies are in good working order at all
times.
Correct headlamp adjustment is extremely
important. Have headlamps checked and
readjusted at regular intervals and when a
bulb has been replaced. See your autho-
rized Mercedes-Benz Center for headlamp
adjustment (
�page 226).
Bulbs Front lamps
Lamp
Type
1
Additional turn
signal lamps
LED
2
Low beam
H7 (55 W)
Xenon*
D2R-35 W
3
Parking, standing
and turn signal lamp
2375 NA
4
High beam
H7 (55 W)
5
Fog lamp
HB4 (55 W)
6
Side marker lamp
W5W
Page 222 of 304

222 Practical hintsReplacing bulbsRear lamps Notes on bulb replacement
�
Use only 12-volt bulbs of the same type
and with the specified watt rating.
�
Switch lights off before changing a bulb
to prevent short circuits.
�
Always use a clean lint-free cloth when
handling bulbs.
�
Your hands should be dry and free of oil
and grease.
�
If the newly installed bulb does not light
up, visit an authorized Mercedes-Benz
Center.
�
Have the LEDs and bulbs for the follow-
ing lamps replaced by an authorized
Mercedes-Benz Center.�
Additional turn signals in the
exterior rear view mirrors
�
High mounted brake lamp
�
Xenon* lamps
�
Front fog lamps
Lamp
Type
7
Brake lamp
1154 / 32 cp
8
High mounted brake
lamp
LED
9
Backup lamp
1154 / 32 cp
10
Turn signal lamp
1156 NA
11
Tail, parking, stand-
ing and side marker
lamp
67 / 4 cp
12
License plate lamps
C5W
13
Rear fog lamp,
driver’s side
1155 / 32 cp
Warning!
G
Keep bulbs out of reach of children.
Bulbs and bulb sockets can be very hot.
Allow the lamp to cool down before
changing a bulb.
Halogen lamps contain pressurized gas.
A bulb can explode if you:�
touch or move it when hot
�
drop the bulb
�
scratch the bulb
Wear eye and hand protection.
Because of high voltage in xenon lamps, it is
dangerous to replace the bulb or repair the
lamp and its components. We recommend
that you have such work done by a qualified
technician.
Page 224 of 304
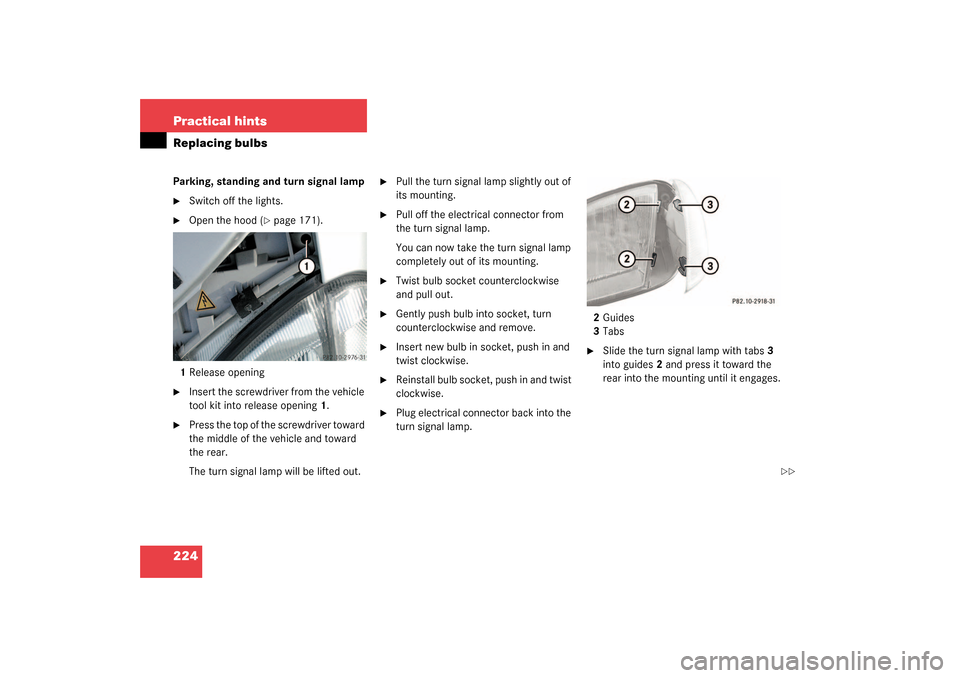
224 Practical hintsReplacing bulbsParking, standing and turn signal lamp�
Switch off the lights.
�
Open the hood (
�page 171).
1Release opening
�
Insert the screwdriver from the vehicle
tool kit into release opening1.
�
Press the top of the screwdriver toward
the middle of the vehicle and toward
the rear.
The turn signal lamp will be lifted out.
�
Pull the turn signal lamp slightly out of
its mounting.
�
Pull off the electrical connector from
the turn signal lamp.
You can now take the turn signal lamp
completely out of its mounting.
�
Twist bulb socket counterclockwise
and pull out.
�
Gently push bulb into socket, turn
counterclockwise and remove.
�
Insert new bulb in socket, push in and
twist clockwise.
�
Reinstall bulb socket, push in and twist
clockwise.
�
Plug electrical connector back into the
turn signal lamp.2Guides
3Tabs
�
Slide the turn signal lamp with tabs3
into guides2 and press it toward the
rear into the mounting until it engages.
��
Page 225 of 304

225 Practical hints
Replacing bulbs
Side marker lamp bulb�
Switch off the lights.
�
Carefully slide lamp towards front.
�
Remove rear end first.
�
Twist bulb socket counterclockwise
and pull out.
�
Gently push bulb into socket, turn
counterclockwise and remove.
�
Insert new bulb in socket, push in and
twist clockwise.
�
Reinstall bulb socket, push in and twist
clockwise.
�
To reinstall lamp, set rear end in
bumper and let front end snap into
place.
Replacing bulbs for rear lamps
Tail lamp assemblies
1Brake lamp
2Turn signal lamp
3Tail, parking and standing lamp, side
marker
4Backup lamp
5Rear fog lamp (driver’s side)
�
Switch off the lights.
�
Open trunk lid (
�page 77).
�
Remove cover in right side panel.
�
Remove first aid kit (
�page 206).
Remove cover in left side panel.
�
Turn bulb socket counterclockwise and
pull out.
�
Gently push bulb into socket, turn
counterclockwise and remove.
�
Insert new bulb in socket, push in and
turn clockwise.
�
Reinstall bulb socket, push in and turn
clockwise.
�
Close cover.
Page 250 of 304

250 Practical hintsTowing the vehicleWarning!
G
Prior to towing the vehicle with all wheels on
the ground, make certain that the key is in
starter switch position2.
If the key is left in starter switch position 0
for an extended period of time, it can no
longer be turned in the switch. In this case,
the steering is locked. To unlock, remove
key from starter switch and reinsert.
If circumstances require towing the vehicle
with all wheels on the ground, always tow
with a tow bar if:�
the engine will not run
�
there is a malfunction in the power sup-
ply or in the vehicle’s electrical system
as that will be necessary to adequately con-
trol the towed vehicle.
Warning!
G
With the engine not running, there is no
power assistance for the braking and steer-
ing systems. In this case, it is important to
keep in mind that a considerably higher de-
gree of effort is necessary to brake and
steer the vehicle. Adapt your driving accord-
ingly.iTo signal turns while being towed with
the hazard warning flasher in use, turn
key in starter switch to position2 and
activate the combination switch for the
left or right turn signal in the usual
manner – only the selected turn signal
will operate.
Upon canceling the turn signal, the haz-
ard warning flasher will operate again.
!When towing the vehicle with all wheels
on the ground, please note the follow-
ing:
With the automatic central locking acti-
vated and the key in starter switch
position2, the vehicle doors lock if the
left front wheel as well as the right rear
wheel are turning at vehicle speeds of
approx. 9 mph (15 km / h) or more.
Switch off the tow-away alarm
(�page 72).
To prevent the vehicle door locks from
locking, deactivate the automatic cen-
tral locking (
�page 78).
Towing of the vehicle should only be
done using the properly installed tow-
ing eye bolt. Never attach tow cable,
tow rope or tow rod to the vehicle chas-
sis, frame or suspension parts.
Page 285 of 304

285 Index
A
ABS 22, 66, 279
ABS control 67
Malfunction indicator lamp 196
Warning lamp 196
Accelerator position, automatic
transmission* 98
Accident
In case of 46
Activating
Air conditioning 107
Air recirculation mode 105
Anti-theft alarm system 71
Climate control 103
ESP 70
Exterior headlamps 43
Hazard warning flasher 85
Headlamps 43
High beams 85
Ignition 29
Immobilizer 71
Rear window defroster 105
Residual heat 107
Seat heater* 81
Tow-away alarm 72
Windshield wipers 44Activating automatic central locking 79
Adding
Coolant 176, 177
Engine oil 175
Additional turn signals 221
Adjusting 30
Air distribution 104
Air volume 104
Backrest tilt 32, 33
Exterior rear view mirror 35
Head restraint height 32
Inside rear view mirror 35
Instrument cluster illumination 88
Manual seat 31
Mirrors 35
Seat cushion tilt 33
Seat fore and aft adjustment 31, 33
Seat height 31, 33
Seats 30
Telescoping steering column* 34
Adjusting headlamp aim
Horizontal headlamp aim 227
Vertical headlamp aim 226
Air conditioning 106
Activating 107
Deactivating 106Air conditioning refrigerant 271
Air distribution
Adjusting 104
Air pressure see Tire inflation
pressure 181
Air recirculation mode 105
Activating 105
Deactivating 105
Air volume
Adjusting 104
AIRBAG OFF indicator lamp 205
Airbags 53
BabySmart airbag deactivation
system 279
BabySmart
TM deactivation
system 62
Children 54
Front 56
Passenger 56
Safety guidelines 55
Side impact 57
Alarm
Audible 65, 71
Canceling 71
Visual 71
Page 287 of 304

287 Index
Battery discharged
Jump starting 247
Battery, vehicle 178, 245
Charging 246
Disconnecting 246
Reconnecting 246
Reinstalling 246
Removing 246
Block heater 184
Bolts
For spare wheel 207
Brake assist system (BAS) 279
Brake fluid 170, 271
Brake lamp bulbs 222
Brake lamp, high mounted 222
Brakes 160
Warning lamp 198
Break-in period 158
Bulbs, replacing 221
Additional turn signals 221
Backup lamps 222
Brake lamps 222
Fog lamps 221
Front lamps 221
High beam 221
High mounted brake lamp 222License plate lamps 222, 226
Low beam 221
Parking lamps 221, 222, 224
Rear fog lamp 222
Rear fog lamps 225
Side marker lamps 221, 225
Standing lamps 221, 222, 224
Tail lamp assemblies 222, 225
Turn signal lamps 221, 222
Xenon* headlamps 223
Button
Audio system 115
C
CAC (Customer Assistance Center) 279
California
Important notice 9
Calling up
Service indicator 186
CAN system 279
Capacities
Fuels, coolants, lubricants, etc. 269
Cargo area see Cargo compartment 77
Cargo compartment
Trunk 77
Casette mode
Playing cassettes 118Catalytic converter 166
CD changer* 120, 209
CD mode 120
Center console 23
AIRBAG OFF indicator lamp 205
Lower part 24
Storage compartment 140
Upper part 23
Central locking
From inside 80
Unlocking from inside 80
Certification label 258
Changing CDs 120
Charging
Vehicle battery 246
CHECK ENGINE malfunction indicator
lamp 199
Checking
Coolant level 170, 176
Oil level 170, 172
Tire inflation pressure 170
Vehicle lighting 170
Checking engine oil level
Via engine oil level indicator 173
Via oil dipstick 173