Page 24 of 376
24 At a glanceCenter consoleLower part
Item
Page
1
Parking assist (Parktronic
system)* deactivation
switch
186
2
Active Body Control (ABC)
switch
183
3
Tow-away alarm switch
77
4
Hardtop open/close con-
trol with buttons for roll bar
159
61
5
Exterior rear view mirror
adjustment
35
Item
Page
6
Vehicle level control switch
184
7
ESP control switch
71
8
Thumbwheel for setting
distance for Distronic*
179
9
Distance warning func-
tion* on/off switch
179
10
Program mode selector for
automatic transmission
141
11
Selector lever for
automatic transmission
137
Page 35 of 376
35 Getting started
Adjusting
Steering column, height�
Move the stalk up or down in the direc-
tion of arrow2. Make sure that your
legs can move freely and that all the
displays (including malfunction and in-
dicator lamps) on the instrument clus-
ter are clearly visible.
Mirrors
Adjust the inside and exterior rear view
mirrors before driving so that you have a
good view of the road and traffic condi-
tions.
Inside rear view mirror�
Manually adjust the inside rear view
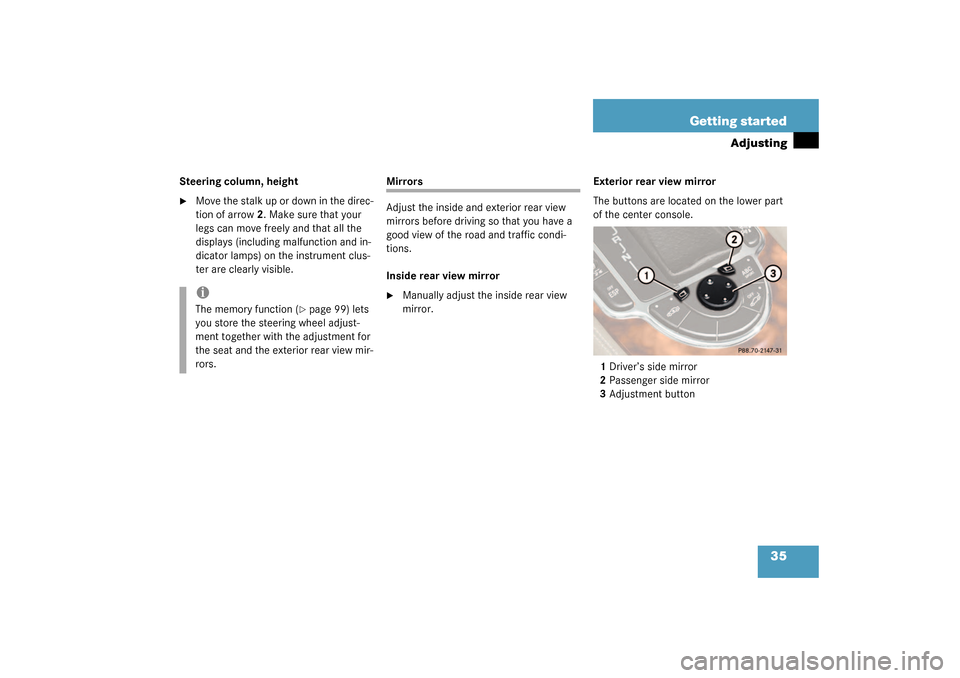
mirror.Exterior rear view mirror
The buttons are located on the lower part
of the center console.
1Driver’s side mirror
2Passenger side mirror
3Adjustment button
iThe memory function (
�page 99) lets
you store the steering wheel adjust-
ment together with the adjustment for
the seat and the exterior rear view mir-
rors.
Page 61 of 376

61 Safety and Security
Occupant safety
Roll barThe roll bar raises automatically in an acci-
dent or in a critical driving situation. You
can also raise and lower the roll bar manu-
ally using the buttons provided.
The buttons for the roll bar are on the cen-
ter console under the roof switch.
1Lower roll bar
2Raise roll bar
The roll bar can be moved manually when
the ignition is turned on.
Warning!
G
An emergency tensioning device (ETD) that
was activated must be replaced.
When scrapping the emergency tensioning
device, our safety instructions must be fol-
lowed. These are available at your autho-
rized Mercedes-Benz Center.!Do not place objects heavier than 20
lbs (9 kg) on the front passenger seat.
This could cause the front or side im-
pact airbag on the front passenger side
to deploy in a crash which exceeds the
system's deployment threshold.
Warning!
G
This vehicle is a two occupant vehicle. The
rear storage area is not intended for use by
occupants and is not equipped for properly
seating or restraining occupants. Thus this
area should never be used by any persons.
Before operating the roll bar switch make
sure that the roll bar’s path is clear and no
persons are injured by the moving roll bar
due to inattention. Raising or lowering of the
roll bar could injure someone inadvertently
occupying the rear storage area.
For your own safety we recommend to drive
with the roll bar raised if the outside temper-
ature is below +5°F (-15°C).!If the outside temperature falls below
+5°F (-15°C), the roll bar must be
raised manually using the buttons pro-
vided to avoid damaging the hydraulics.
iWhen the roll bar is raised automatical-
ly, you will hear a ratcheting sound.
Page 81 of 376

81 Controls in detail
Locking and unlocking
Factory setting
Global unlocking�
Press button
Œ
.
All turn signals blink once. The locking
knobs in the doors move up.
The vehicle will lock again automatically
within approximately 40 seconds of un-
locking if neither door nor trunk is opened.
Global locking
�
Press button
‹
.
All turn signals blink three times. The lock-
ing knobs in the doors move down.Individual setting
If you frequently travel alone, you may wish
to reprogram the key so that
pressing
Œ
only unlocks the driver’s
door, interior lockable storage compart-
ments and the fuel filler flap.
�
Press and hold buttons
Œ
and
‹
simultaneously for about six seconds
until the battery check lamp5 blinks
twice.
The key will then function as follows:
Unlocking driver’s door
�
Press button
Œ
once.
Global unlocking
�
Press button
Œ
twice.
Global locking
�
Press button
‹
.Restoring to factory setting
�
Press and hold buttons
Œ
and
‹
simultaneously for about six seconds
until the battery check lamp5 blinks
twice.
!To prevent possible malfunction, avoid
exposing the key to high levels of elec-
tromagnetic radiation.
Warning!
G
When leaving the vehicle, always remove the
key from the starter switch, take the KEY-
LESS-GO
* card (if so equipped) with you
and lock the vehicle. Do not leave children
unattended in the vehicle, or with access to
an unlocked vehicle. It is possible for chil-
dren to open a locked door from the inside,
which could result in an accident or serious
injury.
Page 111 of 376

111 Controls in detail
Control system
Multifunction steering wheel
The displays in the multifunction display
and the settings in the control system are
controlled by the buttons on the multifunc-
tion steering wheel (
�page 20).Pressing any of the buttons on the multi-
function steering wheel will alter what is
shown in the multifunction display.
The information available in the multifunc-
tion display is arranged in menus, each
containing a number of functions or sub-
menus.
The individual functions are then found
within the relevant menu (radio or CD op-
erations under
AUDIO
, for example). These
functions serve to call up relevant informa-
tion or to customize the settings for your
vehicle.
It is helpful to think of the menus, and the
functions within each menu, as being ar-
ranged in a circular pattern.
�
If you press button
è
or
ÿ
re-
peatedly, you will pass through each
menu one after the other.
�
If you press button
k
or
j
re-
peatedly, you will pass through each
function display, one after the other, in
the current menu.
1
Left multifunction display in the
speedometer
2
Right multifunction display in the
tachometerOperating the control system
3
Selecting the submenu or setting
the volumeç
down / to decrease
æ
up / to increase
4
Telephone*í
to take a call
ì
to end a call
5
Menu systemsè
for next menu
ÿ
for previous menu
6
Moving within a menuj
for next display
k
for previous display
Page 167 of 376
167 Controls in detail
Retractable hardtop
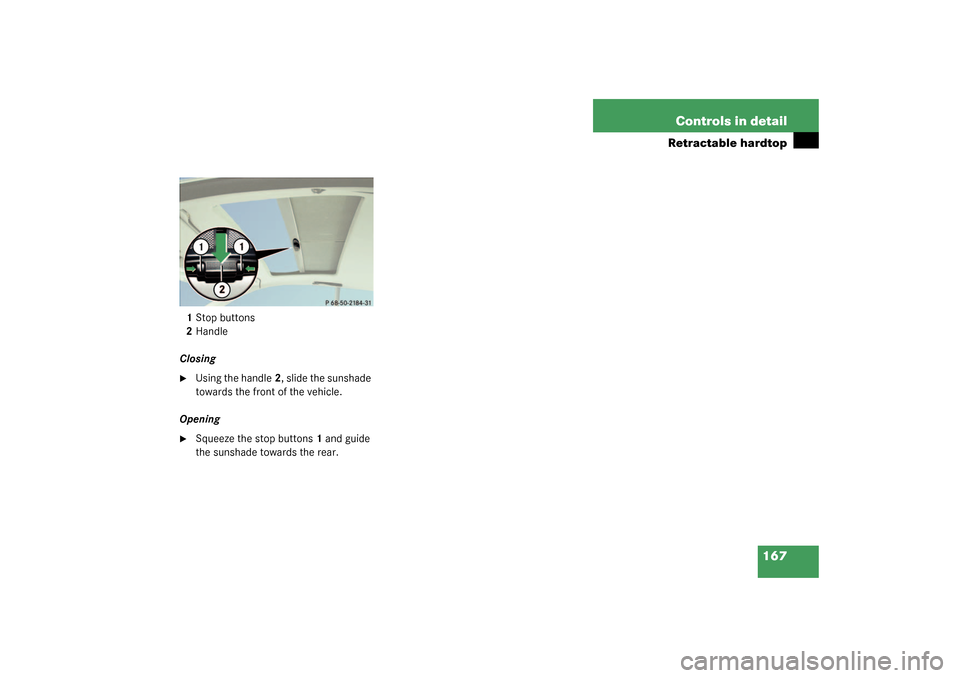
1Stop buttons
2Handle
Closing�
Using the handle2, slide the sunshade
towards the front of the vehicle.
Opening
�
Squeeze the stop buttons1 and guide
the sunshade towards the rear.
Page 193 of 376
193 Controls in detail
Useful features
Armrest storage spaces
The buttons are located under the cushion
of the armrest.
1Button to open storage tray
2Button to open storage compartmentOpening storage tray
�
Press button1 and lift up the armrest.
Opening storage compartment
�
Press button2 and lift the armrest.
Locking the storage spaces
The storage spaces are centrally locked
when you lock the vehicle from the out-
side.
You can also lock the storage spaces
separately, see “Locking the storage com-
partments separately” (
�page 194).Rear storage compartments
The CD changer is located in the left stor-
age compartment.
For instructions on the CD changer, see
separate COMAND Operator’s Manual.
1Release button
2Lid
�
Press the release button.
The lid opens upwards.
Page 200 of 376

200 Controls in detailUseful features
You can take and place telephone calls us-
ing the
í
and
ì
buttons on the
steering wheel. To carry out other tele-
phone functions, use the control system
(
�page 133).
See separate instruction manual for in-
structions on how to operate the tele-
phone.
Tele Aid
Warning!
G
Please do not forget that your primary re-
sponsibility is to drive the vehicle. A driver’s
attention to the road must always be
his /her primary focus when driving. For
your safety and the safety of others, we rec-
o m m e n d t h a t y o u p u l l o v e r t o a s a f e l o c a t i o n
and stop before placing or taking a tele-
phone call.
If you choose to use the telephone
1 while
driving, please use the hands-free device
and only use the telephone when road,
weather, and traffic conditions permit.
Some jurisdictions prohibit the driver from
using a cellular telephone while driving a ve-
hicle.
Only operate the COMAND (Cockpit Man-
agement and Data System)
1 if road, weath-
er, and traffic conditions permit.
1Observe all legal requirements
Bear in mind that at a speed of just 30 mph
(approximately 50 km / h), your vehicle is
covering a distance of approximately
44 feet (approximately 13.5 m) every sec-
ond.
!The initial activation of the Tele Aid sys-
tem may only be performed by com-
pleting the subscriber agreement and
placing an acquaintance call using the
SOS button. Failure to complete either
of these steps will result in a system
that is not activated. If the system is
not activated the indicator lamp in the
SOS button stays on after turning key
in starter switch to position2, or press-
ing KEYLESS-GO* start/stop button (if
so equipped) twice to position2
(�page 30) and the message
Tele Aid
not activated
will be shown in the
multifunction display for approx.
10 seconds.
If you have any questions regarding ac-
tivation, please call the Response Cen-
ter at 1-800-756-9018 (in the USA) or
1-888-923-8367 (in Canada).
* deactivation
switch
186
2
Active Body Control (ABC)
switch
183
3
Tow-away alarm switch
77
4
Hardtop open/close")