Page 288 of 376

288 Practical hintsWhere will I find ...?
Where will I find ...?First aid kit
The first aid kit is located in storage space
under the passenger seat.
1Handle
2Lid�
Pull the handle 1 up.
�
Fold the lid 2 down.
You can now remove the first-aid kit.
Vehicle tool kit
The vehicle tool kit is stored in the space
underneath the trunk floor.�
Lift up the trunk floor cover.
You can now remove the tools and ac-
cessories.
The vehicle tool kit includes�
One pair of universal pliers
�
Two open-end wrenches
�
One hex-socket wrench
�
One interchangeable slot/Phillips
screwdriver
�
One towing eye bolt
�
One wheel wrench
�
One alignment bolt
�
One fuse extractor
�
One fuse chart for the main fuse
box
�
Spare fusesThe jack is exclusively designed for lifting
the vehicle during a wheel change. Always
lower the vehicle on sufficient capacity
jack stands before working under the vehi-
cle.
iCheck expiration dates and contents
for completeness at least once a year
and replace missing/expired items.
Page 325 of 376

325 Practical hints
Towing the vehicle
Towing the vehicle
Mercedes-Benz recommends that the vehi-
cle be transported with all wheels off the
ground using flatbed or appropriate wheel
lift/dolly equipment.When circumstances do not permit the
recommended towing methods, the vehi-
cle may be towed with all wheels on the
ground or front wheels raised only so far as
necessary to have the vehicle moved to a
safe location where the recommended
towing methods can be employed.
!Use flatbed or wheel lift/dolly equip-
ment with key in starter switch turned
to position0.
Do not tow with sling-type equipment.
Towing with sling-type equipment over
bumpy roads will damage radiator and
supports.
To prevent damage during transport,
do not tie down vehicle by its chassis or
suspension parts.
Switch off the tow-away alarm and the
automatic central locking.
!If the vehicle is towed with the front
axle raised, the engine must be shut off
(key in starter switch position0 or1).
Otherwise, the ESP will immediately be
engaged and will apply the rear wheel
brakes.
When towing the vehicle with all wheels
on the ground, the selector lever must
be in positionN and the key must be in
starter switch position2.
When towing the vehicle with all wheels
on the ground or the front axle raised,
the vehicle may be towed only for dis-
tances up to 30 miles (50 km) and at a
speed not to exceed 30 mph (50
km/h).
!To be certain to avoid a possibility of
damage to the transmission, however,
we recommend the drive shaft be dis-
connected at the rear axle drive flange
for any towing beyond a short tow to a
nearby garage.
Page 326 of 376

326 Practical hintsTowing the vehicleWarning!
G
If circumstances require towing the vehicle
with all wheels on the ground, always tow
with a tow bar if:�
the engine will not run
�
there is a malfunction in the SBC brake
system
�
there is a malfunction in the power sup-
ply or in the vehicle’s electrical system
as that will be necessary to adequately con-
trol the towed vehicle.
Prior to towing the vehicle with all wheels on
the ground, make certain that the key is in
starter switch position2.
If the key is left in the starter switch
position0 for an extended period of time, it
can no longer be turned in the switch. In this
case, the steering is locked. To unlock, re-
move key from starter switch and reinsert.
iTo signal turns while being towed with
the hazard warning flasher in use, turn
key in starter switch to position2 and
activate the combination switch for the
left or right turn signal in the usual
manner – only the selected turn signal
will operate.
Upon canceling the turn signal, the haz-
ard warning flasher will operate again.
Warning!
G
The brake system requires electrical power
to operate.
A malfunction in the vehicle’s power supply
or electrical system may impair brake sys-
tem operation and switch it into its
limp-home (emergency operation) mode. To
brake, the driver must then apply signifi-
cantly greater brake pedal pressure and de-
press the pedal much further to obtain the
expected braking effect. If necessary, apply
full pressure to the brake pedal. Brakes are
only applied to the front wheels. Stopping
distance is increased! Adapt your driving
style accordingly. SBC brake system
(�page 72).
With the engine not running, there is no
power assistance for the steering system. In
this case, it is important to keep in mind that
a considerably higher degree of effort is nec-
essary to steer the vehicle. Adapt your driv-
ing accordingly.
Page 327 of 376

327 Practical hints
Towing the vehicle
Installing towing eye bolt
Front of vehicle
1Cover on right side of front bumper.
To remove cover:�
Press mark on cover in direction of ar-
row.
�
Lift cover off to reveal threaded hole for
towing eye bolt.
!When towing the vehicle with all wheels
on the ground, please note the follow-
ing:
With the automatic central locking acti-
vated and the key in starter switch
position2, or KEYLESS-GO* start/stop
button (if so equipped) in position2,
the vehicle doors lock if the left front
wheel as well as the right rear wheel
are turning at vehicle speeds of approx.
9mph (15km/h) or more.
To prevent the vehicle door locks from
locking, deactivate the automatic cen-
tral locking (
�page 91).
Towing of the vehicle should only be
done using the properly installed tow-
ing eye bolt. Never attach tow cable,
tow rope or tow rod to the vehicle chas-
sis, frame or suspension parts.
iThe selector lever will remain locked in
positionP and the key will not turn in
the starter switch if the battery is dis-
connected or discharged. See notes on
the battery (
�page 319) or on jump
starting (
�page 323).
Page 328 of 376
328 Practical hintsTowing the vehicleThe towing eye bolt is supplied with the
tool kit (located in the storage compart-
ment under the trunk floor).�
Screw towing eye bolt in to its stop and
tighten with lug wrench.
To reinstall cover:
�
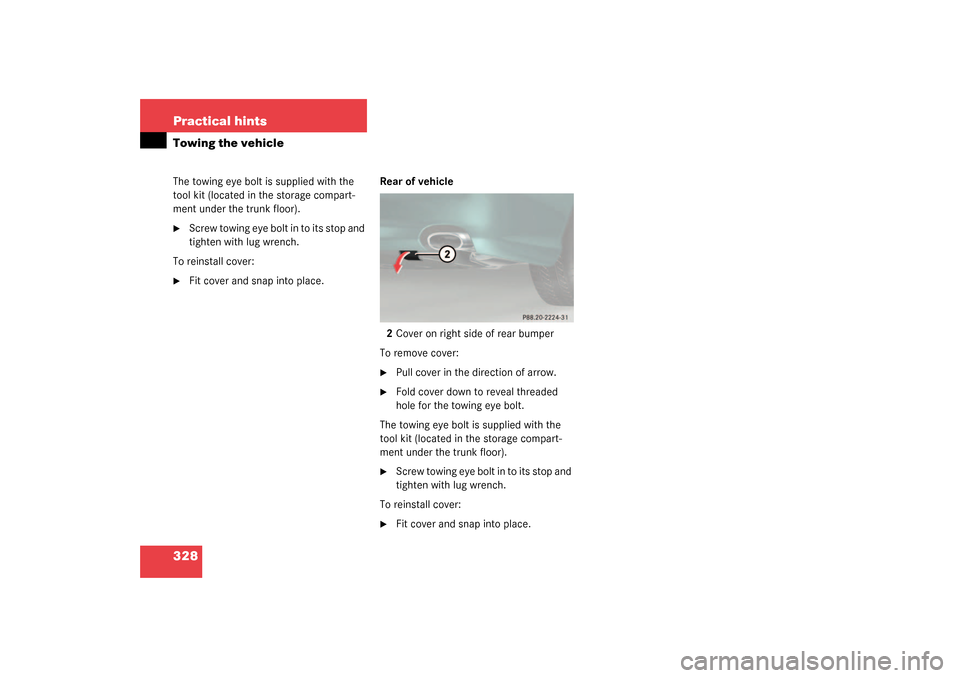
Fit cover and snap into place.Rear of vehicle
2Cover on right side of rear bumper
To remove cover:
�
Pull cover in the direction of arrow.
�
Fold cover down to reveal threaded
hole for the towing eye bolt.
The towing eye bolt is supplied with the
tool kit (located in the storage compart-
ment under the trunk floor).
�
Screw towing eye bolt in to its stop and
tighten with lug wrench.
To reinstall cover:
�
Fit cover and snap into place.
Page 372 of 376

372 IndexTele Aid 200
Emergency calls 202
Information 205
Initiating an emergency call
manually 203
Messages in display 263
Roadside assistance 204
SOS button 25, 203
Tele Aid system 201
Tele Aid System 355
Telephone* 22, 199
Answering a call 134
Dialing 135
Ending a call 135
Hands-free microphone 25
Loading phone book* 135
Messages in display 270
Operating 133
Redialing 136
Signal strength 134
Telephones and two-way radios 223Temperature
Outside temperature indicator 109
Sensor 25
Setting interior temperature 149
Setting units in display 122
Tires 236
Tightening torque 318, 355
Tilt
Head restraint 34
Time display mode
Setting 122
Tire inflation pressure 305, 310
Checking 226, 235
Setting units 129
Tire speed rating 220, 355
Tire traction 220
TIREFIT 355
TIREFIT kit 289, 302, 308
TIREFIT kit 1
Instructions for use 302
TIREFIT kit 2
Instructions for use 308Tires 234, 348
Direction of rotation 235
Driving instructions 219
Messages in display 281
Retreads 234
Rims and tires 337
Rotating 238
Service life 235
SL 500 338
SL 55 AMG Kompressor 338
Temperature 236, 349
Tread depth 239
Wear pattern 238
Winter 239
Tools 288
Tow-away alarm 24, 77
Arming 77
Disarming 77
Disarming for transport 77
Tow-away alarm switch 24
Towing eye bolt (vehicle tool kit) 288
Installing 327
Towing the vehicle 325
Traction 141, 355
Transmission see Automatic transmission
Fluid level 230
Page 373 of 376
 88
Locking separately 83
Message in display 272
Ope")
373 Index
Trip computer 131
Trip odometer 21
Resetting 109
Trunk
Closing the lid 91
Easy-Pack load assist 198
Lighting 107
Lock button (KEYLESS-GO*) 88
Locking separately 83
Message in display 272
Opening from inside vehicle 89
Opening the lid 83
Parcel net 195
Trunk lid lock 291
Unlocking (KEYLESS-GO*) 88
Unlocking in an emergency 291
Unlocking separately 82
Trunk lid 82
Trunk lid emergency release 90
Trunk lighting 107
Turn signals 19, 43
Additional in mirrors 296
Front bulbs 296
Indicator lamps 21
Rear bulbs 296U
Units
Setting speedometer units 123
Setting temperature units 122
Setting tire inflation pressure
units 129
Unlocking 28
Centrally from inside 92
Driver’s door in an emergency 290
Fuel filler flap 225
Global (KEYLESS-GO* card) 86
Interior storage compartments 291
Storage compartments 194
Trunk 82, 89
Trunk (KEYLESS-GO*) 88
Trunk in an emergency 291
Vehicle in an emergency 290
With the electronic key 28
With the KEYLESS-GO* card 30, 84
Uphill driving
Cruise control 169
V
Vehicle
Individual settings 119
Locking 23
Locking in an emergency 292Minimum distance (Parktronic*) 187
Towing 325
Unlocking 23
Unlocking in an emergency 290
Vehicle level 184, 356
Changing 185
Setting 185
Automatic 185
Manual 185
Vehicle level control 356
Vehicle level control switch 24
Vehicle lighting
Checking 226
Vehicle lock status
Checking (KEYLESS-GO*) 87
Vehicle tool kit 288
Alignment bolt 288
Fuse chart 288
Fuse extractor 288
Hex-socket wrench 288
Open-end wrench 288
Screwdriver 288
Spare fuses 288
Universal pliers 288
Wheel wrench 288
Ventilation and residual heat 154