Page 43 of 376
43 Getting started
Driving
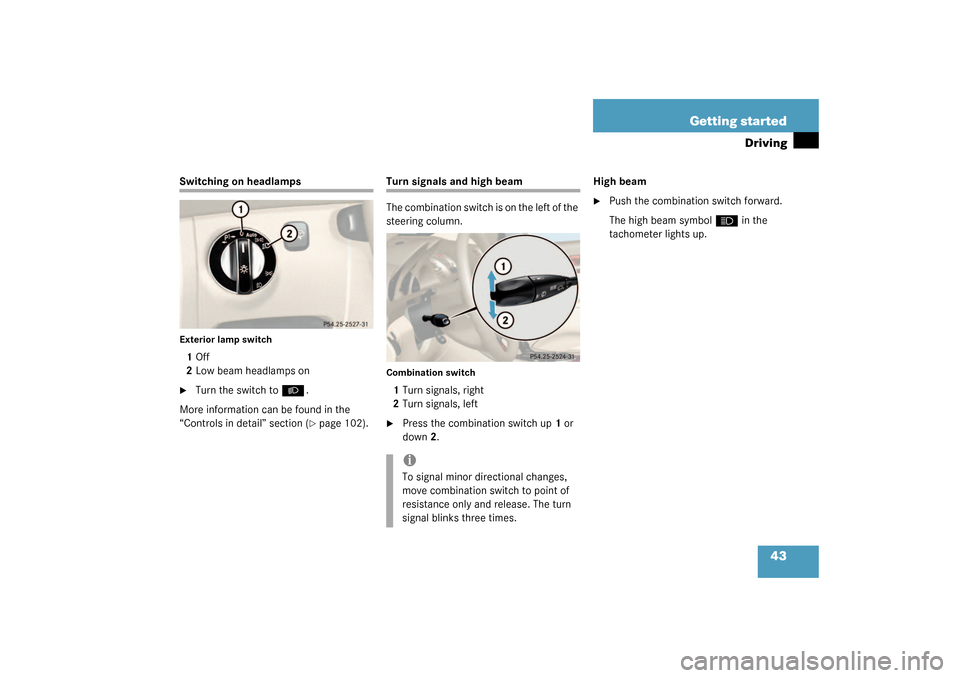
Switching on headlampsExterior lamp switch1Off
2Low beam headlamps on�
Turn the switch to
B
.
More information can be found in the
“Controls in detail” section (�page 102).
Turn signals and high beam
The combination switch is on the left of the
steering column.Combination switch1Turn signals, right
2Turn signals, left�
Press the combination switch up1 or
down2.High beam
�
Push the combination switch forward.
The high beam symbol
A
in the
tachometer lights up.
iTo signal minor directional changes,
move combination switch to point of
resistance only and release. The turn
signal blinks three times.
Page 82 of 376

82 Controls in detailLocking and unlocking
Checking the batteries�
Press button
‹
or
Œ
.
The battery check lamp5 lights up
briefly to indicate that the key batteries
are in order.Unlocking the trunk lid
You can unlock the trunk separately.
�
Press and hold button
Š
until trunk
unlocks.
!If you can no longer lock or unlock the
vehicle with the key, then either the
batteries in the electronics are dis-
charged or the key is malfunctioning.�
Check the batteries in the key
(�page 82) and replace them if
necessary (
�page 293).
or
�
Use the mechanical key to unlock
the doors (
�page 290) and trunk
(
�page 291) as required. Lock the
vehicle using the mechanical key
(�page 292).
If the key is malfunctioning, contact an
authorized Mercedes-Benz Center.
!If the battery check lamp5 does not
light up briefly during check then the
key batteries are discharged.�
Change the batteries (
�page 293).
You can obtain the required batteries
at any authorized Mercedes-Benz Cen-
ter.
iIf the vehicle was previously centrally
locked, the trunk lid will lock automati-
cally when closed. The turn signals will
flash three times to confirm locking.
Page 85 of 376

85 Controls in detail
Locking and unlocking
Important notes on using KEYLESS-GO*�
Always carry the KEYLESS-GO card
with you.
�
Never store the KEYLESS-GO card to-
gether with:�
electronic items such as a cellular
phone or another KEYLESS-GO card
�
metallic objects such as coins or
metal foil
Doing so could impair the function of
the KEYLESS-GO system.
�
Always take a SmartKey with you in
case of a malfunction of the KEY-
LESS-GO system.
�
To lock or unlock the vehicle, the card
must be located outside the vehicle
within approximately 3 ft. (1 m) of a
door or the trunk lid.
�
In order to start the engine with the
KEYLESS-GO card�
the KEYLESS-GO card must be lo-
cated in the vehicle
�
all the doors must be closed
�
If you have started the engine with the
KEYLESS-GO start/stop button, you
can only turn it off again with this but-
ton, even if you have put the key in the
starter switch in the meantime.
�
This does not apply if, after starting, the
selector lever is still in positionP. The
key will then have priority over the card
and the vehicle’s electrical system will
operate according to the position of
the key in the starter switch, even stop-
ping the engine.
�
If the KEYLESS-GO card is positioned
farther away from the vehicle (e.g. in-
side clothing or briefcase) and can no
longer be recognized by the system,
the vehicle cannot be locked or the en-
gine started via the KEYLESS-GO sys-
tem.
�
If the KEYLESS-GO card is removed
from the vehicle while the ignition is
switched on (e.g. if passenger exits the
vehicle with the card), the message Chip card not recognized!
will ap-
pear in the multifunction display.
Find the card or change its present lo-
cation immediately (e.g. place it on the
front passenger seat or insert it in shirt
pocket).
�
Remember that the engine can be
started by anyone with a KEYLESS-GO
card that is left inside the vehicle. If you
leave the card behind when exiting and
locking the vehicle, the message
Chip
card still in vehicle!
will appear in
the multifunction display.
Page 120 of 376

120 Controls in detailControl systemResetting all settings
You can reset all the functions of all sub-
menus to the factory settings.�
Press the reset knob in the instrument
cluster for approximately three sec-
onds.
In the right display you will see the re-
quest to press the reset knob again to
confirm.
�
Press the reset knob again.
The functions of all the submenus will
reset to factory settings.Submenus in the Settings menu
�
Press button
k
or
j
.
In the right display you see the collec-
tion of submenus.
�
Press button
ç
.
The selection marker moves to the next
submenu.
The submenus are arranged by hierarchy.
Scroll down with the ç
button, scroll up
with the
æ
button.
Move within the submenus with the
k
or
j
button to the individual functions.
The settings themselves are made with
button æ
or
ç
.Resetting the functions of a submenu
For each submenu you can reset all the
functions to the factory settings.
�
Move to a function in the submenu.
�
Press the reset knob in the instrument
cluster for approximately three sec-
onds.
In the right display you will see the re-
quest to press the reset knob again to
confirm.
�
Press the reset knob again.
All functions of the submenu will reset
to factory settings.
iThe settings you have changed will not
be reset unless you confirm the action
by pressing the reset knob a second
time.
Page 121 of 376
121 Controls in detail
Control system
The table below shows what settings can
be changed within the various menus. De-
tailed instructions on making individual
settings can be found on the following pag-
es.Instrument cluster
Lighting
Vehicle
Convenience
Select time display mode
Set daytime running
lamp mode (USA only)
Set station selection
mode (radio)
Activate easy-entry/exit
feature
Select temperature dis-
play mode
Set locator lighting
Set automatic locking
Set key dependency
Select speedometer dis-
play mode
Exterior lamps delayed
switch-off
Tire pressure display*
Set parking position for
exterior rear view mirror
Select language
Interior lighting delayed
switch-off
Page 122 of 376

122 Controls in detailControl systemInstrument cluster submenu
Access the
Inst. cluster
menu via the
Settings
menu. Use the
Inst. cluster
submenu to change the instrument cluster
display settings. The following functions
are available:Selecting time display mode
�
Move the selection marker with the æ
or
ç
button to the
Inst.
cluster
submenu.
�
Press button
j
or
k
repeatedly
until you see this message in the left
display:
Clock
.
The selection marker is on the current
setting.
�
Press
æ
or
ç
to set the
12-hour
or
24-hour
time display mode.Selecting temperature display mode
�
Move the selection marker with button æ
or
ç
to the
Inst. cluster
submenu.
�
Press button
j
or
k
repeatedly
until you see this message in the left
display:
Temp. indicator
.
The selection marker is on the current
setting.
�
Press
æ
or
ç
to set temperature
unit to degrees Celsius (
°C) or degrees
Fahrenheit (
°F).
Function
Page
Select time display mode
122
Select temperature display
mode
122
Select speedometer display
mode
123
Select language
123
Page 124 of 376

124 Controls in detailControl systemLighting submenu
Access the
Lighting
submenu via the
Set-
tings
menu. Use the
Lighting
submenu to
change the lamp and lighting settings on
your vehicle. The following functions are
available:Setting daytime running lamp mode
(USA only)
�
Move the selection marker with button æ
or
ç
to the
Lighting
sub-
menu.
�
Press button
j
or
k
repeatedly
until you see this message in the left
display:
Light circuit Headlamp
mode
.
The selection marker is on the current
setting.
�
Press
æ
or
ç
t o s e l e c t m a n u a l o r
daytime running lamp (constant) mode.
This function is not available in coun-
tries where daytime running lamps are
mandatory.With daytime running lamp mode se-
lected and the exterior lamp switch at
position0, the following lamps will
come on automatically when the en-
gine is turned on:
�
Parking lamps and low beam head-
lamps
�
License plate lamps
Function
Page
Set daytime running lamp mode
(USA only)
124
Set locator lighting
125
Exterior lamps delayed
switch-off
125
Interior lighting delayed
switch-off
127
iIf you turn the exterior lamp switch to
another position, the corresponding
lamp(s) will switch on.
For safety reasons, resetting the Lighting
submenu to factory settings
(
�page 111) will not reset the daytime
running lamp mode.
In the right display you will then see the
message:
Cannot be fully reset to
factory settings while driv.!
.
Page 168 of 376

168 Controls in detailDriving systems
Driving systemsThe driving systems of your vehicle are de-
scribed on the following pages:�
Cruise control and Distronic*, with
which the vehicle can maintain a preset
speed
�
ABC with vehicle level control systems,
with which you can change vehicle sus-
pension characteristics
�
Parktronic*, which assists the driver
during parking maneuvers
The driving systems BAS, ABS, SBC, and
ESP are described in the “Safety” section
(
�page 68).
Cruise control
The cruise control automatically maintains
the speed you set for your vehicle.
Use of cruise control is recommended for
driving at a constant speed for extended
periods of time. You can set any speed
over 20 mph (30 km/h).
The cruise control function is operated by
means of the cruise control lever.
The cruise control lever is the uppermost
lever found on the left-hand side of the
steering column (
�page 18).
Warning!
G
The cruise control is a convenience system
designed to assist the driver during vehicle
operation. The driver is and must always re-
main responsible for the vehicle speed and
for safe brake operation.
Only use the cruise control if the road,
traffic, and weather conditions make it ad-
visable to travel at a steady speed.�
The use of cruise control can be danger-
ous on winding roads or in heavy traffic
because conditions do not allow safe
driving at a steady speed.
�
The use of cruise control can be danger-
ous on slippery roads. Rapid changes in
tire traction can result in wheel spin and
loss of control.
�
Deactivate the cruise control when driv-
ing in fog.
The “Resume” function should only be oper-
ated if the driver is fully aware of the previ-
ously set speed and wishes to resume this
particular preset speed.