Page 179 of 376
179 Controls in detail
Driving systems
1Distance warning function on/off
switch
2Thumbwheel for setting distance
Increasing distance
Increasing the distance setting tells Dis-
tronic to maintain a greater following dis-
tance to the vehicle ahead.�
Turn thumbwheel2 towards
¯
.Decreasing distance
Decreasing the distance setting tells Dis-
tronic to maintain a smaller following dis-
tance to the vehicle ahead.
�
Turn thumbwheel2 towards
®
.Distance warning function
When Distronic is deactivated, this func-
tion will continue to warn you if you are fol-
lowing too close to the vehicle ahead:
�
The DTR warning lamp
E
lights up
red.
�
An intermittent warning will sound if
necessary.
If these warnings are issued, you must
brake manually to maintain a safe distance
and avoid a collision with the vehicle
ahead.
Page 180 of 376
.
Deactivating
�
Pres")
180 Controls in detailDriving systems
Activating�
Press switch1.
The indicator lamp on the switch lights
up. A loudspeaker symbol appears in
the speedometer display (
�page 174).
Deactivating
�
Press switch1.
The indicator lamp on the switch goes
out. No loudspeaker symbol appears in
the speedometer display.Driving with Distronic
This section describes a number of driving
situations where special precaution is re-
quired on the part of the driver. Be pre-
pared to brake in such situations. This will
deactivate the Distronic system.
Warning!
G
If the DTR warning lamp (red)
E
in the
speedometer dial lights up while driving
and/or an intermittent warning sounds, im-
mediate attention on the part of the driver is
required.
As required by the traffic situation, apply the
brakes and navigate around a possible ob-
stacle. However, do not drive by relying on
the distance warning function, as this will re-
sult in an emergency braking application.
Especially depending on road surface condi-
tions and driver reaction, this will not always
enable you to avoid a collision.
iComplex driving situations are not al-
ways fully recognized by Distronic. This
could result in wrong or missing dis-
tance warnings.
Page 187 of 376

187 Controls in detail
Driving systems
Range of the sensors
To function properly, the sensors must be
free of dirt, ice snow and slush. Clean the
sensors regularly, being careful not to
scratch or damage the sensors.
Front sensorsRear sensors Minimum distance
If you encounter an obstacle in this range,
all the warning lamps light up and you hear
a warning signal. If the obstacle is closer
than the minimum distance, the actual dis-
tance may no longer be indicated by the
system.
Warning indicators
Visual signals indicate to the driver the rel-
ative distance between the sensors and an
obstacle. The warning indicator for the
front area is located above the center air
vents in the dashboard. The warning indi-
cator for the rear area is integrated in the
rear trim.Center
approx. 40 in (100 cm)
Corners
approx. 48 in (120 cm)
Center
approx. 48 in (120 cm)
Corners
approx. 32 in (80 cm)
!During parking maneuvers, pay special
attention to objects located above or
below the height of the sensors (e.g.
planters or trailer hitches). The Park-
tronic system will not detect such ob-
jects at close range and damage to
your vehicle or the object may result.
Ultrasonic signals from outside sourc-
es (e.g. truck air brakes or jackham-
mers) may impair the operation of the
Parktronic system.
Center
approx. 8 in (20 cm)
Corners
approx. 6 in (15 cm)
Page 188 of 376

188 Controls in detailDriving systemsFront area warning indicator1Left side of the vehicle
2Right side of the vehicle
Each warning indicator is divided into six
yellow and two red segments for either
side of the vehicle. The Parktronic system
is ready when the border around the indi-
cator is illuminated.The position of the gear selector lever de-
termines which warning indicators will be
activated.
As your vehicle approaches an object, one
or more segments will light up, depending
on the distance. When the eighth segment
lights, you have reached the minimum dis-
tance.
�
Front area: An intermittent acoustic
warning will sound as the seventh seg-
ment lights up and a constant acoustic
warning lasting a maximum of three
seconds will sound for the eighth seg-
ment.
�
Rear area: An intermittent acoustic
warning will sound when the first seg-
ment lights up. This signal quickens
with each additional segment lit. When
the eighth segment illuminates, the
acoustic warning becomes a constant
signal. The signal is canceled when the
selector lever is placed in positionD
orP.
Selector lever
position
Warning indicator
D
Front area activated
R or N
Rear area activated
P
Neither activated
Page 189 of 376

189 Controls in detail
Driving systems
Switching the Parktronic system
on/off
You can switch off the Parktronic system
manually.
The Parktronic switch is located in the low-
er section of the center console.
1Parktronic on/off switch
2Indicator lamp
Switching off the Parktronic system�
Press switch1.
The indicator lamp2 comes on.Switching on the Parktronic system
�
Press switch1 again.
The indicator lamp2 goes out.
Parktronic malfunction
There is a malfunction in the Parktronic
system if the red segments of the Park-
tronic warning indicator light up and a
warning sounds. The Parktronic system
will switch itself off after 30 seconds and
the indicator lamp on the Parktronic switch
lights up.
�
Have the Parktronic system checked
by an authorized Mercedes-Benz Cen-
ter as soon as possible.If only the red segments of the Parktronic
warning indicator light up and no warning
sounds, then the sensors of the Parktronic
system are dirty or malfunctioning. Mal-
function may also be caused by interfer-
ence from other radio or ultrasonic signals.
The Parktronic system will switch itself off
after 20 seconds.
�
Clean Parktronic system sensors
(�page 246).
�
Switch on the ignition.
or
�
Check Parktronic operation at another
location to rule out interference from
outside radio or ultrasonic signals.
Page 195 of 376
195 Controls in detail
Useful features
Parcel net in trunk
There are three nets available in the trunk
to secure loads:�
a pocket net on each side of the right
and left trunk side walls
�
a trunk floor net
�
Pull the trunk floor net from the trunk
back wall towards the front over the
luggage.
�
Hang the hooks of the net on the eyes
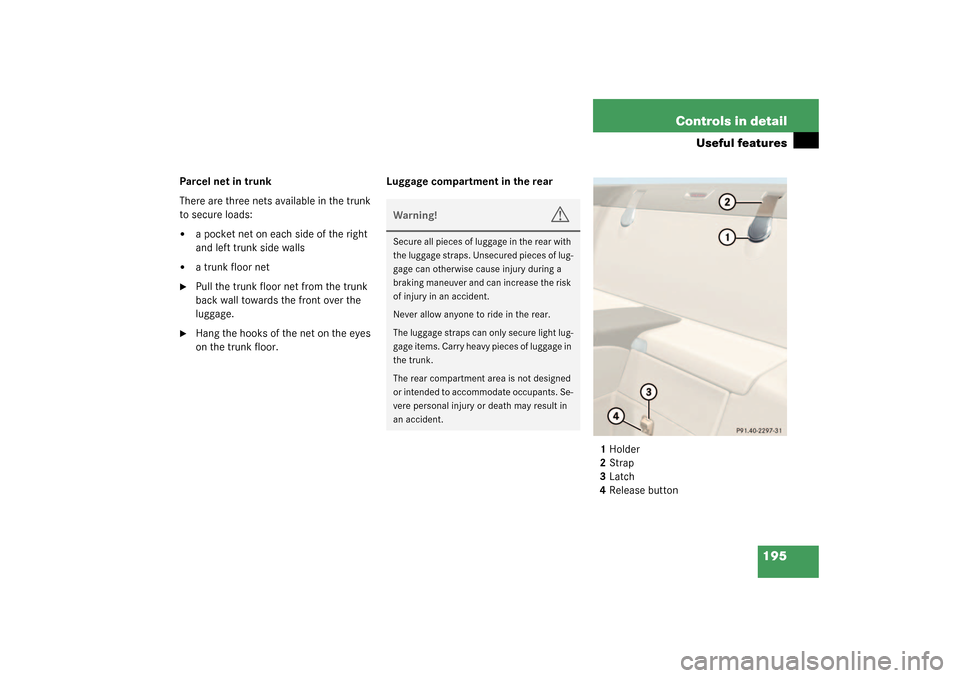
on the trunk floor.Luggage compartment in the rear
1Holder
2Strap
3Latch
4Release button
Warning!
G
Secure all pieces of luggage in the rear with
the luggage straps. Unsecured pieces of lug-
gage can otherwise cause injury during a
braking maneuver and can increase the risk
of injury in an accident.
Never allow anyone to ride in the rear.
The luggage straps can only secure light lug-
gage items. Carry heavy pieces of luggage in
the trunk.
The rear compartment area is not designed
or intended to accommodate occupants. Se-
vere personal injury or death may result in
an accident.
Page 197 of 376
197 Controls in detail
Useful features
Cigarette lighter
The lighter socket can be used to accom-
modate electrical accessories up to a
maximum of 180 W.
1Cigarette lighter�
Switch on the ignition.
�
Push in the cigarette lighter1.
The lighter will pop out automatically
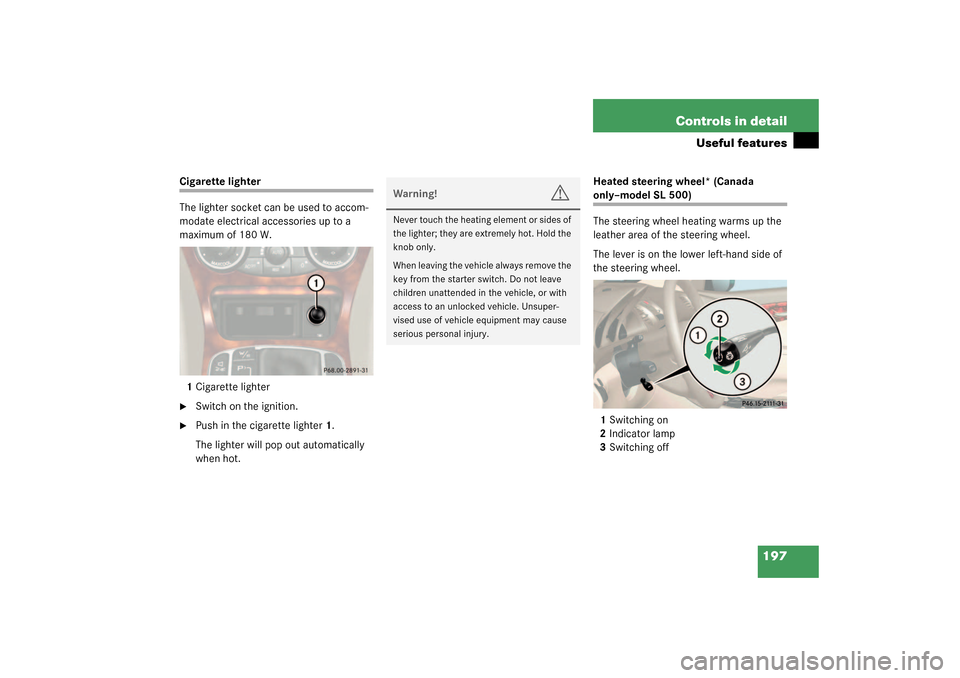
when hot.Heated steering wheel* (Canada
only–model SL 500)
The steering wheel heating warms up the
leather area of the steering wheel.
The lever is on the lower left-hand side of
the steering wheel.
1Switching on
2Indicator lamp
3Switching off
Warning!
G
Never touch the heating element or sides of
the lighter; they are extremely hot. Hold the
knob only.
When leaving the vehicle always remove the
key from the starter switch. Do not leave
children unattended in the vehicle, or with
access to an unlocked vehicle. Unsuper-
vised use of vehicle equipment may cause
serious personal injury.
Page 198 of 376

198 Controls in detailUseful featuresSwitching on�
Make sure that the ignition is switched
on.
All the lamps in the instrument cluster
should light up.
�
Turn lever in the direction of arrow1.
The steering wheel is heated. Indicator
lamp2 lights up.
Switching off
�
Turn lever in the direction of arrow3.
The steering wheel heating is turned
off. Indicator lamp2 goes out.
Easy-Pack load assist in the trunk
To facilitate trunk loading after opening the
lid, use the Easy-Pack feature to raise the
retracted hardtop from its storage position
in the trunk.
1Retracted hardtop
2Luggage cover
3Easy-Pack buttonRaising the hardtop
The hardtop can only be raised when the
luggage cover is closed and the trunk lid is
completely opened.
�
Press button3.
The hardtop rises a short distance.
Button3 lights up brightly. You can
now open the luggage cover.
iThe steering wheel heating does not
turn off automatically.
Warning!
G
To prevent injuries, make sure that there is
no possibility of body parts getting caught in
moving parts. If potential danger exists,
press the switch again. This will immediately
stop the movement of the hardtop.