Page 130 of 376

130 Controls in detailControl systemAfter entering the vehicle, the steering
wheel and seat will move into the position
stored in memory when�
the driver’s door is closed
�
you put the key in the starter switch
and
�
press the appropriate stored position
button on the memory switch
(�page 99)
�
Move the selection marker with button æ
or
ç
to the
Convenience
sub-
menu.
�
Press button
j
or
k
repeatedly
until you see this message in the left
display:
Easy-entry feature Acti-
vate
.
The selection marker is on the current
setting.
�
Press
æ
or
ç
to change the
easy-entry/exit setting.
The following settings are available for
the easy-entry/exit feature:
Off
The easy-entry/exit feature is
deactivated
Steer. column
Only the steering column is
moved
Steer.col.+seat
Both the steering column and
the seat are movedSetting key dependency
Use this function to set whether the mem-
ory settings for the seats, the steering
wheel and the mirrors should be stored
separately for each key (
�page 99).
�
Move the selection marker with button æ
or
ç
to the
Convenience
sub-
menu.
�
Press button
j
or
k
repeatedly
until you see this message in the left
display:
Key-dependent
.
The selection marker is on the current
setting.
�
Press
æ
or
ç
to set key depen-
dency to
On or
Off
.
iTo cancel seat/steering wheel move-
ment, press one of the following:�
the seat adjustment switch
(�page 32)
�
the steering column switch
(�page 34)
�
the memory switch (
�page 99)
Page 131 of 376

131 Controls in detail
Control system
Setting parking position for exterior rear
view mirror
You can store a parking position for the
passenger exterior rear view mirror using
the memory switch (
�page 100).
The exterior rear view mirror will return to
its previous position when you
�
shift out of reverse (after 10 seconds)
�
exceed the speed of 6 mph (10 km/h),
regardless of which gear is engaged
�
press the driver’s side mirror button
(immediately) (
�page 35)
�
Move the selection marker with button æ
or
ç
to the
Convenience
sub-
menu.
�
Press button
j
or
k
repeatedly
until you see this message in the left
display:
Mirror setting when park-
ing
.
The selection marker is on the current
setting.
�
Press
æ
or
ç
to switch function
On or
Off
.
Trip computer menu
Use the trip computer menu to call up sta-
tistical data on your vehicle. The following
information is available:
iThe mirror parking position feature
must be activated and the passenger
side exterior rear view mirror
(�page 35) must be selected at the
time in order for the system to recall the
stored mirror position when reverse
gearR is engaged.
Function
Page
Fuel consumption statistics after
start
132
Fuel consumption statistics
since last reset
132
Call up range (distance to empty)
133
iThe last function called up will reap-
pear the next time you enter the trip
computer menu.
Page 134 of 376

134 Controls in detailControl systemYou can use the functions in the
TEL
menu
to operate your telephone, provided it is
connected to a hands-free system and
switched on.
�
Switch on the telephone and COMAND.
�
Press button
ÿ
or
è
on the
steering wheel repeatedly until you see
the
TEL
menu in the left display.
Which messages will appear in the right
display field depends on whether your tele-
phone is switched on or off:
�
If the telephone is off, the message in
the multifunction display is:
TEL Off
.
�
If the telephone is on:
The telephone will then search for a
network. During this time the right dis-
play is empty.
As soon as the telephone has found a
network,
READY
is indicated in the right
display.
1Signal strength
�
This standby message indicates that
your telephone is ready for use and you
can operate it using the control sys-
tem.Rejecting a call
If you do not wish to receive the call, you
can choose to reject it.
�
Press button
ì
.
You have rejected the call. The caller
receives a busy signal.
Answering a call
When your telephone is ready to receive
calls, you can answer a call at any time. In
the right display you will then see the mes-
sage:
�
Press button
ì
.
You have answered the call. In the right
display you see the length of the call.
Never operate radio transmitters equipped
with a built-in or attached antenna (i.e. with-
out being connected to an external antenna)
from inside the vehicle while the engine is
running. Doing so could lead to a malfunc-
tion of the vehicle’s electronic system, pos-
sibly resulting in an accident and/or
personal injury.
Page 144 of 376
144 Controls in detailAutomatic transmissionEmergency operation (Limp Home Mode)
If vehicle acceleration worsens or the
transmission no longer shifts, the trans-
mission is most likely operating in limp
home (emergency operation) mode. In this
mode only 2nd gear and reverse gear can
be activated.�
Stop the vehicle.
�
Move selector lever toP.
�
Turn off the engine.
�
Wait at least ten seconds before re-
starting.
�
Restart the engine.
�
Move selector lever to positionD (for
2nd gear) orR.
�
Have the transmission checked at an
authorized Mercedes-Benz Center as
soon as possible.
Page 146 of 376
146 Controls in detailGood visibilityHeadlamp cleaning system
The switch is located on the left side of the
dashboard.
1Headlamp washer switch�
Switch on ignition.
�
Press switch1.
Rear window defroster
For information on the rear window de-
froster (
�page 153).
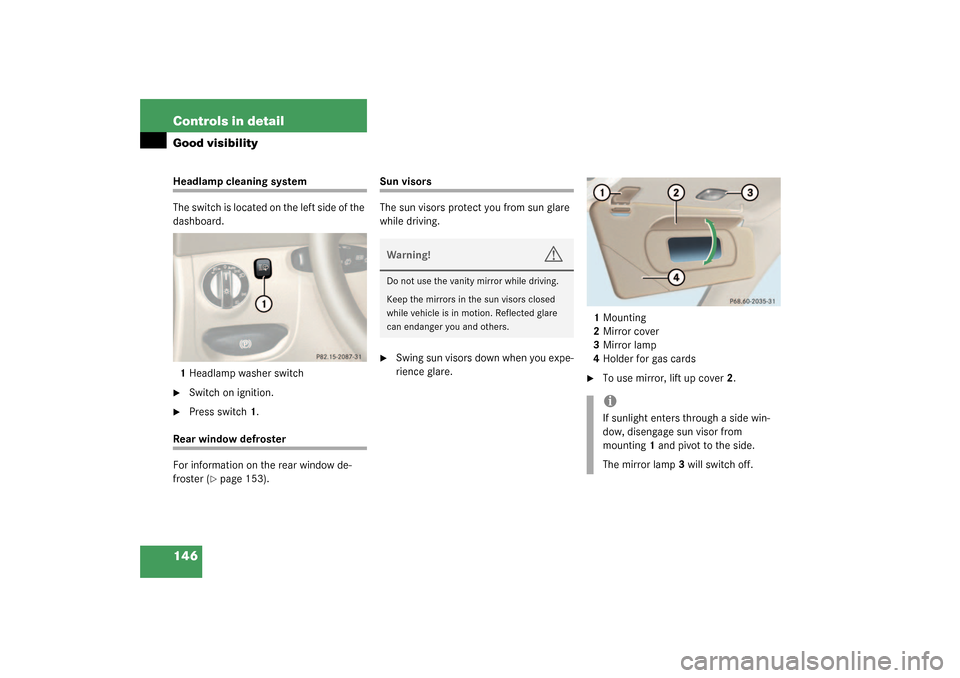
Sun visors
The sun visors protect you from sun glare
while driving.�
Swing sun visors down when you expe-
rience glare.1Mounting
2Mirror cover
3Mirror lamp
4Holder for gas cards
�
To use mirror, lift up cover2.
Warning!
G
Do not use the vanity mirror while driving.
Keep the mirrors in the sun visors closed
while vehicle is in motion. Reflected glare
can endanger you and others.
iIf sunlight enters through a side win-
dow, disengage sun visor from
mounting1 and pivot to the side.
The mirror lamp3 will switch off.
Page 148 of 376
148 Controls in detailAutomatic climate control
Automatic climate control panel
Item
1
Center air vent, adjustable
2
Center air vent, fixed
3
Air temperature controls for cen-
ter and side air vents
4
Air volume control for center and
side air vents
5
Center air vent, adjustable
6
Side defroster vent
7
Side air vent, adjustable
8
Automatic climate control panel
iFor draft-free ventilation, move the slid-
ers for the center air vents to the mid-
dle position.
Item
1
Temperature control, left
2
Air distribution, left (automatic or
manual operation)
3
Defrosting
4
Air recirculation
5
Rear window defroster
6
Air distribution, right (automatic or
manual operation)
7
Temperature control, right
8
Automatic climate control on/off
(complete system)
9
Residual heat/ventilation
10
Air volume control (automatic, man-
ual)
11
AC cooling on/off
Page 149 of 376

149 Controls in detail
Automatic climate control
The automatic climate control is operation-
al whenever the engine is running. You can
operate the climate control system in ei-
ther the automatic or manual mode. The
system cools or heats the interior depend-
ing on the selected interior temperature
and the current outside temperature.
Nearly all dust particles, pollutants and
odors are filtered out before outside air en-
ters the passenger compartment through
the air distribution system.
Setting the temperature
Use the temperature controls1 and7 to
separately adjust the air temperature on
each side of the passenger compartment.
You should raise or lower the temperature
setting in small increments, preferably
starting at 72°F (22°C). Increasing
�
Turn the outer adjustment ring slightly
to the right.
The automatic climate control system
will correspondingly adjust the interior
air temperature.
Decreasing
�
Turn the outer adjustment ring slightly
to the left.
The automatic climate control system
will correspondingly adjust the interior
air temperature.
Warning!
G
Follow the recommended settings for heat-
ing and cooling given on the following pag-
es. Otherwise the windows could fog up,
impairing visibility and endangering you and
others.
iIf the vehicle interior is hot, ventilate
the interior before driving off.
Keep the air intake grille in front of the
windshield free of snow and debris.
When the retractable hardtop is closed,
do not obstruct air flow by placing ob-
jects on the air flow-through exhaust
slots below the rear window.
iWhen operating the climate control
system in automatic mode, you will
only rarely need to adjust the tempera-
ture, air volume and air distribution.
Page 150 of 376

150 Controls in detailAutomatic climate controlAdjusting the temperature for center
and side air vents
When outside temperatures are low, you
can manually raise the air temperature for
the center and side air vents. The
controls3 are located between the center
air vents (
�page 147).
Turning on warm air
�
Press the left button (red).
The indicator lamp on the button lights
up. Warm air will enter from the center
and side air vents.
Turning off warm air
�
Press the left button (red).
The indicator lamp on the button goes
out. The air from the outlets will return
to the temperature set in the system.Turning on cooler air
�
Press the right button (blue).
The indicator lamp on the button lights
up. Cooler air will enter from the center
and side air vents.
Turning off cooler air
�
Press the right button (blue).
The indicator lamp on the button goes
out. The air from the outlets will return
to the temperature set in the system.
Adjusting air volume
Use the air volume control10
(�page 148) for both automatic and man-
ual air volume adjustment.
Adjusting manually
�
Press the control knob.
The
U
light on the control knob
goes out. You can now select one of
nine air volume settings.
Adjusting automatically
�
Press the control knob.
The
U
light on the control knob
comes on. The airflow is adjusted auto-
matically.

If vehicle acceleration worsens or the
transmission no longer shifts, the trans-
mission is most likely operating in l")