Page 91 of 376

91 Controls in detail
Locking and unlocking
Closing the trunk lid
1Handle�
Lower trunk lid by pulling firmly on
handle1.
Automatic central locking
The doors and the trunk lid automatically
lock when the vehicle is set into motion.
You can open a locked door from the in-
side. Open door only when conditions are
safe to do so.
You can deactivate the automatic locking
using the control system (
�page 128).
Warning!
G
To prevent possible personal injury, always
keep hands and fingers away from the trunk
opening when closing the trunk lid. Be espe-
cially careful when small children are
around.
iTo prevent an inadvertent lockout, do
not place the key in the trunk.
Vehicles with KEYLESS-GO*: To pre-
vent a possible inadvertent lockout, the
trunk lid will open automatically if a
KEYLESS-GO card is recognized inside
the trunk.
When the hardtop is retracted, it must
be completely lowered in the trunk be-
fore the trunk lid can be closed
(�page 199).
Warning!
G
Only drive with the trunk closed as, among
other dangers such as visibility blockage,
exhaust fumes may enter the vehicle interi-
or.
iThe doors unlock automatically after an
accident if the force of the impact ex-
ceeds a preset threshold.
The vehicle automatically locks when
the ignition is switched on and the
wheels are turning at vehicle speeds of
approximately 9 mph (15 km/h) or
more. You could therefore lock yourself
out when the vehicle �
is pushed
�
is on a test stand
Page 92 of 376

92 Controls in detailLocking and unlockingLocking and unlocking from the inside
You can lock or unlock the vehicle from in-
side using the central locking switches.
This can be useful, for example, if you want
to unlock the passenger door from the in-
side or want to lock the vehicle before
starting to drive.
The switches are located above and be-
tween the center air vents of the air condi-
tioning.
Central locking switches1Locking
2Unlocking
Locking�
Press central locking switch1.
If all the doors are closed, the vehicle
locks.
Unlocking
�
Press central locking switch2.
The vehicle unlocks.
iYou can open a locked door from inside
at any time. Open door only when con-
ditions are safe to do so.
If you have locked the vehicle with the
key or the KEYLESS-GO* card, the cen-
tral locking switches do not work.
iIf the vehicle was previously centrally
locked using the SmartKey or the
KEYLESS-GO* card, it will not unlock
using the central locking switch.Warning!
G
When leaving the vehicle, always remove the
key from the starter switch, take the KEY-
LESS-GO
* card (if so equipped) with you
and lock the vehicle. Do not leave children
unattended in the vehicle, or with access to
an unlocked vehicle. Unsupervised use of
vehicle equipment may cause an accident
and/or serious personal injury.
Page 99 of 376

99 Controls in detail
Memory function
Memory function
With the memory switch you can store up
to three different settings per key and KEY-
LESS-GO* card.
The following settings are saved for each
stored position:�
Driver’s seat and backrest position
�
Steering wheel position
�
Inside rear view mirror position
�
Driver’s side exterior rear view mirror
position
�
Passenger side exterior rear view mir-
ror position
These key dependent memory settings can
be deactivated if desired (
�page 130).The memory switch is located on the door.
MMemory button
1, 2, 3Stored positions
�
Be sure that the ignition is switched on
or one door is open.
All the lamps in the instrument cluster
light up when the ignition is switched
on.
!Prior to operating the vehicle, the driv-
er should check and adjust the seat
height, seat position fore and aft, and
seat backrest angle if necessary, to en-
sure adequate control, reach and com-
fort. The head restraint should also be
adjusted for proper height. Also see air-
bag section (
�page 53) for proper seat
positioning.
In addition, adjust the steering wheel to
ensure adequate control, reach, opera-
tion and comfort. Both the inside and
outside rear view mirrors should be ad-
justed for adequate rear vision.
Fasten seat belts. Infants and small
children should be seated in a properly
secured restraint system that complies
with U.S. Federal Motor Vehicle Safety
Standard 213 and Canadian Motor Ve-
hicle Safety Standard 213.
Warning!
G
Do not activate the memory function while
driving. Activating the memory function
while driving could cause the driver to lose
control of the vehicle.
Page 101 of 376
101 Controls in detail
Memory function
You can store a parking position for the
passenger exterior rear view mirror for
each key and each KEYLESS-GO* card us-
ing the memory switch.
1Passenger side exterior rear view mir-
ror
2Adjustment button�
Stop the vehicle.
�
Switch ignition on (if not already on).
�
Press button1 in center console.
The passenger side exterior rear view
mirror is selected.
�
Adjust the exterior rear view mirror
with button2 so that you see the rear
wheel and the road curb.
�
Press memory buttonM on the door.
�
Within three seconds press adjustment
button2 in the center console.
The parking position is stored if the
mirror does not move.iIf the mirror does move, repeat the
above steps. After the setting is stored
you can move the mirror again.
Page 102 of 376
102 Controls in detailLighting
LightingFor notes on how to switch on the head-
lamps and use the turn signals, see the
“Getting started” section (
�page 43).
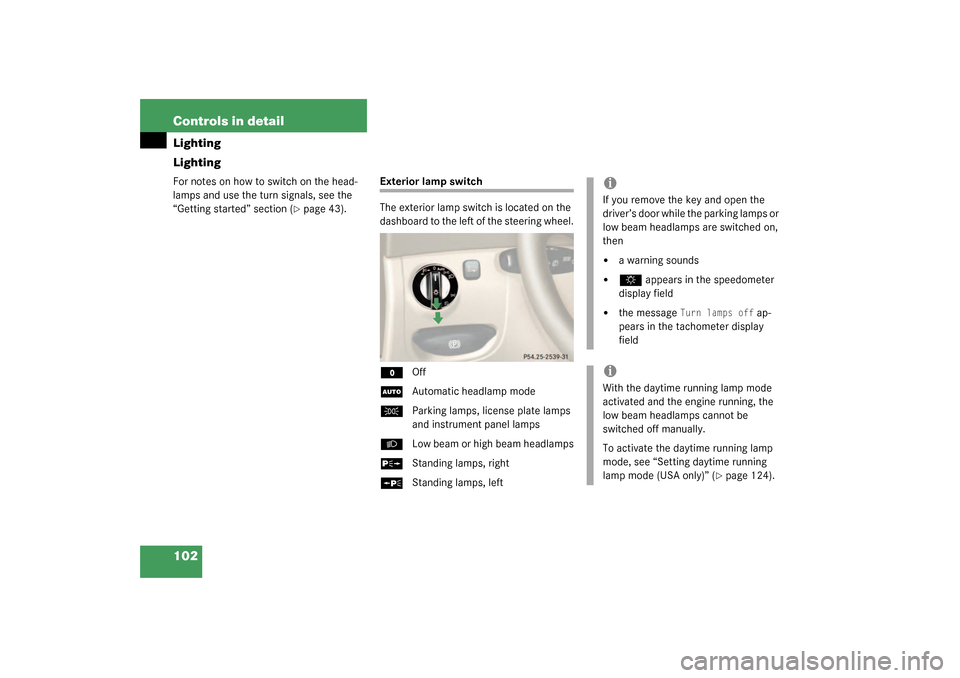
Exterior lamp switch
The exterior lamp switch is located on the
dashboard to the left of the steering wheel.M
Off
U
Automatic headlamp mode
C
Parking lamps, license plate lamps
and instrument panel lamps
B
Low beam or high beam headlamps
ˆ
Standing lamps, right
‚
Standing lamps, left
iIf you remove the key and open the
driver’s door while the parking lamps or
low beam headlamps are switched on,
then �
a warning sounds
�
$
appears in the speedometer
display field
�
the message
Turn lamps off
ap-
pears in the tachometer display
field
iWith the daytime running lamp mode
activated and the engine running, the
low beam headlamps cannot be
switched off manually.
To activate the daytime running lamp
mode, see “Setting daytime running
lamp mode (USA only)” (
�page 124).
Page 106 of 376
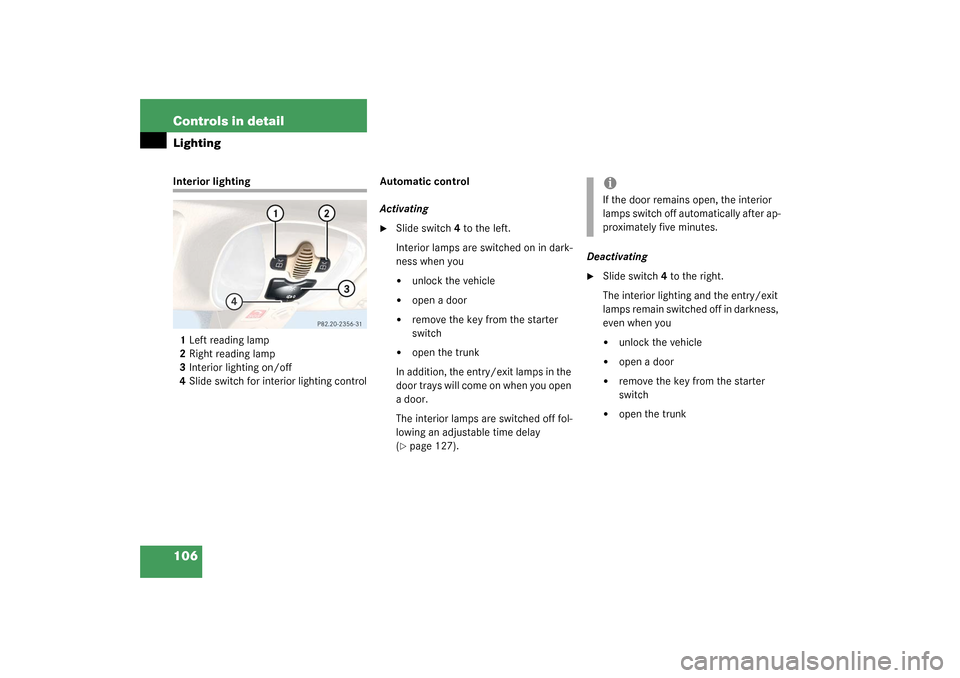
106 Controls in detailLightingInterior lighting
1Left reading lamp
2Right reading lamp
3Interior lighting on/off
4Slide switch for interior lighting controlAutomatic control
Activating
�
Slide switch4 to the left.
Interior lamps are switched on in dark-
ness when you �
unlock the vehicle
�
open a door
�
remove the key from the starter
switch
�
open the trunk
In addition, the entry/exit lamps in the
door trays will come on when you open
a door.
The interior lamps are switched off fol-
lowing an adjustable time delay
(
�page 127).Deactivating
�
Slide switch4 to the right.
The interior lighting and the entry/exit
lamps remain switched off in darkness,
even when you�
unlock the vehicle
�
open a door
�
remove the key from the starter
switch
�
open the trunk
iIf the door remains open, the interior
lamps switch off automatically after ap-
proximately five minutes.
Page 107 of 376
107 Controls in detail
Lighting
Manual control
Switching lamps on�
Press switch3.
The interior lighting switches on.
Switching lamps off
�
Press switch3 again.
The interior lighting switches off.
Courtesy lighting
For better orientation in the dark, courtesy
lamps will illuminate the interior of your ve-
hicle as follows:
With parking lamps switched on:�
the door handles
�
the driver and passenger footwells
With key in starter switch position1:
�
the door handles
�
the center console
iThe setting selected for the interior
lighting is used for the trunk lighting as
well.
If you leave the trunk lid open for an ex-
tended period of time, the trunk light-
ing will switch off automatically after
approximately ten minutes.
iIf you turn the key in the starter switch
to position0 and switch off the exterior
headlamps, the door handle lamps will
remain lit for approximately five min-
utes.
Page 110 of 376

110 Controls in detailControl system
Control systemThe control system is activated as soon as
the key in the starter switch is turned to
position1. The control system enables you
to�
call up information about your vehicle
�
change vehicle settings
For example, you can use the control sys-
tem to find out when your vehicle is next
due for service, to set the language for
messages in the instrument cluster dis-
play, and much more.
The control system relays information to
the multifunction display.
Multifunction display
The multifunction display consists of the
display fields in the speedometer and the
tachometer. In its default state, the left
display field shows the trip and main
odometer, while the present outside tem-
perature appears in the right display field.
This default setting is referred to as the
standard display.
1Main odometer
2Trip odometer
3Current gear selector lever position
4Outside temperature
5Automatic transmission program mode
Warning!
G
A driver’s attention to the road and traffic
conditions must always be his /her primary
focus when driving.
For your safety and the safety of others, se-
lecting features through the multifunction
steering wheel should only be done by the
driver when traffic and road conditions per-
mit it to be done safely.
Bear in mind that at a speed of just 30 mph
(approximately 50 km / h), your vehicle is
covering a distance of 44 feet (approximate-
ly 13.5 m) every second.