Page 272 of 376
272 Practical hintsWhat to do if …Left display
Right display
Possible cause
Possible solution
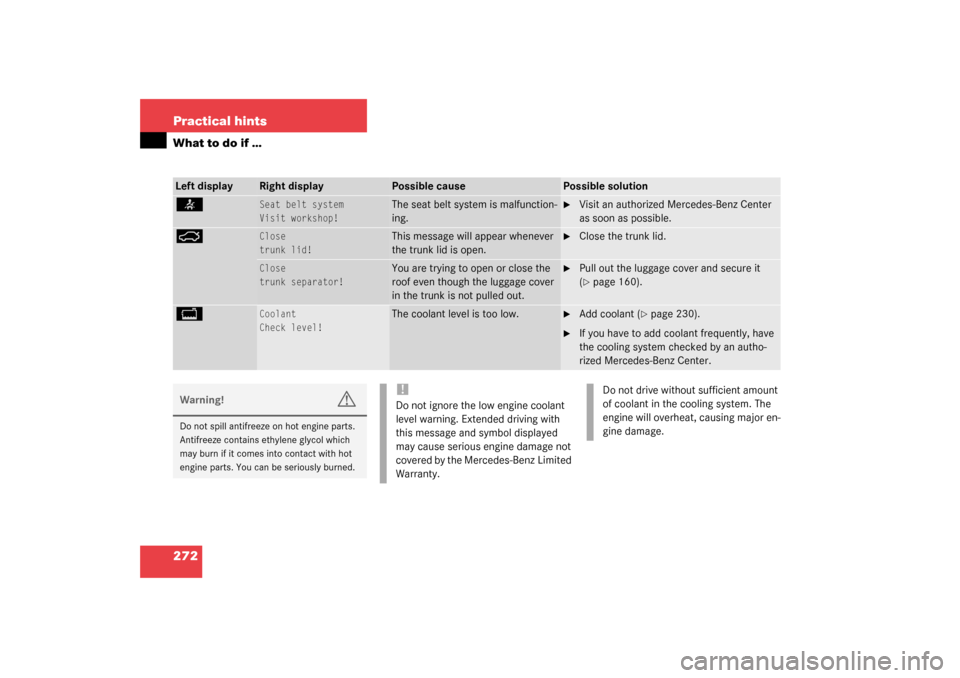
<
Seat belt system
Visit workshop!
The seat belt system is malfunction-
ing.
�
Visit an authorized Mercedes-Benz Center
as soon as possible.
Ê
Close
trunk lid!
This message will appear whenever
the trunk lid is open.
�
Close the trunk lid.
Close
trunk separator!
You are trying to open or close the
roof even though the luggage cover
in the trunk is not pulled out.
�
Pull out the luggage cover and secure it
(�page 160).
B
Coolant
Check level!
The coolant level is too low.
�
Add coolant (
�page 230).
�
If you have to add coolant frequently, have
the cooling system checked by an autho-
rized Mercedes-Benz Center.
Warning!
G
Do not spill antifreeze on hot engine parts.
Antifreeze contains ethylene glycol which
may burn if it comes into contact with hot
engine parts. You can be seriously burned.
!Do not ignore the low engine coolant
level warning. Extended driving with
this message and symbol displayed
may cause serious engine damage not
covered by the Mercedes-Benz Limited
Warranty.
Do not drive without sufficient amount
of coolant in the cooling system. The
engine will overheat, causing major en-
gine damage.
Page 288 of 376
288 Practical hintsWhere will I find ...?
Where will I find ...?First aid kit
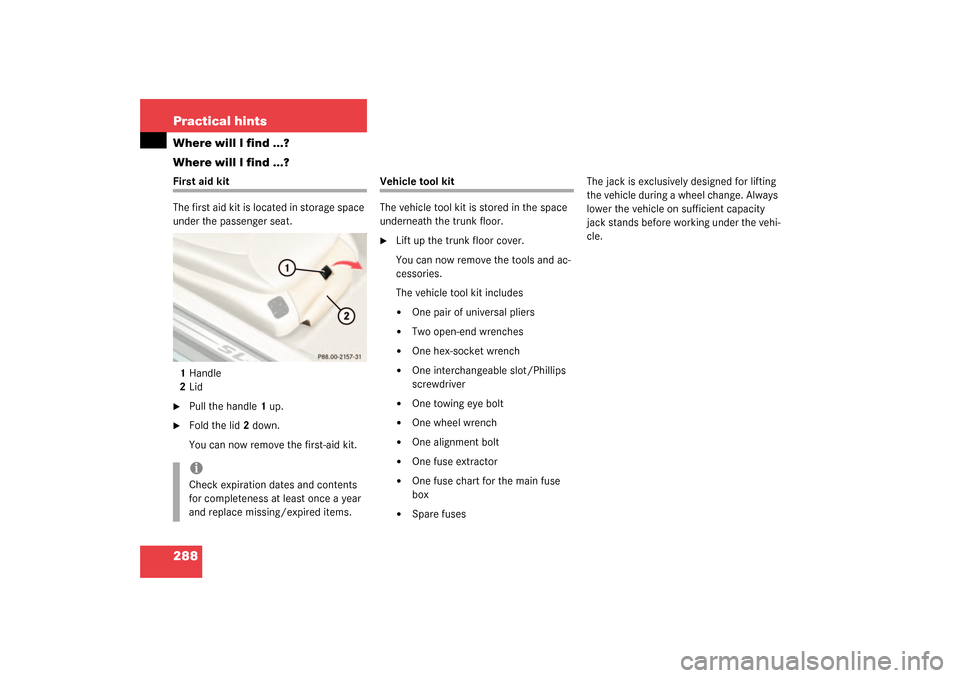
The first aid kit is located in storage space
under the passenger seat.
1Handle
2Lid�
Pull the handle 1 up.
�
Fold the lid 2 down.
You can now remove the first-aid kit.
Vehicle tool kit
The vehicle tool kit is stored in the space
underneath the trunk floor.�
Lift up the trunk floor cover.
You can now remove the tools and ac-
cessories.
The vehicle tool kit includes�
One pair of universal pliers
�
Two open-end wrenches
�
One hex-socket wrench
�
One interchangeable slot/Phillips
screwdriver
�
One towing eye bolt
�
One wheel wrench
�
One alignment bolt
�
One fuse extractor
�
One fuse chart for the main fuse
box
�
Spare fusesThe jack is exclusively designed for lifting
the vehicle during a wheel change. Always
lower the vehicle on sufficient capacity
jack stands before working under the vehi-
cle.
iCheck expiration dates and contents
for completeness at least once a year
and replace missing/expired items.
Page 291 of 376
291 Practical hints
Locking/unlocking in an emergency
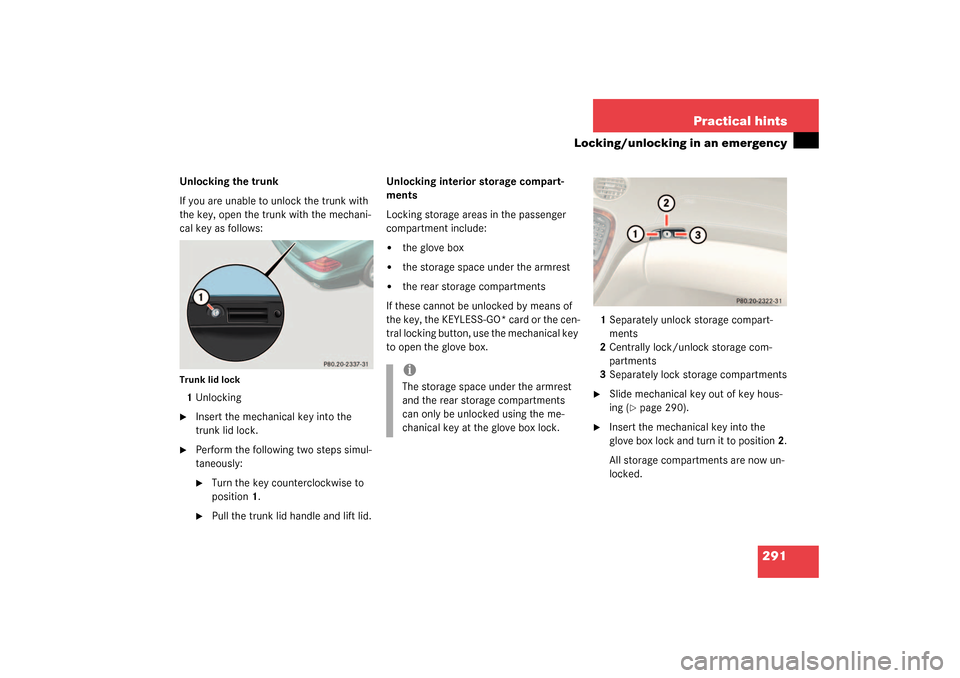
Unlocking the trunk
If you are unable to unlock the trunk with
the key, open the trunk with the mechani-
cal key as follows:Trunk lid lock1Unlocking�
Insert the mechanical key into the
trunk lid lock.
�
Perform the following two steps simul-
taneously:�
Turn the key counterclockwise to
position 1.
�
Pull the trunk lid handle and lift lid.Unlocking interior storage compart-
ments
Locking storage areas in the passenger
compartment include:
�
the glove box
�
the storage space under the armrest
�
the rear storage compartments
If these cannot be unlocked by means of
the key, the KEYLESS-GO* card or the cen-
tral locking button, use the mechanical key
to open the glove box.1Separately unlock storage compart-
ments
2Centrally lock/unlock storage com-
partments
3Separately lock storage compartments
�
Slide mechanical key out of key hous-
ing (
�page 290).
�
Insert the mechanical key into the
glove box lock and turn it to position 2.
All storage compartments are now un-
locked.
iThe storage space under the armrest
and the rear storage compartments
can only be unlocked using the me-
chanical key at the glove box lock.
Page 292 of 376
292 Practical hintsLocking/unlocking in an emergencyLocking the vehicle
If you are unable to lock the vehicle with
the electronic key, lock it with the mechan-
ical key as follows:�
Close the passenger door and the
trunk.
�
Press the central locking switch in the
cockpit (
�page 91).
�
Check to see whether the locking knob
on the passenger door is still visible. If
necessary push it down manually.
�
Lock the driver’s door with the me-
chanical key.
�
Lock the trunk if necessary with the
mechanical key (
�page 83).Lowering the Easy Pack feature
manually
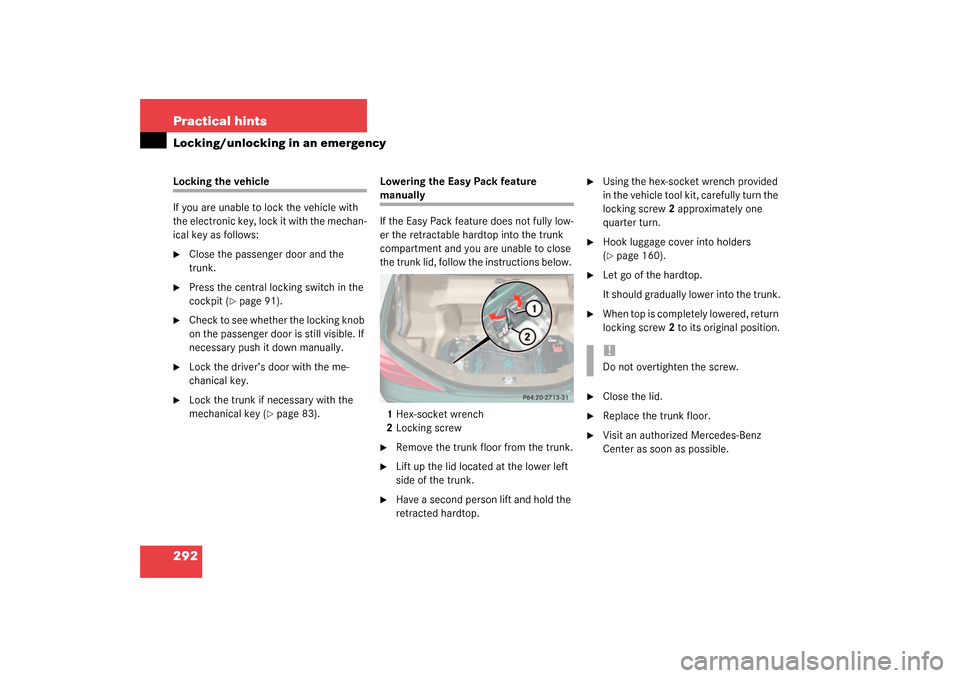
If the Easy Pack feature does not fully low-
er the retractable hardtop into the trunk
compartment and you are unable to close
the trunk lid, follow the instructions below.
1Hex-socket wrench
2Locking screw�
Remove the trunk floor from the trunk.
�
Lift up the lid located at the lower left
side of the trunk.
�
Have a second person lift and hold the
retracted hardtop.
�
Using the hex-socket wrench provided
in the vehicle tool kit, carefully turn the
locking screw 2 approximately one
quarter turn.
�
Hook luggage cover into holders
(�page 160).
�
Let go of the hardtop.
It should gradually lower into the trunk.
�
When top is completely lowered, return
locking screw 2 to its original position.
�
Close the lid.
�
Replace the trunk floor.
�
Visit an authorized Mercedes-Benz
Center as soon as possible.!Do not overtighten the screw.
Page 299 of 376

299 Practical hints
Replacing bulbs
�
Turn the locking mechanism 2 clock-
wise.
�
Plug the connector onto the bulb.
�
Align headlamp cover and click into
place.
Replacing parking and standing lamp
bulbs
�
Switch off the lights.
�
Open the hood (
�page 227).
�
Press ends of headlamp cover tab to-
gether and remove cover.
�
Pull out the bulb socket with the bulb.
�
Pull the bulb out of the bulb socket.
�
Insert a new bulb in the socket.
�
Reinstall the bulb socket.
�
Align headlamp cover and click into
place.Replacing side marker lamp
�
Switch off the lights.
�
Carefully slide lamp towards rear.
�
Remove front end first.
�
Twist bulb socket counterclockwise
and pull out.
�
Pull bulb out of the bulb socket.
�
Insert new bulb in socket.
�
Reinstall bulb socket, push in, and twist
clockwise.
�
To reinstall lamp, set rear end in
bumper and let front end snap into
place.
Replacing bulbs for rear lamps
Tail lamp assemblies
1Backup lamp
2Turn signal lamp
3Driver’s side: Rear fog lamp
Passenger’s side: Substitute lamp�
Switch off the lights.
�
Open the trunk lid (
�page 83).
�
Fold trim to side and remove.
�
Twist bulb socket counterclockwise
and pull out.
iHave the headlamp adjustment
checked regularly.
��
Page 302 of 376
302 Practical hintsFlat tire
Flat tireYour vehicle is equipped with a TIREFIT kit
(SL 55 AMG only) or a spare wheel
(SL 500 only).
You can identify which TIREFIT kit
(SL 55 AMG only) you have as follows:�
The TIREFIT container of kit 1 is a
squeeze container.
�
The TIREFIT container of kit 2 is a rigid
container.
Preparing the vehicle�
Park the vehicle as far as possible from
moving traffic on a hard surface.
�
Turn on the hazard warning flashers.
�
Engage the steering wheel lock in the
straight ahead position and set the
parking brake.
�
Move the selector lever to P.
�
Have any passenger exit the vehicle at
a safe distance from the roadway.
Sealing tires with TIREFIT kit 1
Small tire punctures, particularly those in
the tread, can be sealed with TIREFIT.
TIREFIT can be used in ambient tempera-
tures down to -4°F (-20°C).The TIREFIT kit stored in the trunk contains
the TIREFIT container, a filler hose, a valve
stem tool, a valve, and a sticker.Warning!
G
Keep TIREFIT away from sparks, open flame
or heat source.
Do not smoke.
Warning!
G
TIREFIT is a limited repair device. TIREFIT
cannot be used for cuts or punctures larger
than approx. 0.16 in (4 mm) and tire dam-
age caused by driving with extremely low
tire pressure, or on a flat tire, or a damaged
wheel.
Do not drive the vehicle under such circum-
stances.
Contact your nearest Mercedes-Benz Cen-
ter for assistance or call Roadside
Assistance.
Page 305 of 376
305 Practical hints
Flat tire
�
Drive the vehicle back and forth very
slowly approximately 30 ft (10 m).
This distributes the TIREFIT sealant ma-
terial inside the tire.
�
Take the electric air pump out of the
trunk.
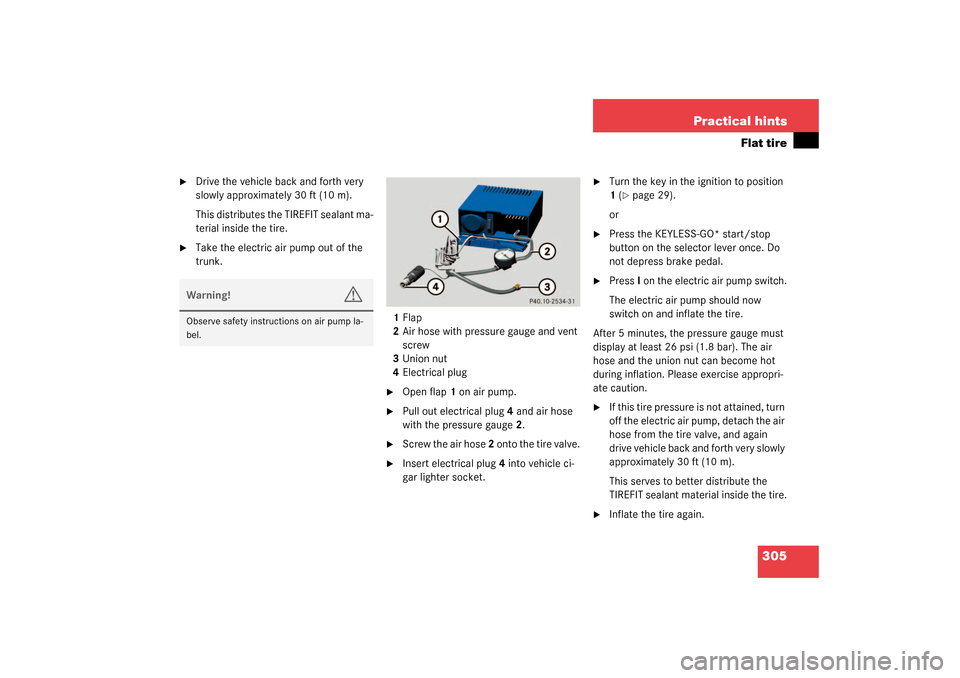
1Flap
2Air hose with pressure gauge and vent
screw
3Union nut
4Electrical plug
�
Open flap 1 on air pump.
�
Pull out electrical plug 4 and air hose
with the pressure gauge 2.
�
Screw the air hose 2 onto the tire valve.
�
Insert electrical plug 4 into vehicle ci-
gar lighter socket.
�
Turn the key in the ignition to position
1 (
�page 29).
or
�
Press the KEYLESS-GO* start/stop
button on the selector lever once. Do
not depress brake pedal.
�
Press I on the electric air pump switch.
The electric air pump should now
switch on and inflate the tire.
After 5 minutes, the pressure gauge must
display at least 26 psi (1.8 bar). The air
hose and the union nut can become hot
during inflation. Please exercise appropri-
ate caution.
�
If this tire pressure is not attained, turn
off the electric air pump, detach the air
hose from the tire valve, and again
drive vehicle back and forth very slowly
approximately 30 ft (10 m).
This serves to better distribute the
TIREFIT sealant material inside the tire.
�
Inflate the tire again.
Warning!
G
Observe safety instructions on air pump la-
bel.
Page 306 of 376
306 Practical hintsFlat tire�
Press 0 on the electric air pump switch.
�
Turn the key in the ignition to
position0.
or
�
Press KEYLESS-GO* start/stop button
on the selector lever twice. Do not de-
press brake pedal.
The electric air pump should now be
switched off.
�
Detach the electric air pump.
The air hose may still be hot. Please ex-
ercise appropriate caution.
�
Store the electrical plug and the air
hose behind the flap and place the air
pump back in the trunk.
�
Close the trunk lid.
�
Drive away immediately.
The TIREFIT sealant will distribute itself
evenly inside the tire.
�
After driving vehicle for an initial
10 minutes, check tire pressure using
the pressure gauge on the air pump.
!Do not operate the electric air pump
longer than eight minutes without in-
terruption. Otherwise it may overheat.
You may operate the air pump again af-
ter it has cooled off.
Warning!
G
If a tire pressure of 26 psi (1.8 bar) is not at-
tained, tire is too severely damaged for
TIREFIT to provide a reliable tire repair.
In this case, TIREFIT cannot properly seal
the tire.
Do not drive the vehicle.
Contact the nearest Mercedes-Benz Center
or call Roadside Assistance.
Warning!
G
Do not exceed vehicle speed of
50 mph (80 km / h). A TIREFIT repair is not
designed to operate at higher speeds.
The sticker must be attached on the instru-
ment cluster where it will be easily seen by
the driver.
Vehicle handling characteristics may
change. Adapt your driving accordingly.