Page 89 of 376

89 Controls in detail
Locking and unlocking
Loss of KEYLESS-GO-card
If you lose your KEYLESS-GO card, you
should do the following:�
Have the KEYLESS-GO card deactivat-
ed by an authorized Mercedes-Benz
Center.
�
Report the loss immediately to your car
insurance company.
�
Have the mechanical lock replaced if
necessary.
Your authorized Mercedes-Benz Center
will be glad to supply you with a replace-
ment.
Opening the doors from the inside
You can open a locked door from the in-
side. Open door only when conditions are
safe to do so.
1Locking knob
2Inside door handle�
Pull on the door handle2.
If door was locked, the locking knob1
will move up.
Opening the trunk from the inside
You can open the trunk from the inside if
the vehicle is stationary and the retract-
able hardtop is fully opened or closed. The
switch is located on the driver’s door.
1Remote trunk lid release switch
2Indicator lamp
iIf you open a door, the side windows on
that side of the vehicle will lower slight-
ly. The windows close again when you
close the door.
Page 91 of 376

91 Controls in detail
Locking and unlocking
Closing the trunk lid
1Handle�
Lower trunk lid by pulling firmly on
handle1.
Automatic central locking
The doors and the trunk lid automatically
lock when the vehicle is set into motion.
You can open a locked door from the in-
side. Open door only when conditions are
safe to do so.
You can deactivate the automatic locking
using the control system (
�page 128).
Warning!
G
To prevent possible personal injury, always
keep hands and fingers away from the trunk
opening when closing the trunk lid. Be espe-
cially careful when small children are
around.
iTo prevent an inadvertent lockout, do
not place the key in the trunk.
Vehicles with KEYLESS-GO*: To pre-
vent a possible inadvertent lockout, the
trunk lid will open automatically if a
KEYLESS-GO card is recognized inside
the trunk.
When the hardtop is retracted, it must
be completely lowered in the trunk be-
fore the trunk lid can be closed
(�page 199).
Warning!
G
Only drive with the trunk closed as, among
other dangers such as visibility blockage,
exhaust fumes may enter the vehicle interi-
or.
iThe doors unlock automatically after an
accident if the force of the impact ex-
ceeds a preset threshold.
The vehicle automatically locks when
the ignition is switched on and the
wheels are turning at vehicle speeds of
approximately 9 mph (15 km/h) or
more. You could therefore lock yourself
out when the vehicle �
is pushed
�
is on a test stand
Page 92 of 376

92 Controls in detailLocking and unlockingLocking and unlocking from the inside
You can lock or unlock the vehicle from in-
side using the central locking switches.
This can be useful, for example, if you want
to unlock the passenger door from the in-
side or want to lock the vehicle before
starting to drive.
The switches are located above and be-
tween the center air vents of the air condi-
tioning.
Central locking switches1Locking
2Unlocking
Locking�
Press central locking switch1.
If all the doors are closed, the vehicle
locks.
Unlocking
�
Press central locking switch2.
The vehicle unlocks.
iYou can open a locked door from inside
at any time. Open door only when con-
ditions are safe to do so.
If you have locked the vehicle with the
key or the KEYLESS-GO* card, the cen-
tral locking switches do not work.
iIf the vehicle was previously centrally
locked using the SmartKey or the
KEYLESS-GO* card, it will not unlock
using the central locking switch.Warning!
G
When leaving the vehicle, always remove the
key from the starter switch, take the KEY-
LESS-GO
* card (if so equipped) with you
and lock the vehicle. Do not leave children
unattended in the vehicle, or with access to
an unlocked vehicle. Unsupervised use of
vehicle equipment may cause an accident
and/or serious personal injury.
Page 99 of 376

99 Controls in detail
Memory function
Memory function
With the memory switch you can store up
to three different settings per key and KEY-
LESS-GO* card.
The following settings are saved for each
stored position:�
Driver’s seat and backrest position
�
Steering wheel position
�
Inside rear view mirror position
�
Driver’s side exterior rear view mirror
position
�
Passenger side exterior rear view mir-
ror position
These key dependent memory settings can
be deactivated if desired (
�page 130).The memory switch is located on the door.
MMemory button
1, 2, 3Stored positions
�
Be sure that the ignition is switched on
or one door is open.
All the lamps in the instrument cluster
light up when the ignition is switched
on.
!Prior to operating the vehicle, the driv-
er should check and adjust the seat
height, seat position fore and aft, and
seat backrest angle if necessary, to en-
sure adequate control, reach and com-
fort. The head restraint should also be
adjusted for proper height. Also see air-
bag section (
�page 53) for proper seat
positioning.
In addition, adjust the steering wheel to
ensure adequate control, reach, opera-
tion and comfort. Both the inside and
outside rear view mirrors should be ad-
justed for adequate rear vision.
Fasten seat belts. Infants and small
children should be seated in a properly
secured restraint system that complies
with U.S. Federal Motor Vehicle Safety
Standard 213 and Canadian Motor Ve-
hicle Safety Standard 213.
Warning!
G
Do not activate the memory function while
driving. Activating the memory function
while driving could cause the driver to lose
control of the vehicle.
Page 100 of 376
.
�
Press memory buttonM.
�
Release mem")
100 Controls in detailMemory functionStoring positions into memory�
Adjust the seats, steering wheel and
rear view mirrors to the desired posi-
tion (
�page 32).
�
Press memory buttonM.
�
Release memory button and press a
stored position button1, 2, or3 within
three seconds.
All the settings are stored at the select-
ed position.
Recalling positions from memory�
On memory switch, press and hold
stored position button1, 2 or3 until
the seat, steering wheel and rear view
mirrors have fully moved to the stored
positions.
Storing parking position
For easier parking you can adjust the pas-
senger exterior rear view mirror so that you
can see the right rear wheel as soon as you
engage reverse gearR.
The exterior rear view mirror returns to its
stored driving position:�
10 seconds after you put the gear se-
lector lever in positionD
�
immediately once you exceed a speed
of approx. 6 mph (10 km/h)
�
immediately when you press the button
for driver’s side mirror
iReleasing the button immediately
stops movement to the stored posi-
tions.
iThe mirror parking position feature
(�page 131) must be activated and the
passenger side exterior rear view mirror
(�page 35) must be selected at the
time in order for the system to recall the
stored mirror position when reverse
gearR is engaged.
Page 102 of 376
102 Controls in detailLighting
LightingFor notes on how to switch on the head-
lamps and use the turn signals, see the
“Getting started” section (
�page 43).
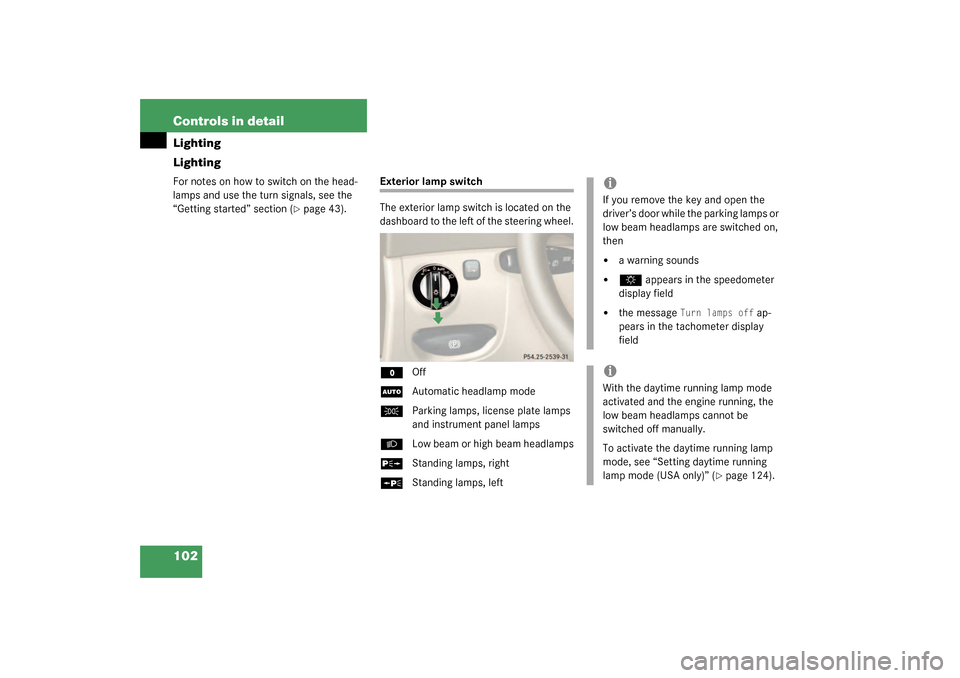
Exterior lamp switch
The exterior lamp switch is located on the
dashboard to the left of the steering wheel.M
Off
U
Automatic headlamp mode
C
Parking lamps, license plate lamps
and instrument panel lamps
B
Low beam or high beam headlamps
ˆ
Standing lamps, right
‚
Standing lamps, left
iIf you remove the key and open the
driver’s door while the parking lamps or
low beam headlamps are switched on,
then �
a warning sounds
�
$
appears in the speedometer
display field
�
the message
Turn lamps off
ap-
pears in the tachometer display
field
iWith the daytime running lamp mode
activated and the engine running, the
low beam headlamps cannot be
switched off manually.
To activate the daytime running lamp
mode, see “Setting daytime running
lamp mode (USA only)” (
�page 124).
Page 103 of 376

103 Controls in detail
Lighting
Manual headlamp mode
The low beam headlamps and parking
lamps can be switched on or off with the
exterior lamp switch.
Automatic headlamp mode
The parking lamps, low beam headlamps
and license plate lamps switch on and off
automatically depending on the brightness
of the ambient light.
�
Turn the exterior lamp switch to
U
.Daytime running lamp mode
�
Turn exterior lamp switch to
position
M
or
U
.
When the engine is running, the low
beam headlamps are automatically
switched on. In low ambient light con-
ditions the parking lamps will also
switch on.
Canada only:
When you shift from a driving position to
positionN orP, the low beam switches off
(3 minutes delay).
For nighttime driving you should turn the
exterior lamp switch to position
B
to
permit activation of the high beam head-
lamps.
Warning!
G
In automatic headlamp mode, the head-
lamps will not be automatically switched on
under foggy conditions. To minimize risk to
you and to others, activate headlamps by
turning exterior lamp switch to
B
.
The driver is responsible for the operation of
the vehicle’s lights at all times. The automat-
ic headlamp feature is only an aid to the driv-
er. Switch on the vehicle lights manually
when driving or when traffic conditions re-
quire you to do so.
iWith the daytime running lamp mode
activated, the low beam headlamps will
not be switched off automatically.iFront fog lamps and rear fog lamp can
not be switched on manually with exte-
rior lamp switch in position
U
. To
activate the fog lamps turn exterior
lamp switch to position
B
.
iIf you drive in countries where vehicles
drive on the other side of the road than
the country where the vehicle is regis-
tered, you must have the headlamps
modified for symmetrical low beams.
Relevant information can be obtained
at your authorized Mercedes-Benz Cen-
ter.
Page 107 of 376
107 Controls in detail
Lighting
Manual control
Switching lamps on�
Press switch3.
The interior lighting switches on.
Switching lamps off
�
Press switch3 again.
The interior lighting switches off.
Courtesy lighting
For better orientation in the dark, courtesy
lamps will illuminate the interior of your ve-
hicle as follows:
With parking lamps switched on:�
the door handles
�
the driver and passenger footwells
With key in starter switch position1:
�
the door handles
�
the center console
iThe setting selected for the interior
lighting is used for the trunk lighting as
well.
If you leave the trunk lid open for an ex-
tended period of time, the trunk light-
ing will switch off automatically after
approximately ten minutes.
iIf you turn the key in the starter switch
to position0 and switch off the exterior
headlamps, the door handle lamps will
remain lit for approximately five min-
utes.