Page 85 of 376

85 Controls in detail
Locking and unlocking
Important notes on using KEYLESS-GO*�
Always carry the KEYLESS-GO card
with you.
�
Never store the KEYLESS-GO card to-
gether with:�
electronic items such as a cellular
phone or another KEYLESS-GO card
�
metallic objects such as coins or
metal foil
Doing so could impair the function of
the KEYLESS-GO system.
�
Always take a SmartKey with you in
case of a malfunction of the KEY-
LESS-GO system.
�
To lock or unlock the vehicle, the card
must be located outside the vehicle
within approximately 3 ft. (1 m) of a
door or the trunk lid.
�
In order to start the engine with the
KEYLESS-GO card�
the KEYLESS-GO card must be lo-
cated in the vehicle
�
all the doors must be closed
�
If you have started the engine with the
KEYLESS-GO start/stop button, you
can only turn it off again with this but-
ton, even if you have put the key in the
starter switch in the meantime.
�
This does not apply if, after starting, the
selector lever is still in positionP. The
key will then have priority over the card
and the vehicle’s electrical system will
operate according to the position of
the key in the starter switch, even stop-
ping the engine.
�
If the KEYLESS-GO card is positioned
farther away from the vehicle (e.g. in-
side clothing or briefcase) and can no
longer be recognized by the system,
the vehicle cannot be locked or the en-
gine started via the KEYLESS-GO sys-
tem.
�
If the KEYLESS-GO card is removed
from the vehicle while the ignition is
switched on (e.g. if passenger exits the
vehicle with the card), the message Chip card not recognized!
will ap-
pear in the multifunction display.
Find the card or change its present lo-
cation immediately (e.g. place it on the
front passenger seat or insert it in shirt
pocket).
�
Remember that the engine can be
started by anyone with a KEYLESS-GO
card that is left inside the vehicle. If you
leave the card behind when exiting and
locking the vehicle, the message
Chip
card still in vehicle!
will appear in
the multifunction display.
Page 102 of 376
102 Controls in detailLighting
LightingFor notes on how to switch on the head-
lamps and use the turn signals, see the
“Getting started” section (
�page 43).
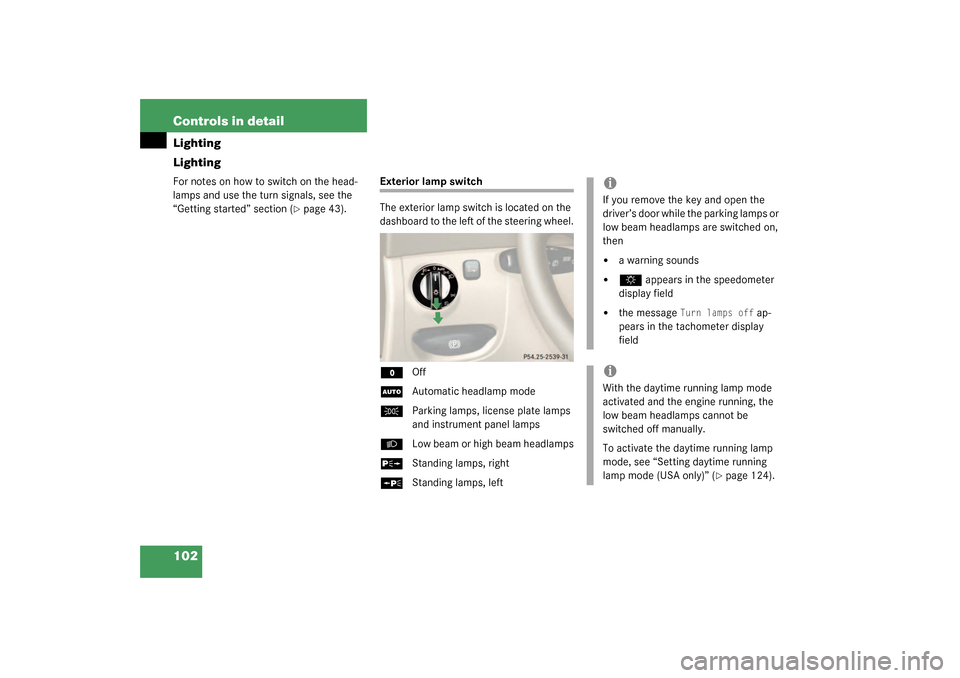
Exterior lamp switch
The exterior lamp switch is located on the
dashboard to the left of the steering wheel.M
Off
U
Automatic headlamp mode
C
Parking lamps, license plate lamps
and instrument panel lamps
B
Low beam or high beam headlamps
ˆ
Standing lamps, right
‚
Standing lamps, left
iIf you remove the key and open the
driver’s door while the parking lamps or
low beam headlamps are switched on,
then �
a warning sounds
�
$
appears in the speedometer
display field
�
the message
Turn lamps off
ap-
pears in the tachometer display
field
iWith the daytime running lamp mode
activated and the engine running, the
low beam headlamps cannot be
switched off manually.
To activate the daytime running lamp
mode, see “Setting daytime running
lamp mode (USA only)” (
�page 124).
Page 114 of 376
114 Controls in detailControl systemMenus, submenus and functions
Menu 1
Menu 2
Menu 3
Menu 4
Menu 5
Menu 6
Menu 7
Menu 8
Standard dis-
play
AUDIO
NAVI
Distronic*
Malfunction
memory
Settings
Trip computer
Telephone
Commands/submenusDigital speed-
ometer
Select radio
station
Activate
route guid-
ance
Call up set-
tings
Call up malfunc-
tion messages
Reset to factory
settings
Fuel consump-
tion statistics af-
ter start
Load phone
book
Call up FSS
Operate CD
player
Instrument clus-
ter submenu
Fuel consump-
tion statistics
since the last re-
set
Search for
name in
phone book
Check tire
pressure*
Lighting sub-
menu
Call up range
Check engine
oil level
Vehicle sub-
menuConvenience
submenu
Page 137 of 376
.
Your transmiss")
137 Controls in detail
Automatic transmission
Automatic transmission
Information for driving with an automatic
transmission is found in the “Getting start-
ed” section (
�page 39).
Your transmission adapts its gear shifting
process to your individual driving style by
continually adjusting the shift points up or
down. These shift point adjustments are
performed based on current operating and
driving conditions.
If the operating conditions change the au-
tomatic transmission reacts by adjusting
its gear shift program.The automatic transmission selects indi-
vidual gears automatically, dependent
upon
�
the selector lever positionD with gear
ranges4, 3, 2, 1 (
�page 139)
�
the selected shift program
(S/W)(
�page 141)
�
the position of the accelerator pedal
(�page 142)
�
the vehicle speed
The current selector lever position and
shift program (S/W) appear in the
tachometer display (
�page 110).When the selector lever is in positionD,
you can influence transmission shifting by
�
limiting the gear range
�
changing gears yourselfWarning!
G
It is dangerous to shift the selector lever out
ofP orN if the engine speed is higher than
idle speed. If your foot is not firmly on the
brake pedal, the vehicle could accelerate
quickly forward or reverse. You could lose
control of the vehicle and hit someone or
something. Only shift into gear when the en-
gine is idling normally and when your right
foot is firmly on the brake pedal.
Page 141 of 376

141 Controls in detail
Automatic transmission
Program mode selector switch
1Program mode selector switch
S Standard For regular driving
W Winter For winter driving�
Press the program mode selector
switch repeatedly until the letter of the
desired shift program appears in the ta-
chometer display field (
�page 109).
Select
Wfor winter driving:
�
The vehicle starts out in second
gear (both forward and reverse) for
gentler starts. This does not apply if
full throttle is applied or gear
range1 is selected.
�
Traction and driving stability are im-
proved on icy roads.
�
Upshifts occur earlier even when you
give more gas. The engine then oper-
ates at lower rpms and the wheels are
less likely to spin.�
The power transmission ratio for se-
lector lever positionR changes de-
pending on the program mode
selected (
W or
S).
Warning!
G
When leaving the vehicle, always remove the
key from the starter switch, take the KEY-
LESS-GO
* card (if so equipped) with you
and lock the vehicle. Do not leave children
unattended in the vehicle, or with access to
an unlocked vehicle. Children could move
the selector lever from positionP, which
could result in an accident and/or serious
personal injury.
Page 143 of 376

143 Controls in detail
Automatic transmission
Activating steering wheel gearshift
control�
Press the program mode selector
switch repeatedly until the
Mfor manu-
al shift program appears in the tachom-
eter display field.
Automatic gear shifting is deactivated.
Upshifting
�
Press the button located on the right
side of the steering wheel.
or
�
Briefly press the selector lever to the
right in the D+direction.
The transmission shifts to the next
higher gear.
Warm up the engine smoothly. Do not
place full load on the engine until the oper-
ating temperature has been reached. Shift
into reverse gear only when the vehicle is
stopped.Downshifting
�
Press the button located on the left
side of the steering wheel.
or
�
Briefly press the selector lever to the
right in the D–direction.
The transmission shifts to the next
lower gear.Deactivating steering wheel gearshift
control
�
Press the program mode selector
switch repeatedly until
S or
W appears
in the tachometer display field.
Warning!
G
On slippery road surfaces, never downshift
in order to obtain braking action. This could
result in drive wheel slip and reduced vehi-
cle control. Your vehicle’s ABS will not pre-
vent this type of loss of control.
iAt each engine start, the transmission
will go into the last shift program mode
selected (
S or
W). Only program mode
M
is not stored and will not be recalled
when engine is restarted.
Page 144 of 376
144 Controls in detailAutomatic transmissionEmergency operation (Limp Home Mode)
If vehicle acceleration worsens or the
transmission no longer shifts, the trans-
mission is most likely operating in limp
home (emergency operation) mode. In this
mode only 2nd gear and reverse gear can
be activated.�
Stop the vehicle.
�
Move selector lever toP.
�
Turn off the engine.
�
Wait at least ten seconds before re-
starting.
�
Restart the engine.
�
Move selector lever to positionD (for
2nd gear) orR.
�
Have the transmission checked at an
authorized Mercedes-Benz Center as
soon as possible.
Page 149 of 376

149 Controls in detail
Automatic climate control
The automatic climate control is operation-
al whenever the engine is running. You can
operate the climate control system in ei-
ther the automatic or manual mode. The
system cools or heats the interior depend-
ing on the selected interior temperature
and the current outside temperature.
Nearly all dust particles, pollutants and
odors are filtered out before outside air en-
ters the passenger compartment through
the air distribution system.
Setting the temperature
Use the temperature controls1 and7 to
separately adjust the air temperature on
each side of the passenger compartment.
You should raise or lower the temperature
setting in small increments, preferably
starting at 72°F (22°C). Increasing
�
Turn the outer adjustment ring slightly
to the right.
The automatic climate control system
will correspondingly adjust the interior
air temperature.
Decreasing
�
Turn the outer adjustment ring slightly
to the left.
The automatic climate control system
will correspondingly adjust the interior
air temperature.
Warning!
G
Follow the recommended settings for heat-
ing and cooling given on the following pag-
es. Otherwise the windows could fog up,
impairing visibility and endangering you and
others.
iIf the vehicle interior is hot, ventilate
the interior before driving off.
Keep the air intake grille in front of the
windshield free of snow and debris.
When the retractable hardtop is closed,
do not obstruct air flow by placing ob-
jects on the air flow-through exhaust
slots below the rear window.
iWhen operating the climate control
system in automatic mode, you will
only rarely need to adjust the tempera-
ture, air volume and air distribution.


If vehicle acceleration worsens or the
transmission no longer shifts, the trans-
mission is most likely operating in l")