Page 195 of 376
195 Controls in detail
Useful features
Parcel net in trunk
There are three nets available in the trunk
to secure loads:�
a pocket net on each side of the right
and left trunk side walls
�
a trunk floor net
�
Pull the trunk floor net from the trunk
back wall towards the front over the
luggage.
�
Hang the hooks of the net on the eyes
on the trunk floor.Luggage compartment in the rear
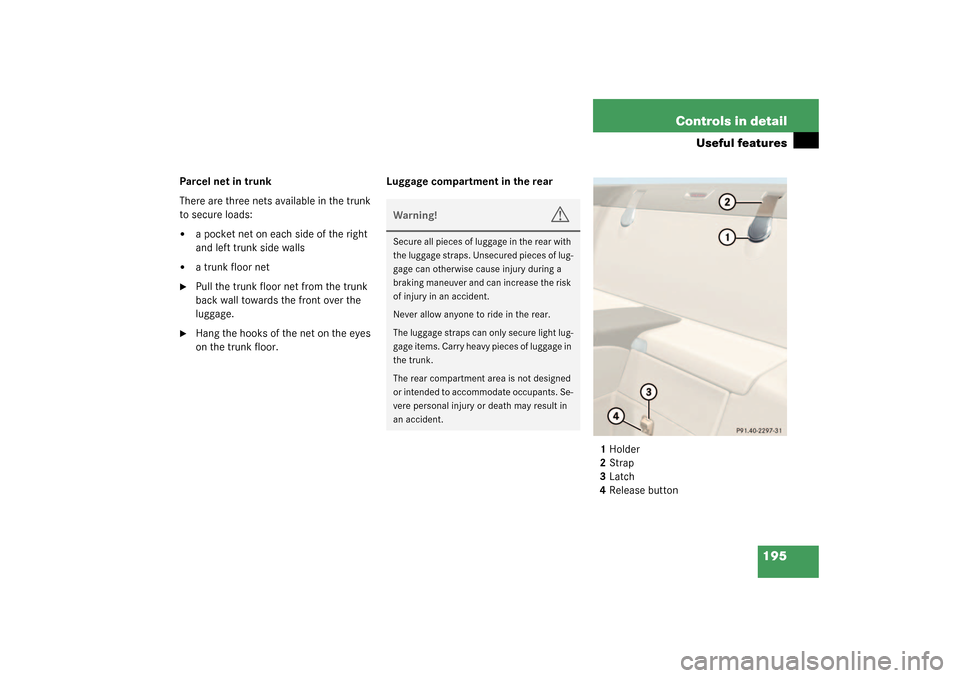
1Holder
2Strap
3Latch
4Release button
Warning!
G
Secure all pieces of luggage in the rear with
the luggage straps. Unsecured pieces of lug-
gage can otherwise cause injury during a
braking maneuver and can increase the risk
of injury in an accident.
Never allow anyone to ride in the rear.
The luggage straps can only secure light lug-
gage items. Carry heavy pieces of luggage in
the trunk.
The rear compartment area is not designed
or intended to accommodate occupants. Se-
vere personal injury or death may result in
an accident.
Page 196 of 376

196 Controls in detailUseful features�
Pull the strap2 out of the holder1.
�
Secure the luggage with the strap so
that it cannot move.
�
Insert the strap in the latch3.
Releasing the strap
�
Press the release button4 and guide
the strap back to the holder.
Ashtray
1Cover plate
2Sliding knob
Opening ashtray�
Briefly touch the cover plate1.
The ashtray opens automatically.Removing the ashtray insert
�
Secure vehicle from movement by set-
ting the parking brake. Move the selec-
tor lever to positionN.
Now you have more room to take out
the insert.
�
Press the sliding knob2 to the right.
The insert will eject a short distance.
Replacing the ashtray insert
�
Press the insert into the frame until it
snaps into place.
Warning!
G
The shelf below the rear window should not
be used to carry objects. This will avoid such
objects from being thrown about and injur-
ing vehicle occupants during an accident or
sudden maneuver.
The trunk is the preferred place to carry ob-
jects.
Warning!
G
Remove ashtray only with vehicle standing
still. Set the parking brake to secure vehicle
from movement. Move gear selector lever to
positionN. With gear selector lever in
positionN, turn off the engine.
Page 317 of 376

317 Practical hints
Flat tire
�
Press 0 on the electric air pump switch.
�
Turn the key in the ignition to
position0.
or
�
Press KEYLESS-GO* start/stop button
on the selector lever twice without de-
pressing the brake pedal.
The electric air pump should now be
switched off.
�
If the tire pressure is above 36 psi
(2.5 bar), release excess tire pressure
using the vent screw.
�
Detach the electric air pump.
�
Stow the electrical plug and the air
hose behind the flap and place the air
pump back in the trunk.
!Do not operate the air pump longer
than eight minutes without interrup-
tion. Otherwise it may overheat.
You may operate the air pump again af-
ter it has cooled off.
Warning!
G
Follow recommend inflation pressures.
Do not overinflate tires. Overinflating tires
can result in sudden deflation (blowout) be-
cause they are more likely to become punc-
tured or damaged by road debris, potholes
etc.
Do not underinflate tires. Underinflated tires
wear unevenly, adversely affect handling
and fuel economy, and are more likely to fail
from being overheated.
iThe flat tire may be transported in the
trunk when the retractable hardtop is
lowered. Use the protective sheet pro-
vided with the spare wheel. Do not ac-
tivate the tire inflation pressure
monitor until the deflated tire has been
removed from the vehicle.
Page 373 of 376
 88
Locking separately 83
Message in display 272
Ope")
373 Index
Trip computer 131
Trip odometer 21
Resetting 109
Trunk
Closing the lid 91
Easy-Pack load assist 198
Lighting 107
Lock button (KEYLESS-GO*) 88
Locking separately 83
Message in display 272
Opening from inside vehicle 89
Opening the lid 83
Parcel net 195
Trunk lid lock 291
Unlocking (KEYLESS-GO*) 88
Unlocking in an emergency 291
Unlocking separately 82
Trunk lid 82
Trunk lid emergency release 90
Trunk lighting 107
Turn signals 19, 43
Additional in mirrors 296
Front bulbs 296
Indicator lamps 21
Rear bulbs 296U
Units
Setting speedometer units 123
Setting temperature units 122
Setting tire inflation pressure
units 129
Unlocking 28
Centrally from inside 92
Driver’s door in an emergency 290
Fuel filler flap 225
Global (KEYLESS-GO* card) 86
Interior storage compartments 291
Storage compartments 194
Trunk 82, 89
Trunk (KEYLESS-GO*) 88
Trunk in an emergency 291
Vehicle in an emergency 290
With the electronic key 28
With the KEYLESS-GO* card 30, 84
Uphill driving
Cruise control 169
V
Vehicle
Individual settings 119
Locking 23
Locking in an emergency 292Minimum distance (Parktronic*) 187
Towing 325
Unlocking 23
Unlocking in an emergency 290
Vehicle level 184, 356
Changing 185
Setting 185
Automatic 185
Manual 185
Vehicle level control 356
Vehicle level control switch 24
Vehicle lighting
Checking 226
Vehicle lock status
Checking (KEYLESS-GO*) 87
Vehicle tool kit 288
Alignment bolt 288
Fuse chart 288
Fuse extractor 288
Hex-socket wrench 288
Open-end wrench 288
Screwdriver 288
Spare fuses 288
Universal pliers 288
Wheel wrench 288
Ventilation and residual heat 154