Page 43 of 376
43 Getting started
Driving
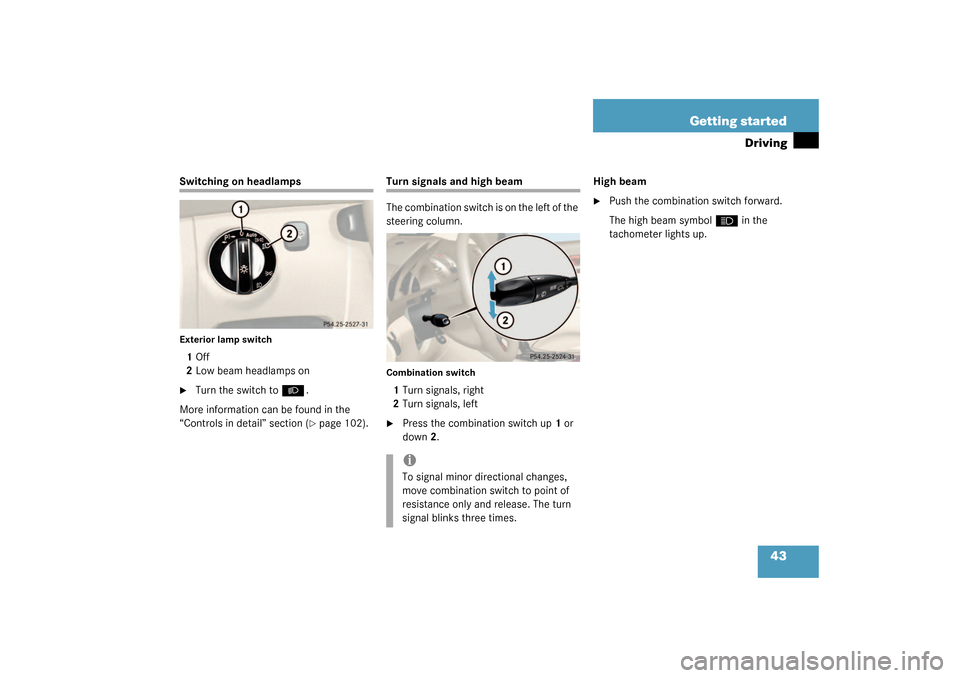
Switching on headlampsExterior lamp switch1Off
2Low beam headlamps on�
Turn the switch to
B
.
More information can be found in the
“Controls in detail” section (�page 102).
Turn signals and high beam
The combination switch is on the left of the
steering column.Combination switch1Turn signals, right
2Turn signals, left�
Press the combination switch up1 or
down2.High beam
�
Push the combination switch forward.
The high beam symbol
A
in the
tachometer lights up.
iTo signal minor directional changes,
move combination switch to point of
resistance only and release. The turn
signal blinks three times.
Page 48 of 376
.
More information can be found in the
“Controls in detail” section (
�page 102).
Turning off engin")
48 Getting startedParking and locking
Switching off headlamps�
Turn the switch to
M
(�page 43).
More information can be found in the
“Controls in detail” section (
�page 102).
Turning off engine with the key�
Place the gear selector lever inP.
�
Turn the key in the starter switch
(�page 29) to position0 and remove
it.
The immobilizer is activated.
�
Press the seat belt release button
(�page 37).
Warning!
G
When leaving the vehicle, always remove the
key from the starter switch, take the KEY-
LESS-GO
* card (if so equipped) with you
and lock the vehicle. Do not leave children
unattended in the vehicle, or with access to
an unlocked vehicle. Children could release
the parking brake and/or move the gear se-
lector lever from positionP, either of which
could result in an accident and/or serious
injury.
Warning!
G
Getting out of your vehicle with the selector
lever not fully engaged in positionP is dan-
gerous. Also, when parked on an incline,
positionP alone may not prevent your vehi-
cle from moving, possibly hitting people or
objects.
Always set the parking brake in addition to
shifting to positionP (
�page 140).
When parked on an incline, also turn front
wheel against road curb.
iAlways set the parking brake in addi-
tion to shifting to positionP.
On steep slopes, turn the front wheels
towards the road curb.
Page 49 of 376
.
The locking knobs on the doors move
down.
More information can be")
49 Getting started
Parking and locking
�
After exiting the vehicle, press the lock
button
‹
on the remote control
(
�page 28).
The locking knobs on the doors move
down.
More information can be found in the
“Controls in detail” section (
�page 80).
Turning off engine with KEYLESS-GO* �
Place the gear selector lever inP.
�
Press the KEYLESS-GO start/stop but-
ton until the engine shuts off.
With the driver's door closed, the start-
er switch is now in the position1. With
the driver's door opened, the starter
switch is set to position0, same as key
removed from starter switch
(�page 29).
�
Press the seat belt release button
(�page 37).
!If you hear a warning signal you have ei-
ther�
forgotten to turn off the lights, or
�
not put the gear selector lever inP
before opening the driver’s door.
Turn off the lights or place the gear se-
lector lever inP.
Warning!
G
To prevent possible personal injury, always
keep hands and fingers away from the door
openings when closing the doors. Be espe-
cially careful when small children are
around.
Before closing doors, make sure that there
is no possibility of someone getting caught
in a door during closing.
Page 50 of 376
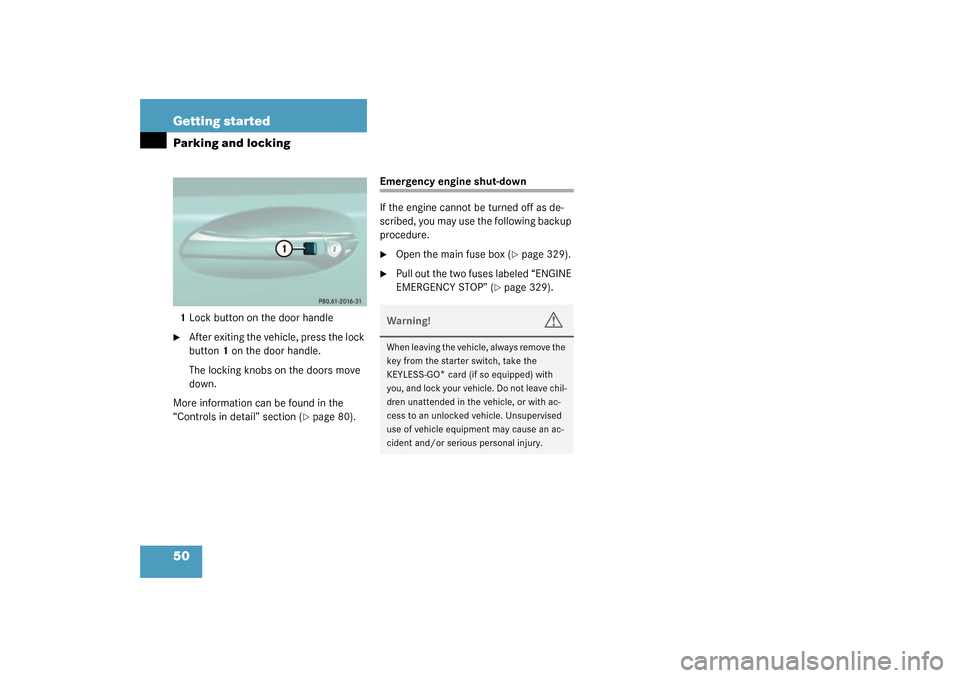
50 Getting startedParking and locking1Lock button on the door handle�
After exiting the vehicle, press the lock
button1 on the door handle.
The locking knobs on the doors move
down.
More information can be found in the
“Controls in detail” section (
�page 80).
Emergency engine shut-down
If the engine cannot be turned off as de-
scribed, you may use the following backup
procedure.�
Open the main fuse box (
�page 329).
�
Pull out the two fuses labeled “ENGINE
EMERGENCY STOP” (
�page 329).
Warning!
G
When leaving the vehicle, always remove the
key from the starter switch, take the
KEYLESS-GO
* card (if so equipped) with
you, and lock your vehicle. Do not leave chil-
dren unattended in the vehicle, or with ac-
cess to an unlocked vehicle. Unsupervised
use of vehicle equipment may cause an ac-
cident and/or serious personal injury.
Page 53 of 376
 or
side")
53 Safety and Security
Occupant safety
AirbagsWarning!
G
Airbags are designed to reduce the potential
for injury resulting from certain frontal im-
pacts (front airbags, driver-side kneebag) or
side impacts (head-thorax airbags) which
may cause significant injuries. However, no
system available today can totally eliminate
injuries and fatalities.
The activation of the SRS temporarily releas-
es a small amount of dust from the airbags.
This dust, however, is neither injurious to
your health, nor does it indicate a fire in the
vehicle. The dust might cause some tempo-
rary breathing difficulty for people with asth-
ma or other breathing trouble. To avoid this,
you may wish to get out of the vehicle as
soon as it is safe to do so. If you have any
breathing difficulty but cannot get out of the
vehicle after the airbag inflates, then get
fresh air by opening a window or door.
Warning!
G
To reduce the risk of injury when the front
airbags inflate, it is very important for the
driver and passenger to always be in a prop-
erly seated position and to wear your seat
belts.
For maximum protection in the event of a
collision always be in normal seated position
with your back against the backrest. Fasten
your seat belt and ensure that it is properly
positioned on your body (
�page 37).
Since the airbag inflates with considerable
speed and force, a proper seating and hands
on steering wheel position will help to keep
you at a safe distance from the airbag. Oc-
cupants who are unbelted, out of position or
too close to the airbag can be seriously in-
jured by an airbag as it inflates with great
force in the blink of an eye:
�
Sit properly belted in an upright position
with your back against the seat back-
rest.
�
Adjust the driver seat as far as possible
rearward, still permitting proper opera-
tion of vehicle controls. The distance
from the center of the driver’s breast-
bone to the center of the airbag cover on
the steering wheel must be at least ten
inches (25 cm) or more. You should be
able to accomplish this by a combina-
tion of adjustments to the seat and
steering wheel. If you have any prob-
lems, please see your authorized
Mercedes-Benz Center.
�
Do not lean with your head or chest
close to the steering wheel or dash-
board.
�
Keep hands on the outside of steering
wheel rim. Placing hands and arms in-
side the rim can increase the risk and
potential severity of hand / arm injury
when driver front airbag inflates.
�
Adjust the passenger seat as far as pos-
sible rearward from the dashboard when
the seat is occupied.
Page 79 of 376
79 Controls in detail
Locking and unlocking
Seats
Memory function
Lighting
Instrument cluster
Control system
Automatic transmission
Good visibility
Automatic climate control
Power windows
Retractable hardtop
Driving systems
Useful features
Page 80 of 376

80 Controls in detailLocking and unlockingIn the “Controls in detail” section you will
find detailed information on how to oper-
ate the equipment installed on your vehi-
cle. if you are already familiar with the
basic functions of your vehicle, this section
will be of particular interest to you.
To quickly familiarize yourself with the ba-
sic functions of the vehicle, refer to the
“Getting started” section of this manual.
The corresponding page numbers are giv-
en at the beginning of each segment.
Locking and unlockingKeys
Your vehicle comes supplied with two
SmartKeys with remote controls and a re-
movable mechanical key. The locking tabs
for the mechanical key portion of the two
keys are a different color to help distin-
guish each key unit.
The remote control key provides an ex-
tended operating range. To prevent theft,
however, it is advisable to only unlock the
vehicle when you are in close proximity to
it.
The key centrally locks and unlocks:�
the doors
�
the trunk lid
�
the glove box
�
the storage space under the armrest
�
the storage compartment in the rear
�
the fuel filler flap
SmartKey with remote controls1‹
Lock button
2
Š
Unlock button for the trunk lid
3Mechanical key locking tab
4
Œ
Unlock button
5Battery check lamp
6
Â
Panic button (
�page 67)
iYou can also open and close the re-
tractable hardtop using the key
(�page 163).
Page 81 of 376

81 Controls in detail
Locking and unlocking
Factory setting
Global unlocking�
Press button
Œ
.
All turn signals blink once. The locking
knobs in the doors move up.
The vehicle will lock again automatically
within approximately 40 seconds of un-
locking if neither door nor trunk is opened.
Global locking
�
Press button
‹
.
All turn signals blink three times. The lock-
ing knobs in the doors move down.Individual setting
If you frequently travel alone, you may wish
to reprogram the key so that
pressing
Œ
only unlocks the driver’s
door, interior lockable storage compart-
ments and the fuel filler flap.
�
Press and hold buttons
Œ
and
‹
simultaneously for about six seconds
until the battery check lamp5 blinks
twice.
The key will then function as follows:
Unlocking driver’s door
�
Press button
Œ
once.
Global unlocking
�
Press button
Œ
twice.
Global locking
�
Press button
‹
.Restoring to factory setting
�
Press and hold buttons
Œ
and
‹
simultaneously for about six seconds
until the battery check lamp5 blinks
twice.
!To prevent possible malfunction, avoid
exposing the key to high levels of elec-
tromagnetic radiation.
Warning!
G
When leaving the vehicle, always remove the
key from the starter switch, take the KEY-
LESS-GO
* card (if so equipped) with you
and lock the vehicle. Do not leave children
unattended in the vehicle, or with access to
an unlocked vehicle. It is possible for chil-
dren to open a locked door from the inside,
which could result in an accident or serious
injury.