Page 300 of 376
300 Practical hintsReplacing bulbs�
Gently push bulb into socket, turn
counterclockwise and remove.
�
Insert new bulb and reinstall bulb sock-
et.
The bulb socket should audibly click
into place.
�
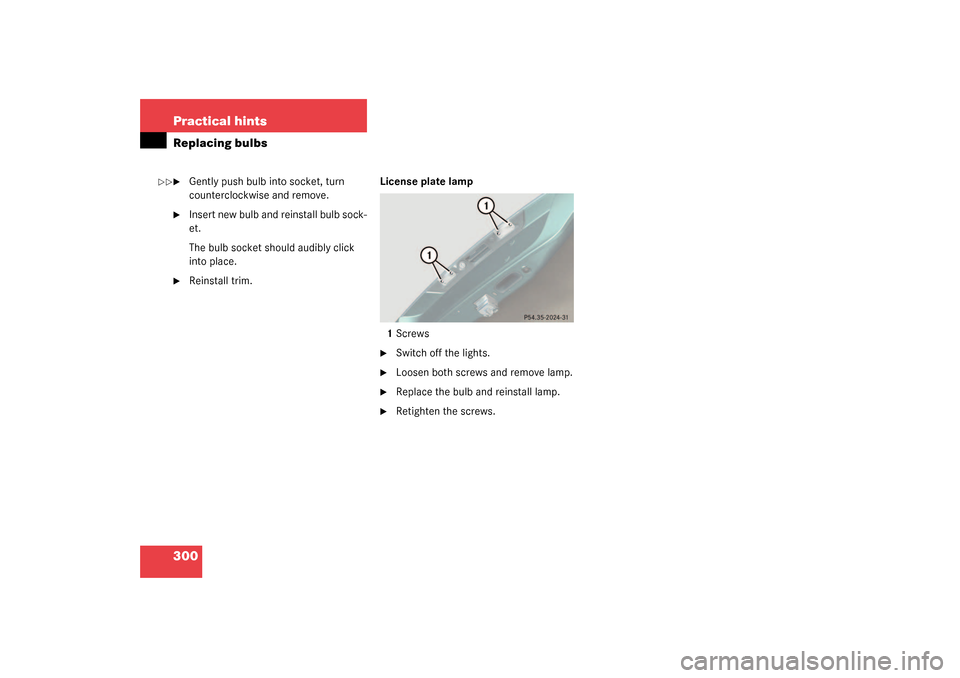
Reinstall trim.License plate lamp
1Screws
�
Switch off the lights.
�
Loosen both screws and remove lamp.
�
Replace the bulb and reinstall lamp.
�
Retighten the screws.
��
Page 305 of 376
.
This distributes the TIREFIT sealant ma-
terial inside the tire.
�
Take the electric air pump")
305 Practical hints
Flat tire
�
Drive the vehicle back and forth very
slowly approximately 30 ft (10 m).
This distributes the TIREFIT sealant ma-
terial inside the tire.
�
Take the electric air pump out of the
trunk.
1Flap
2Air hose with pressure gauge and vent
screw
3Union nut
4Electrical plug
�
Open flap 1 on air pump.
�
Pull out electrical plug 4 and air hose
with the pressure gauge 2.
�
Screw the air hose 2 onto the tire valve.
�
Insert electrical plug 4 into vehicle ci-
gar lighter socket.
�
Turn the key in the ignition to position
1 (
�page 29).
or
�
Press the KEYLESS-GO* start/stop
button on the selector lever once. Do
not depress brake pedal.
�
Press I on the electric air pump switch.
The electric air pump should now
switch on and inflate the tire.
After 5 minutes, the pressure gauge must
display at least 26 psi (1.8 bar). The air
hose and the union nut can become hot
during inflation. Please exercise appropri-
ate caution.
�
If this tire pressure is not attained, turn
off the electric air pump, detach the air
hose from the tire valve, and again
drive vehicle back and forth very slowly
approximately 30 ft (10 m).
This serves to better distribute the
TIREFIT sealant material inside the tire.
�
Inflate the tire again.
Warning!
G
Observe safety instructions on air pump la-
bel.
Page 309 of 376

309 Practical hints
Flat tire
1TIREFIT container
2Flap
3Notch
4Electrical plug
5Air hose
6Flange�
Open flap2 on the electric air pump.
�
Pull plug4 and air hose5 out of the
pump housing.
�
Screw the air pump’s air hose5 onto
flange6 of the TIREFIT container.
�
Stick TIREFIT container1 upside down
into notch3 of the electric air pump.
7Tire valve
8Electric air pump switch
9Air hose with pressure gauge and vent
screw
10Filler hose
�
Unscrew the valve cap from tire
valve7.
�
Screw filler hose10 onto tire valve7.
�
Insert electrical plug4 into vehicle cig-
arette lighter socket.
�
Turn the key in the ignition to
position1 (
�page 29).
or
�
Press the KEYLESS-GO* start/stop
button (
�page 30) on the selector le-
ver once. Do not depress brake pedal.
�
PressI on electric air pump switch8.
The electric air pump should now
switch on and inflate the tire.
iIf sealant has leaked out, let it dry. You
can then peel it off.
Warning!
G
Observe safety instructions on air pump la-
bel.
!Do not operate the electric air pump
longer than eight minutes without in-
terruption. Otherwise it may overheat.
You may operate the air pump again af-
ter it has cooled off.
Page 316 of 376
.
1Flap
2Air hose with pressure gauge and vent
screw
3Union nut
4Electrical plug
�
Open")
316 Practical hintsFlat tireInflating the spare tire�
Take the electric air pump out of the
trunk (
�page 289).
1Flap
2Air hose with pressure gauge and vent
screw
3Union nut
4Electrical plug
�
Open flap 1 on air pump.
�
Pull out the electrical plug 4 and air
hose with the pressure gauge 2.
�
Remove the valve cap from the tire
valve.
�
Screw the air hose 2 onto the tire valve.
�
Insert electrical plug 4 into vehicle ci-
gar lighter socket.
�
Turn the key in the ignition to
position1.
or
�
Press the KEYLESS-GO* start/stop
button on the selector lever once with-
out depressing the brake pedal.
�
Press 1 on the electric air pump switch.
The electric air pump should now
switch on and inflate the tire.
�
Inflate the tire to approx. 36 psi
(2.5 bar).
This takes about five minutes for the
spare tire. The air hose 2 and the union
nut 3 can become hot duration infla-
tion. Exercise proper caution to avoid
burning yourself when using the equip-
ment.
!Do not lower the vehicle before inflat-
ing the spare wheel tire. Otherwise the
rim may be damaged.Warning!
G
Observe instructions on air pump label.
Page 373 of 376
 88
Locking separately 83
Message in display 272
Ope")
373 Index
Trip computer 131
Trip odometer 21
Resetting 109
Trunk
Closing the lid 91
Easy-Pack load assist 198
Lighting 107
Lock button (KEYLESS-GO*) 88
Locking separately 83
Message in display 272
Opening from inside vehicle 89
Opening the lid 83
Parcel net 195
Trunk lid lock 291
Unlocking (KEYLESS-GO*) 88
Unlocking in an emergency 291
Unlocking separately 82
Trunk lid 82
Trunk lid emergency release 90
Trunk lighting 107
Turn signals 19, 43
Additional in mirrors 296
Front bulbs 296
Indicator lamps 21
Rear bulbs 296U
Units
Setting speedometer units 123
Setting temperature units 122
Setting tire inflation pressure
units 129
Unlocking 28
Centrally from inside 92
Driver’s door in an emergency 290
Fuel filler flap 225
Global (KEYLESS-GO* card) 86
Interior storage compartments 291
Storage compartments 194
Trunk 82, 89
Trunk (KEYLESS-GO*) 88
Trunk in an emergency 291
Vehicle in an emergency 290
With the electronic key 28
With the KEYLESS-GO* card 30, 84
Uphill driving
Cruise control 169
V
Vehicle
Individual settings 119
Locking 23
Locking in an emergency 292Minimum distance (Parktronic*) 187
Towing 325
Unlocking 23
Unlocking in an emergency 290
Vehicle level 184, 356
Changing 185
Setting 185
Automatic 185
Manual 185
Vehicle level control 356
Vehicle level control switch 24
Vehicle lighting
Checking 226
Vehicle lock status
Checking (KEYLESS-GO*) 87
Vehicle tool kit 288
Alignment bolt 288
Fuse chart 288
Fuse extractor 288
Hex-socket wrench 288
Open-end wrench 288
Screwdriver 288
Spare fuses 288
Universal pliers 288
Wheel wrench 288
Ventilation and residual heat 154
Page 374 of 376
 334,
356
Voice control system* 19
Hands-free microphone 25
Voice control system+ 353
W
Warning lamps see Lamps, indicator and
warning
Warning sounds
Dist")
374 IndexVIN (vehicle identification number) 334,
356
Voice control system* 19
Hands-free microphone 25
Voice control system+ 353
W
Warning lamps see Lamps, indicator and
warning
Warning sounds
Distance warning function* 179
Distronic* 173
Warranty coverage 333
Washing the vehicle 245
Wear pattern (tires) 238
Wheel change 312
Tightening torque 318
Wind screen 165, 356
Installing 165
Removing 166
Windows see Side windows
Windshield
Refilling washer fluid 233
Washer fluid 45, 233
Washer system 233
Windshield and headlamp washer
system 347Windshield washer fluid 45
Filler neck 233
Message in display 287
Mixing ratio 347
Refilling 233
Windshield wipers 19, 44
Fast wiper speed 44
Intermittent wiping 44
Replacing wiper blades 301
Wiping with windshield washer
fluid 45
Winter driving
Snow chains 240
Tires 239
Transmission program mode 141
Winter driving instructions 221
Winter tires 239
Wrench, hex-socket (vehicle tool
kit) 288, 292
Wrench, open-end (vehicle tool kit) 288
Wrench, wheel (vehicle tool kit) 288, 289
X
Xenon headlamps 356
Bi-Xenon 351