Page 122 of 226
114 NavigationImportant notes
Travelling abroad
If you intend to travel through different re-
gions or abroad, you will need the respec-
tive navigation CD.
Contact your Mercedes-Benz Center or
the Customer Assistance Center at
1-800-FOR-MERCedes (1-800-367-6372)
for the available CDs.�
Change the navigation CD
(�page 119).
!GPS (G
lobal P
ositioning S
ystem) sig-
nals received make it possible to deter-
mine the current vehicle position.
Deviations from the actual position
may occur
�
if the reception of GPS signals is
disturbed e.g. in parking garages
and tunnels
�
if road conditions are bad
�
depending on the vehicle’s conditi-
on
If the reception of the GPS signal is un-
available, you will have to manually en-
ter the current vehicle position
(�page 180).
If your vehicle has been transported by
a car, train or ferry, COMAND needs
some time to find its exact position.
Moving the vehicle a few yards is typi-
cally enough to remedy this situation.
Page 162 of 226
154 NavigationRoute guidanceExample of a traffic situation with voice
output
1“Prepare to turn right” (advance notice)
2“Turn right after 250 feet”
3“Please, turn next right”
Manual recall of the current voice instruc-
tion�
Press left-hand rotary/push-
button v.Advance notice of right turn
4Name of the street you are to turn onto
5Arrow indicating driving direction
6Name of the street you are travelling on
7Distance in miles to right turn Just before a right turn
8Name of the street you will to turn onto
9Right-turn arrow
aName of the street you are now driving
on
bDistance graph to turning point, redu-
ces as you approach the intersectionTurning onto a street
iAs you approach a junction or inter-
change (e.g. I-695), COMAND will advi-
se you the direction of travel to follow
(e.g. North) as well as the name of the
route.
iIn special situations, e.g. when turning
quickly several times in succession, the-
re may be deviations in the accuracy of
the voice instructions.
Page 189 of 226
181 Navigation
Settings
In order to ensure an exact fix on position,
you have to calibrate COMAND to new ti-
res every time tires are changed.�
Turn the right-hand rotary/push-
button v to highlight “Settings” in the
main destination input menu and press
to confirm.
A menu of options will appear.
Menu “Settings”1Activate menu “Calibration”�
Turn the right-hand rotary/push-
button v to highlight 1 and press to
confirm.
The menu “Calibration” will appear.2Enter the tread depth and the tire type
3Return to the main destination input
menu
�
Press the right-hand rotary/push-
button v to start calibration.
A menu of options will appear.
CalibrationiMercedes-Benz recommends that you
have tires changed by an authorized
Mercedes-Benz Center.
Page 192 of 226

184 Info Services/System settingsInfo Services
� Info ServicesIn chapter “Info Services/System set-
tings”, you will find detailed information on
the following topics: �
Requesting and displaying Info Services
�
Adjusting the brightness
�
Selecting the language for the menu
text displays and the voice output
�
Setting the date and time
�
Selecting beep tones
�
Setting changeover between day and
night display
�
Reset all settings to the factory set-
tings
�
Switching an auxiliary audio source on
and off
If you have not done so already, please fa-
miliarize yourself with these functions by
reading chapter “At a glance” (
�page 6).When you subscribe to Info Services, you
can download information directly to your
COMAND. You can select from news, wea-
ther, sports, stocks, and calendar informa-
tion.
To personalize your selections, visit
�
www.MBUSA.com or call
�
1-800-FOR-MERCedes.
Main service menu1New information service is requested
from Response center
2Shows date and time of the message
3The main settings menu will appear
(
�page 187)
iThis function is not available in some
countries.
Requesting and displaying
Info ServicesiBefore you can use Info Services, Tele
Aid must be activated at the Response
center and Info Services selected.
Page 198 of 226

190 Info Services/System settingsSystem settingsYou can select the following languages�
“Adopt from Instrument Cluster”
COMAND will use the same language
as is set in instrument cluster
�
“Deutsch”
�
“English” (metric)
Distance measured in km,
speed in km/h
�
“English” (imperial)
Distance measured in yards and miles,
speed in miles per hour (mph)
�
“Español”
�
“Français”
�
“Italiano”
�
“Nederlands”COMAND is equipped with an integrated
clock, which it shows in the main system
settings menu.
Automatically
COMAND automatically sets date and time
if the GPS time is received.
However, you can make the following ad-
justments:�
Set the time in increments of 30 minu-
tes (
�page 191)
�
Set the time by selecting a country and
the time zone (
�page 192)Manually
You must always set the clock manually
(
�page 195), if
�
COMAND does not receive a GPS time
�
the clock has been disconnected from
the vehicle battery
�
the dates of the change between sum-
mer and winter time are not available
Setting date and timeiThe clock displays e.g. the estimated
time of arrival at the destination during
route guidance.
Page 202 of 226
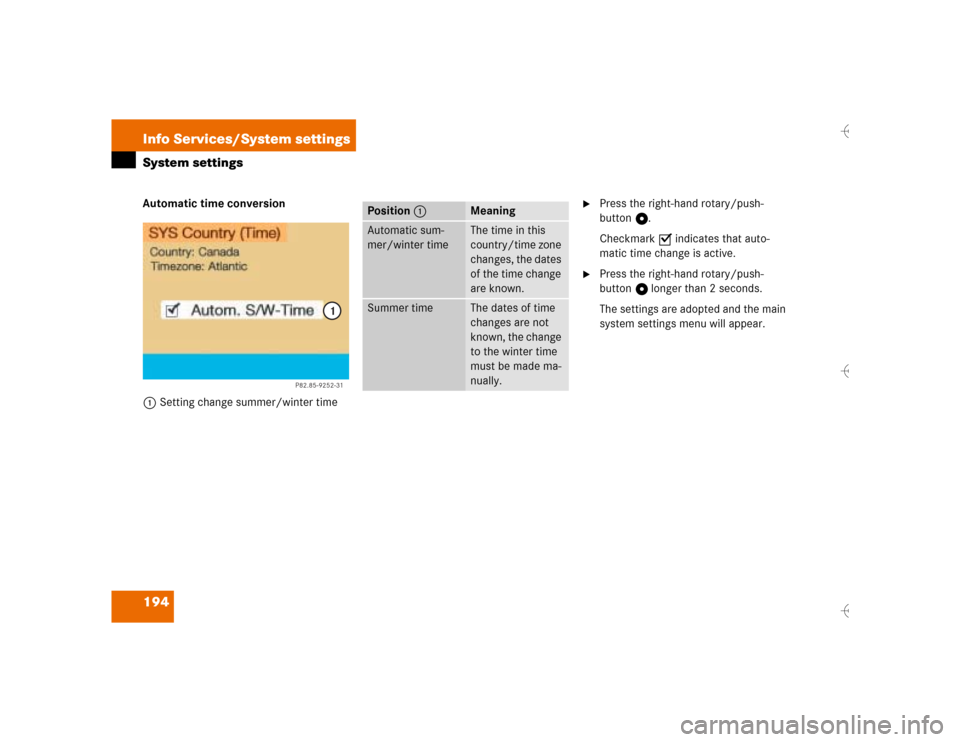
194 Info Services/System settingsSystem settingsAutomatic time conversion
1Setting change summer/winter time
�
Press the right-hand rotary/push-
button v.
Checkmark P indicates that auto-
matic time change is active.
�
Press the right-hand rotary/push-
button v longer than 2 seconds.
The settings are adopted and the main
system settings menu will appear.
P82.85-9252-31
1
Position 1
Meaning
Automatic sum-
mer/winter time
The time in this
country/time zone
changes, the dates
of the time change
are known.
Summer time
The dates of time
changes are not
known, the change
to the winter time
must be made ma-
nually.
Page 203 of 226

195 Info Services/System settings
System settings
Manually setting date and clock
You must manually set the date and clock,
if�
COMAND does not receive a GPS time
�
the clock has been disconnected from
the vehicle battery
�
the dates of the change between sum-
mer and winter time are not available
Date/time menu1Day, month, year, hours, minutes
Day is highlighted when the menu
appears�
Turn the right-hand rotary/push-
button v to highlight “Date/Time...”
in the settings menu (
�page 188) and
press to confirm.
The menu displays date and time.Setting
�
Press the right-hand rotary/push-
button v.
The day appears in red letters, setting
mode is active.
Move the day forward or back
�
Turn the right-hand rotary/push-
button v to the right or left.
�
Press the right-hand rotary/push-
button v.
The day appears in black letters, set-
ting mode is switched off. The cursor
moves one position to the right.
�
Repeat the operating steps to subse-
quently change month, year, hours and
minutes.
P82.85-7719-31
1
Page 204 of 226
196 Info Services/System settingsSystem settingsAdopting settings�
Press the right-hand rotary/push-
button v longer than 2 seconds.
The main system settings menu will ap-
pear with the changed settings.Selecting the time format
1Date display in day, month format
2Date display in month, day format
3Time display in 24-hour format
4Time display in 12-hour format
P Setting is active
Q Setting is not activeIn the “Date/Time” menu
�
Turn the right-hand rotary/push-
button v to highlight “Time format”
and press to confirm.
The “Time format” menu will appear.
Setting
�
Turn the right-hand rotary/push-
button v to highlight the desired entry
and press to confirm. A checkmark will
appear P.
iIf you have selected an invalid setting,
the message “Invalid input” will appear.
iIf the 12-hour format is selected, either
AM (a
nte m
eridiem) or PM (p
ost m
eri-
diem) will appear after the time.


2“Turn right after 250 feet”
3“Please, turn next right”
Manual recal")