Page 107 of 416

107 Controls in detailSeats
Power head restraints, rear*
You can fold the rear head restraints back-
ward or forward using head restraint fold-
ing switch. The switches are located�
on the front center console
(�page 106):
�
Make sure the ignition is switched
on.
All the lamps in the instrument clus-
ter should light up
�
Press switch1 briefly.
The rear head restraints will fold
backward.
�
Press switch1 and hold.
The rear head restraints will fold up-
right.
�
on the rear section of the door for ad-
justing the respective head restraint:�
Make sure the ignition is switched
on.
All the lamps in the instrument clus-
ter should light up
�
Press switch1 up.
The rear head restraints will fold up-
right.
�
Press switch1 down.
The rear head restraints will fold
backward.
Multicontour seat*
The multicontour seat has a movable seat
cushion and inflatable air cushions built
into the seat backrest to provide additional
lumbar and side support.
The seat cushion movement and the seat
backrest cushion height and curvature can
be continuously varied with regulators on
the right side of the seat after turning the
SmartKey in the starter switch to
position2 or pressing the KEYLESS-GO*
start/stop button twice.
Page 113 of 416
113 Controls in detailSeats
Rapid seat heating�
Press switch1 once.
Both indicator lamps above the switch
light up. Switching off rapid seat heating mode
�
Press switch1 twice.
Rear seats
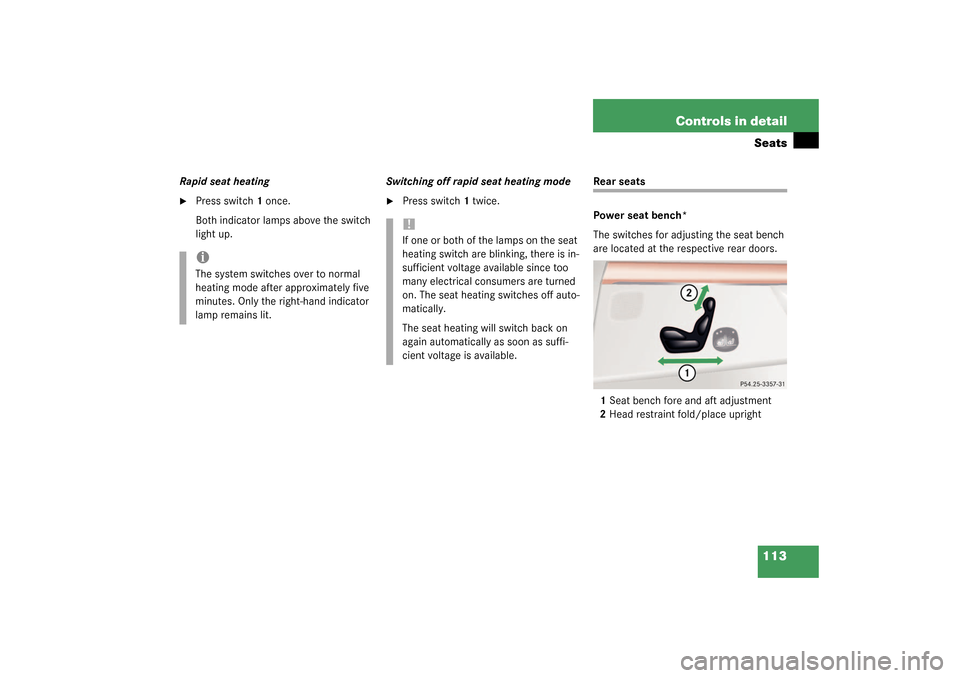
Power seat bench*
The switches for adjusting the seat bench
are located at the respective rear doors.
1Seat bench fore and aft adjustment
2Head restraint fold/place upright
iThe system switches over to normal
heating mode after approximately five
minutes. Only the right-hand indicator
lamp remains lit.
!If one or both of the lamps on the seat
heating switch are blinking, there is in-
sufficient voltage available since too
many electrical consumers are turned
on. The seat heating switches off auto-
matically.
The seat heating will switch back on
again automatically as soon as suffi-
cient voltage is available.
Page 114 of 416
114 Controls in detailSeatsSeat bench fore and aft adjustment�
Press the switch forward or backward
in direction of arrow1.
Head restraint folding
�
Press the switch up or down in direc-
tion of arrow2.
The head restraint is folded or placed
upright.
Information on switching on seat heating*
and seat ventilation* can be found on
(
�page 110) and (
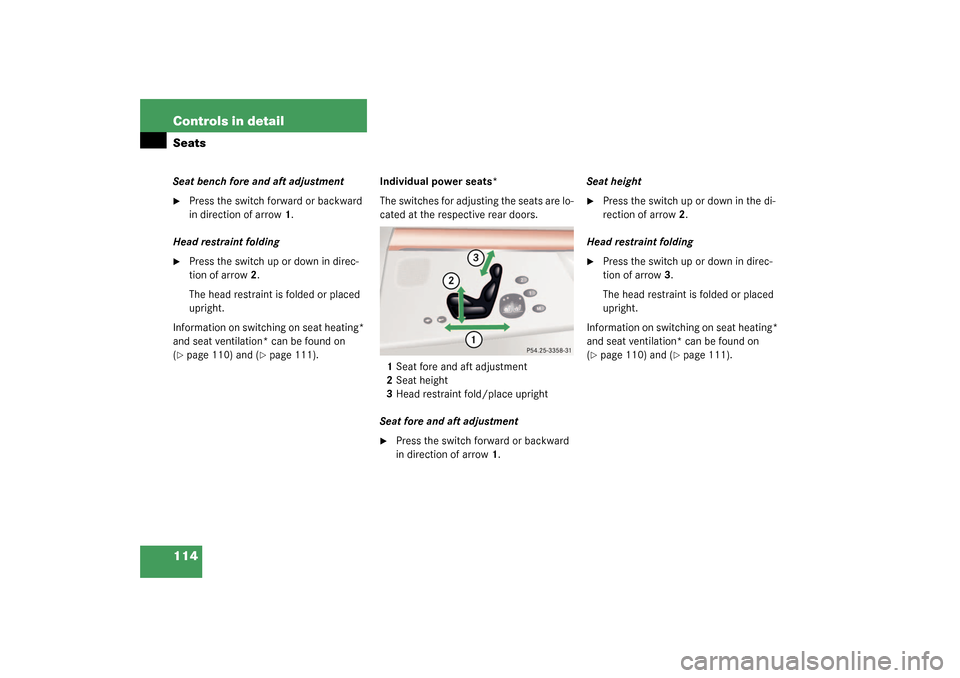
�page 111).Individual power seats*
The switches for adjusting the seats are lo-
cated at the respective rear doors.
1Seat fore and aft adjustment
2Seat height
3Head restraint fold/place upright
Seat fore and aft adjustment
�
Press the switch forward or backward
in direction of arrow1.Seat height
�
Press the switch up or down in the di-
rection of arrow2.
Head restraint folding
�
Press the switch up or down in direc-
tion of arrow3.
The head restraint is folded or placed
upright.
Information on switching on seat heating*
and seat ventilation* can be found on
(
�page 110) and (
�page 111).
Page 121 of 416
.
A")
121 Controls in detail
Lighting
Manual headlamp mode
The low beam headlamps and parking
lamps can be switched on and off with the
exterior lamp switch. For exterior lamp
switch, see (
�page 120).
Automatic headlamp mode
The parking lamps, low beam headlamps
and license plate lamps switch on and off
automatically depending on the brightness
of the ambient light.
�
Turn the exterior lamp switch to
U
.
iWith the daytime running lamp mode
activated, the low beam headlamps will
not switch off automatically.
iFront fog lamps and rear fog lamp can
not be switched on manually with exte-
rior lamp switch in position
U
. To
activate the fog lamps, turn exterior
lamp switch to position
B
and pull
the exterior lamp switch to first or
second stop (
�page 122).
Warning!
G
In automatic headlamp mode, the head-
lamps will not be automatically switched on
under foggy conditions. To minimize risk to
you and to others, activate headlamps by
turning exterior lamp switch to
B
.
The driver is responsible for the operation of
the vehicle’s lights at all times. The automat-
ic headlamp feature is only an aid to the driv-
er. Switch on the vehicle lights manually
when driving or when traffic conditions re-
quire you to do so.
iIf you drive in countries where vehicles
drive on the other side of the road than
the country where the vehicle is regis-
tered, you must have the headlamps
modified for symmetrical low beams.
Relevant information can be obtained
at your authorized Mercedes-Benz Cen-
ter.
Page 126 of 416
126 Controls in detailLightingSwitching rear interior lights on�
Press switch2.
The rear compartment lighting is
switched on.
Switching rear interior lights off
�
Press switch2.
The rear compartment lighting is
switched off.
Front reading lamps
Switching on
�
Press switch 1 or 3.
The corresponding reading lamp is
switched on.
Switching off
�
Press switch 1 or 3.
The corresponding reading lamp is
switched off.
Courtesy lighting
For better orientation in the dark, courtesy
lamps will illuminate the interior of your ve-
hicle as follows:
With parking lamps switched on:�
the door entry lamps
�
the driver and passenger footwells
With SmartKey in starter switch position1:
�
the door entry lamps
�
the center consoleiIf you turn the SmartKey in the starter
switch to position0 and switch off the
headlamps, the door entry lamps will
remain lit for approximately five min-
utes.
Page 129 of 416

129 Controls in detail
Instrument cluster
Tachometer
The red marking on the tachometer de-
notes excessive engine speed.
To help protect the engine, the fuel supply
is interrupted if the engine is operated
within the red marking.
S 55 AMG
The tachometer of the S 55 AMG does not
have a red marking denoting excessive en-
gine speed.
To help protect the engine, the fuel supply
is interrupted if the engine is operated at
an excessive engine speed.
Outside temperature indicator
The temperature sensor is located in the
front bumper area. Due to its location, the
sensor can be affected by road or engine
heat during idling or slow driving. There-
fore, the accuracy of the displayed temper-
a t u r e c a n o n l y b e v e r i f i e d b y c o m p a r i s o n t o
a thermometer placed next to the sensor,
not by comparison to external displays
(e.g. bank signs etc.).When moving the vehicle into colder ambi-
ent temperatures (e.g. when leaving your
garage), you will notice a delay before the
lower temperature is displayed.
A delay also occurs when ambient temper-
atures rise. This prevents inaccurate tem-
perature indications caused by heat
radiated from the engine during idling or
slow driving.
!Avoid driving at excessive engine
speeds, as it may result in serious en-
gine damage that is not covered by the
Mercedes-Benz Limited Warranty.
Warning!
G
The outside temperature indicator is not de-
s i g n e d t o s e r v e a s a n i c e - w a r n i n g d e v i c e a n d
is therefore unsuitable for that purpose.
Indicated temperatures just above the freez-
ing point do not guarantee that the road sur-
face is free of ice. The road may still be icy,
especially in wooded areas or on bridges.
Page 145 of 416
�
Press button
ÿ
or
è
repeatedly
until you see the first function of the
Trip computer menu.
�
Press button
j
or
k
repeat")
145 Controls in detail
Control system
Call up range (distance to empty)�
Press button
ÿ
or
è
repeatedly
until you see the first function of the
Trip computer menu.
�
Press button
j
or
k
repeatedly
until you see this message in the dis-
play:
RANGE
.
In the display you will see the calculat-
ed range based on the current fuel tank
level.
Malfunction memory menu
Use the malfunction memory menu to scan
malfunction and warning messages that
may be stored in the system. What infor-
mation is shown in the display depends on
whether malfunctions have actually oc-
curred.
�
Press button
è
or
ÿ
repeatedly
until you see the malfunction message
memory in the display.
No malfunction messages
If no malfunctions have occurred, the mes-
sage in the display is:
NO MALFUNCTIONMalfunctions have occurred
If malfunctions have occurred, you will see
the number of malfunctions in the display:
1Number of malfunctions
Warning!
G
Malfunction and warning messages are only
indicated for certain systems and are inten-
tionally not very detailed. The malfunction
and warning messages are simply a remind-
er with respect to the operation of certain
systems and do not replace the owner’s
and/or driver’s responsibility to maintain
the vehicle’s operating safety by having all
required maintenance and safety checks
performed on the vehicle and by bringing
the vehicle to an authorized Mercedes-Benz
Center to address the malfunction and
warning messages (
�page 296).
Page 151 of 416
�
Move the selection marker with
the
æ
or
ç
button to the
LIGHT-
ING
submenu.
�
Press button
j
or
k
repeated")
151 Controls in detail
Control system
Setting daytime running lamp mode
(USA only)�
Move the selection marker with
the
æ
or
ç
button to the
LIGHT-
ING
submenu.
�
Press button
j
or
k
repeatedly
until you see this message in the dis-
play:
LAMP CIRCUIT HEADLAMP MODE
.
The selection marker is on the current
setting.
�
Press
æ
or
ç
to select manual
or daytime running lamp (constant)
mode. This function is not available in
countries where daytime running
lamps are mandatory.With daytime running lamp mode se-
lected and the exterior lamp switch at
position0, the following lamps will
come on automatically when the en-
gine is turned on:
�
Parking lamps and low beam head-
lamps
�
License plate lamps (in low ambient
light conditions) Setting locator lighting
During darkness, the following lamps will
come on when the exterior lamp switch is
in position
U
, the locator lighting fea-
ture is activated, and the vehicle is un-
locked by remote control:
�
Parking lamps
�
Tail lamps
�
License plate lamps
�
Front fog lamps
The locator lighting switches off when the
driver’s door is opened. It switches off au-
tomatically after a period of approximately
40 seconds.
�
Move the selection marker with
the
æ
or
ç
button to the
LIGHT-
ING
submenu.
iIf you turn the exterior lamp switch to
another position, the corresponding
lamp(s) will switch on.
For safety reasons, resetting the LIGHTING
submenu to factory settings
(
�page 147) while driving will not re-
set the daytime running lamp mode.
In the display you will then see the mes-
sage:
LIGHTING – CANNOT BE TOTALLY
RESET TO FACTORY SETTINGS WHILE
DRIVING.
��