Page 69 of 416

69 Safety and Security
Occupant safety
BabySmart
TM
airbag deactivation
system
1Indicator lampSpecial BabySmart
TM compatible child
seats, designed for use with the
Mercedes-Benz system and available at
any authorized Mercedes-Benz Center are
required for use with the BabySmart
TM air-
bag deactivation system. With the special
child seat properly installed, the passenger
front airbag will not deploy.
The “PASSENGER AIRBAG OFF” indicator
lamp1 located in the center console will
be illuminated, except with the SmartKey
removed or in starter switch position0.
BabySmart
TM is a trademark of Siemens
Automotive Corp.
Infants and small children should never
share a seat belt with another occupant.
During an accident, they could be crushed
between the occupant and seat belt.
Children too big for child restraint systems
must ride in back seats using regular seat
belts. Position shoulder belt across chest
and shoulder, not face or neck. A booster
seat may be necessary to achieve proper
belt positioning for children from 41 lbs. un-
til they reach a height where a lap/shoulder
belt fits properly without a booster.
A child’s risk of serious or fatal injuries is
significantly increased if the child restraints
are not properly secured in the vehicle and
the child is not properly secured in the child
restraint.
When the child restraint is not in use, re-
move it from the vehicle or secure it with the
seat belt to prevent the child restraint from
becoming a projectile in the event of an ac-
cident.
Do not leave children, unattended in the ve-
hicle, even if the children are secured in a
child restraint system. Unsupervised chil-
dren in a child restraint system may use ve-
hicle equipment and may cause an accident
and/or serious personal injury.
iThe system does not deactivate the
side impact airbag or the emergency
tensioning device.
Page 75 of 416
75 Safety and Security
Panic alarm
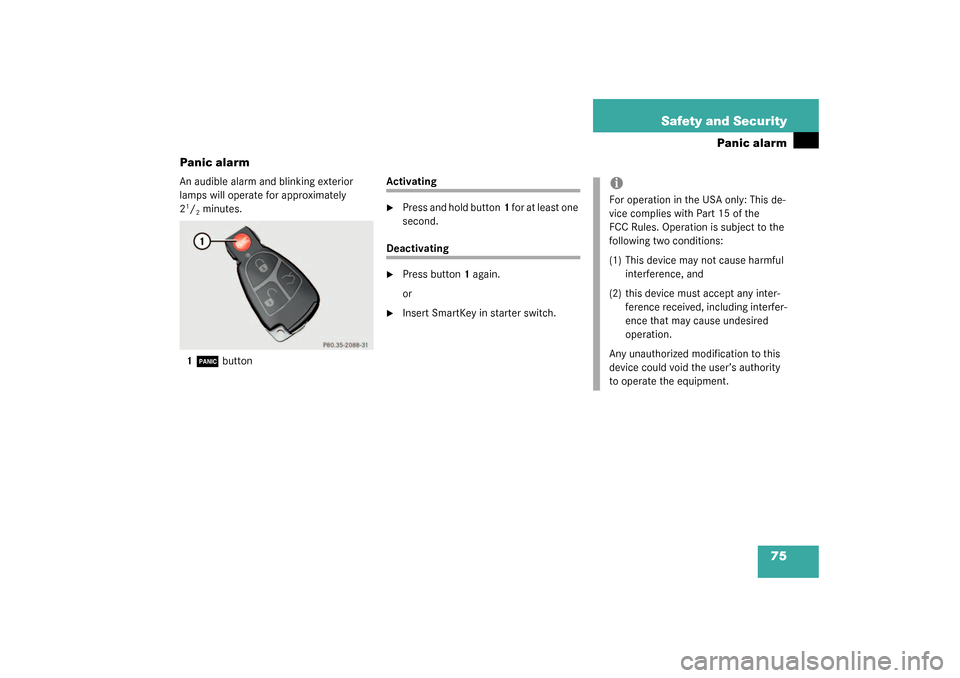
Panic alarm
An audible alarm and blinking exterior
lamps will operate for approximately
21/2minutes.
1Â
button
Activating�
Press and hold button1 for at least one
second.
Deactivating�
Press button1 again.
or
�
Insert SmartKey in starter switch.
iFor operation in the USA only: This de-
vice complies with Part 15 of the
FCC Rules. Operation is subject to the
following two conditions:
(1) This device may not cause harmful
interference, and
(2) this device must accept any inter-
ference received, including interfer-
ence that may cause undesired
operation.
Any unauthorized modification to this
device could void the user’s authority
to operate the equipment.
Page 83 of 416

83 Safety and Security
Anti-theft systems
Arming the alarm system
The alarm system is armed after locking
the vehicle with the SmartKey or KEY-
LESS-GO*. The turn signal lamps blink
three times to indicate that the alarm sys-
tem is activated. The indicator lamp in the
central locking switch (
�page 25) will
blink after approximately 10 seconds
when the alarm system is completely
armed.Disarming the alarm system
The alarm system is disarmed when you
unlock your vehicle with the SmartKey or
KEYLESS-GO*. The turn signal lamps blink
once to indicate that the alarm system is
deactivatedCanceling the alarm
To cancel the alarm:
With the SmartKey
�
Insert the SmartKey in the starter
switch.
or
�
Press the
Œ
or
‹
button.
With KEYLESS-GO*
�
Grasp the outside door handle.
or
�
Press the KEYLESS-GO* start/stop
button.
iIf the alarm stays on for more than
20 seconds, an emergency call is initi-
ated automatically by the Tele Aid sys-
tem provided that Tele Aid service was
subscribed to and properly activated,
and that necessary cellular service and
GPS coverage are available.
iIf the turn signal lamps do not blink
three times, a door or the hood may not
be closed properly.
Close the respective element and lock
the vehicle again.
Page 87 of 416

87 Controls in detail
Locking and unlocking
Factory setting
Global unlocking�
Press button
Œ
.
All turn signal lamps blink once. The
locking knobs in the doors move up.
The anti-theft alarm system is switched
off. If it is dark, the locator lighting
switches on.
The vehicle will lock again automatically
within approximately 40 seconds of un-
locking if:
�
neither door nor trunk is opened
�
the SmartKey is not inserted in the
starter switch
�
the central locking switch is not acti-
vatedGlobal locking
�
Press button
‹
.
All turn signal lamps blink three times.
The locking knobs in the doors move
down.
The anti-theft alarm system is activat-
ed.Selective setting
If you frequently travel alone, you may wish
to reprogram the SmartKey so that
pressing
Œ
only unlocks the driver’s
door and the fuel filler flap.
�
Press and hold buttons
Œ
and
‹
simultaneously for about five seconds
until battery check lamp5 blinks twice.
The SmartKey will then function as fol-
lows:
Unlocking driver’s door and fuel filler
flap
�
Press button
Œ
once.
Global unlocking
�
Press button
Œ
twice.
Global locking
�
Press button
‹
.
Page 97 of 416

97 Controls in detail
Locking and unlocking
�
Briefly press the emergency release
button.
The trunk unlocks and the trunk lid
opens.
Closing the trunk lid�
Lower trunk lid by pulling firmly on
handle1 (
�page 96).
2Extending handle
�
Push the trunk lid down gently at the
extending handle2 until it engages into
the lock.The power closing assist automatically en-
sures that the lid is pulled closed com-
pletely (
�page 102).
The extending handle2 is retracted after a
few seconds.
!The emergency release button does
not open the trunk lid if the vehicle bat-
tery is discharged or disconnected.iIf the emergency release button is
pressed and the vehicle was centrally
locked, the exterior lamps will flash and
the alarm will sound as the trunk lid
opens.
To cancel the alarm, insert the
SmartKey in the starter switch or press
button
Œ
or
‹
on the SmartKey.
Warning!
G
To prevent possible personal injury, always
keep hands and fingers away from the trunk
lid opening when closing the trunk. Be espe-
cially careful when small children are
around.Warning!
G
Only drive with the trunk closed as, among
other dangers such as visibility blockage,
exhaust fumes may enter the vehicle interi-
or.
Page 104 of 416
104 Controls in detailSeats
SeatsInformation on seat adjustment can be
found in the “Getting started” section,
(�page 34).
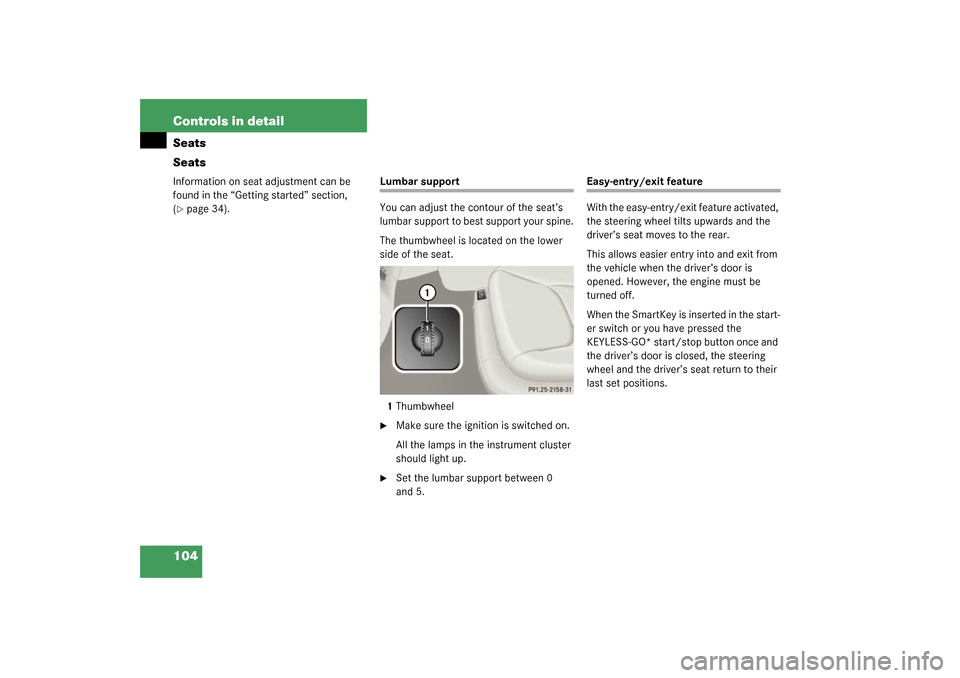
Lumbar support
You can adjust the contour of the seat’s
lumbar support to best support your spine.
The thumbwheel is located on the lower
side of the seat.
1Thumbwheel�
Make sure the ignition is switched on.
All the lamps in the instrument cluster
should light up.
�
Set the lumbar support between 0
and 5.
Easy-entry/exit feature
With the easy-entry/exit feature activated,
the steering wheel tilts upwards and the
driver’s seat moves to the rear.
This allows easier entry into and exit from
the vehicle when the driver’s door is
opened. However, the engine must be
turned off.
When the SmartKey is inserted in the start-
er switch or you have pressed the
KEYLESS-GO* start/stop button once and
the driver’s door is closed, the steering
wheel and the driver’s seat return to their
last set positions.
Page 106 of 416

106 Controls in detailSeatsInstalling front head restraints:�
Press switch1 upwards and hold for
about five seconds.
�
Push the head restraint down until it
engages.
�
Adjust head restraint to desired posi-
tion (
�page 35).
Rear seat head restraintsFolding rear head restraints back
�
Make sure the ignition is switched on.
All the lamps in the instrument cluster
should light up.
�
Press switch1.
The rear head restraints will fold back-
ward.Placing rear head restraints upright
�
Pull the rear head restraint forward un-
til it locks into position.
Rear head restraint tilt
The read head restraint angle can be ad-
justed manually.
Warning!
G
For safety reasons, always drive with the
rear head restraints in the upright position
when the rear seats are occupied.
Keep the area around head restraints clear
of articles (e.g. clothing) to not obstruct the
folding operation of the head restraints.iYou can adjust the angle manually by
pulling or pushing the head restraints
by hand.
!Make sure that the head restraints en-
gage when adjusting them manually.
Otherwise, their protective function
cannot be ensured.
Page 107 of 416

107 Controls in detailSeats
Power head restraints, rear*
You can fold the rear head restraints back-
ward or forward using head restraint fold-
ing switch. The switches are located�
on the front center console
(�page 106):
�
Make sure the ignition is switched
on.
All the lamps in the instrument clus-
ter should light up
�
Press switch1 briefly.
The rear head restraints will fold
backward.
�
Press switch1 and hold.
The rear head restraints will fold up-
right.
�
on the rear section of the door for ad-
justing the respective head restraint:�
Make sure the ignition is switched
on.
All the lamps in the instrument clus-
ter should light up
�
Press switch1 up.
The rear head restraints will fold up-
right.
�
Press switch1 down.
The rear head restraints will fold
backward.
Multicontour seat*
The multicontour seat has a movable seat
cushion and inflatable air cushions built
into the seat backrest to provide additional
lumbar and side support.
The seat cushion movement and the seat
backrest cushion height and curvature can
be continuously varied with regulators on
the right side of the seat after turning the
SmartKey in the starter switch to
position2 or pressing the KEYLESS-GO*
start/stop button twice.