Page 117 of 416

117 Controls in detail
Memory function
Memory function
The memory button and stored position
switch are located on the door.
You can store up to three different settings
per SmartKey or KEYLESS-GO* card.
The following settings are saved for each
stored position:�
Seat and backrest position
�
Settings for the multi-contour seat*
�
Steering wheel position
�
Inside rear view mirror position
�
Exterior rear view mirror position
�
Automatic climate control
These key dependent memory settings can
be deactivated if desired (
�page 156).
1 Stored position buttons
2Memory button
�
Make sure that the ignition is switched
on or the relevant door is open and the
SmartKey is inserted in the starter
switch.
!Prior to operating the vehicle, the driv-
er should check and adjust the seat
height, seat position fore and aft, and
seat backrest angle if necessary, to en-
sure adequate control, reach, and com-
fort. The head restraint should also be
adjusted for proper height. Also see
“Airbags” (
�page 57) section for prop-
er seat positioning.
In addition, adjust the steering wheel to
ensure adequate control, reach, opera-
tion and comfort. Both the inside and
outside rear view mirrors should be ad-
justed for adequate rear vision.
Fasten seat belts. Infants and small
children should be seated in a properly
secured restraint system that complies
with U.S. Federal Motor Vehicle Safety
Standards 213 and 225 and Canadian
Motor Vehicle Safety Standards 213
and 210.2.
Warning!
G
Do not activate the memory function while
driving. Activating the memory function
while driving could cause the driver to lose
control of the vehicle.
Page 119 of 416
119 Controls in detail
Memory function
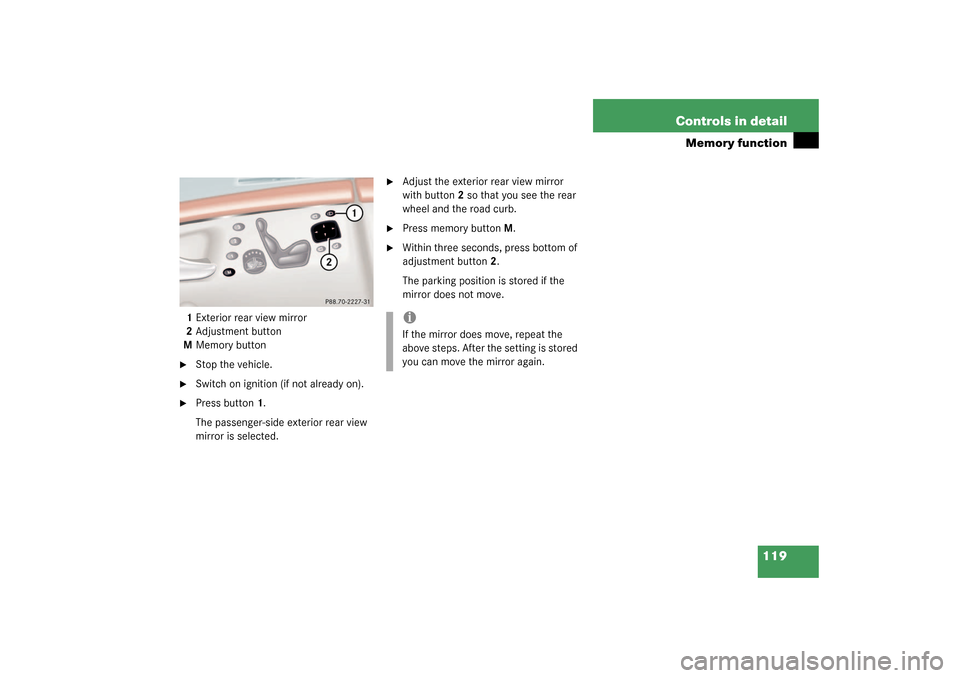
1Exterior rear view mirror
2Adjustment button
MMemory button�
Stop the vehicle.
�
Switch on ignition (if not already on).
�
Press button1.
The passenger-side exterior rear view
mirror is selected.
�
Adjust the exterior rear view mirror
with button2 so that you see the rear
wheel and the road curb.
�
Press memory button M.
�
Within three seconds, press bottom of
adjustment button2.
The parking position is stored if the
mirror does not move.iIf the mirror does move, repeat the
above steps. After the setting is stored
you can move the mirror again.
Page 127 of 416
.
The instrume")
127 Controls in detail
Instrument cluster
Instrument cluster
A full view illustration of the instrument
cluster can be found in the “At a glance”
section of this manual (
�page 22).
The instrument cluster is activated when
you
�
open a door
�
turn on the ignition
�
press the reset button
J
(�page 22)
�
switch on the exterior lamps
You can change the instrument cluster set-
tings in the Instrument cluster submenu of
the control system (
�page 149).
Instrument cluster illumination
1Knob for adjusting instrument cluster
illumination
Use knob1 to adjust the illumination
brightness for the instrument cluster.
�
Press knob1. The knob will pop out.
To brighten illumination
�
Turn knob1 in the instrument cluster
clockwise.
The instrument cluster illumination will
brighten.
To dim illumination
�
Turn knob1 in the instrument cluster
counterclockwise.
The instrument cluster illumination will
dim.
iThe instrument cluster illumination is
dimmed or brightened automatically to
suit ambient light conditions.
The instrument cluster illumination will
also be adjusted automatically when
you switch on the vehicle’s exterior
lamps.
Page 168 of 416
 and for setting the rear view
mirrors (
�page 38) is found in the “Get-
ting started” section")
168 Controls in detailGood visibility
Good visibilityInformation on the windshield wipers
(�page 47) and for setting the rear view
mirrors (
�page 38) is found in the “Get-
ting started” section.
Rear view mirror
Automatic antiglare rear view mirror
The reflection brightness of the exterior
rear view mirror on the driver’s side and
the inside rear view mirror will respond au-
tomatically to glare when�
the ignition is switched on, and
�
incoming light from headlamps falls on
the sensor in the inside rear view
mirror.
The rear view mirror will not react if
�
reverse gear is engaged
�
the interior lighting is turned on
Warning!
G
The automatic antiglare function does not
react if incoming light is not aimed directly
at sensors in the inside rear view mirror.
The inside rear view mirror and the exterior
rear view mirror on the driver’s side do not
react, for example, if the rear window sun
shade* is in raised position.
Glare can endanger you and others.Warning!
G
In the case of an accident liquid electrolyte
may escape from the mirror housing if the
mirror glass breaks.
Electrolyte has an irritating effect. Do not al-
low the liquid to come into contact with
eyes, skin, clothing, or respiratory system.
In case it does, immediately flush affected
area with water, and seek medical help if
necessary.
Warning!
G
Exercise care when using the passen-
ger-side exterior rear view mirror. The mirror
surface is convex (outwardly curved surface
for a wider field of view). Objects in mirror
are closer than they appear. Check your in-
side rear view mirror or glance over your
shoulder before changing lanes.!Electrolyte drops coming into contact
with the vehicle paint finish can be
completely removed only while in the
liquid state by applying plenty of water.
Page 169 of 416

169 Controls in detail
Good visibility
Activating exterior rear view mirror
parking position
Follow these steps to activate the mirror
parking position so that the passen-
ger-side exterior rear view mirror will be
turned downward to the stored position.�
Make sure you have stored a parking
position for the passenger-side exterior
rear view mirror (
�page 118).
�
Make sure that the
MIRROR SETTING
WHEN PARKING
function in the
CONVENIENCE
submenu of the control
system is switched to
ON (�page 158).
�
Switch on ignition (if not already on).
�
Press button2 for the passenger-side
exterior rear view mirror.
�
Place the gear selector lever in reverse
gearR.
The passenger-side exterior rear view
mirror will be turned downward to the
stored position.
1Driver’s side exterior mirror switch
2Passenger-side exterior mirror switchThe exterior rear view mirror returns to its
previously stored driving position:
�
10 seconds after you put the gear se-
lector lever out of positionR
�
immediately once your vehicle exceeds
a speed of approximately 6 mph (10
km/h)
�
immediately when you press button1
for driver’s side mirror.
Page 170 of 416

170 Controls in detailGood visibilityElectrically folding exterior rear view mirrors
Folding the exterior mirrors in and out
automatically
When the corresponding function in the
control system is activated (
�page 158):
�
The exterior rear view mirrors automat-
ically fold in as soon as the vehicle is
locked from the outside.
�
The exterior rear view mirrors automat-
ically fold out as soon as the vehicle is
unlocked and the driver’s or front pas-
senger door are subsequently opened.Folding the exterior mirrors in and out
manually
The exterior rear view mirrors can vibrate if
they are not completely folded out.
The buttons are located on the door.
1Folds the exterior mirrors out
2Folds the exterior mirrors in
�
Make sure that the ignition is switched
on.All the lamps in the instrument cluster
light up.
Folding in
�
Press button2 briefly.
Both mirrors fold in.
Folding out
�
Press button1 briefly.
Both mirrors fold out.
!Before you drive the vehicle through an
automatic car wash, fold the exterior
mirrors in, otherwise they may get
damaged.
iIf you are driving at more than 9 mph
(15 km/h) you will not be able to fold
the exterior mirrors in.
!If an exterior rear view mirror housing
is forcibly pushed forward (hit from the
rear), reposition it manually by applying
firm pressure until it snaps back into
place.
If an exterior rear view mirror housing
is forcibly pushed rearward (hit from
the front), press button2 to fold mir-
rors in, then press button1 to fold mir-
rors out. Do not force mirrors by hand
as this may damage the adjustment
mechanism.
Page 171 of 416
.
A rain sensor automatically controls the
wind")
171 Controls in detail
Good visibility
Windshield wipers
Information on the windshield wipers is
found in the “Getting started” section
(�page 47).
A rain sensor automatically controls the
windshield wipers depending on how wet
the windshield is.
�
Switch on ignition.
�
Set wiper switch to position I
(�page 47).
After the initial wipe, pauses between
wipes are automatically controlled by the
rain sensor which monitors the wetness of
the windshield.
Headlamp cleaning system
The switch is located on the left side of the
dashboard.
1Headlamp washer switch�
Switch on ignition.
�
Press switch1.
iIntermittent wiping is interrupted when
the vehicle is at a standstill and a front
door is opened.
!To prevent the windshield wipers from
being damaged, do not leave the wiper
switch in intermittent setting when tak-
ing the vehicle to an automatic car
wash or when cleaning the windshield.
The switch should not be left in inter-
mittent setting as the wipers will wipe
the windshield once every time the en-
gine is started. Dust that accumulates
on the windshield might scratch the
glass when wiping occurs on a dry
windshield.iIf intermittent wiping is on and you turn
the SmartKey in the steering lock from
position 1 to position 2 (
�page 31)
and keep the SmartKey in that position
longer than 2 seconds, the wipe inter-
val will be set to approximately 5 sec-
onds.
Page 185 of 416

185 Controls in detail
Automatic climate control
Residual heat and ventilation
With the engine switched off, it is possible
to continue to heat or ventilate the interior
for up to 30 minutes. This feature makes
use of the residual heat produced by the
engine.
Activating�
Turn the SmartKey in the starter switch
to position1 or remove it from the
starter switch.
�
Press button
T
(�page 175).
The indicator lamp on button
T
comes on.
Deactivating
�
Press button
T
(�page 175).
The indicator lamp on button
T
goes off.The residual heat is automatically turned
off:
�
when the ignition is switched on
�
after about 30 minutes
�
if the battery voltage drops
!Do not obstruct the air vent in the stor-
age compartment.iThe storage compartment can be heat-
ed or cooled.
The compartment can get very warm
due to its confined space. When storing
heat sensitive objects in the compart-
ment, close the air vent (
�page 184)
while heating the passenger compart-
ment.
iHow long the system will provide heat-
ing depends on the coolant tempera-
ture and the temperature set by the
operator. The blower will run at speed
setting1 regardless of the air distribu-
tion control setting.