Page 95 of 416
95 Controls in detail
Locking and unlocking
To cancel the alarm, do one of the follow-
ing:�
Press button
‹
or
Œ
on the
SmartKey.
�
Insert the SmartKey in the starter
switch.
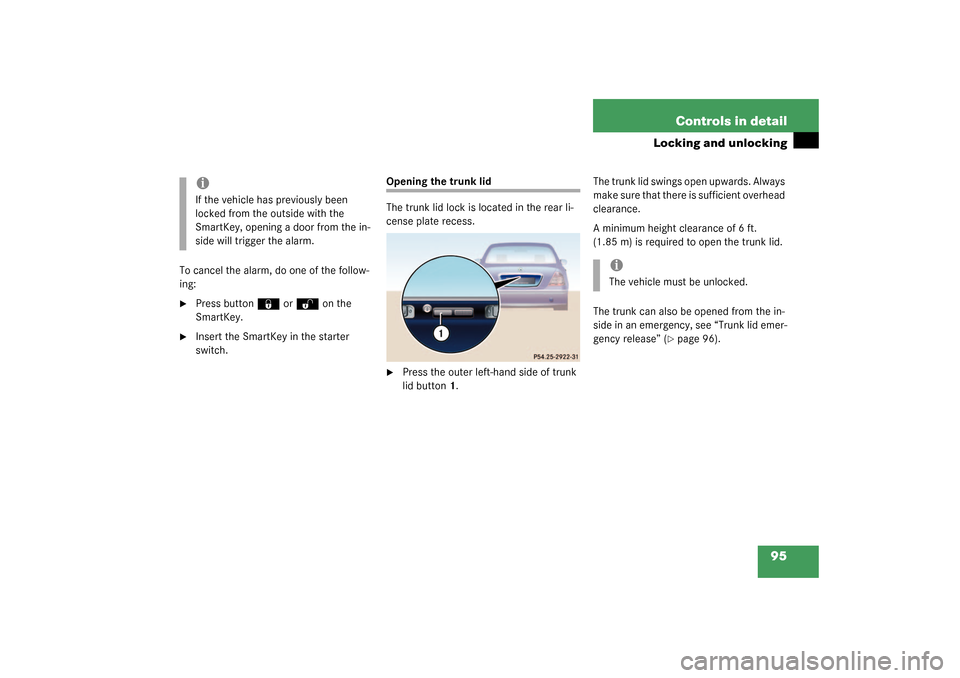
Opening the trunk lid
The trunk lid lock is located in the rear li-
cense plate recess.�
Press the outer left-hand side of trunk
lid button1.The trunk lid swings open upwards. Always
make sure that there is sufficient overhead
clearance.
A minimum height clearance of 6 ft.
(1.85 m) is required to open the trunk lid.
The trunk can also be opened from the in-
side in an emergency, see “Trunk lid emer-
gency release” (
�page 96).
iIf the vehicle has previously been
locked from the outside with the
SmartKey, opening a door from the in-
side will trigger the alarm.
iThe vehicle must be unlocked.
Page 96 of 416
96 Controls in detailLocking and unlockingOpening the trunk from the inside
When the vehicle is stationary, you can
open the trunk from the inside using the
trunk lid release switch located on the driv-
er’s door control panel.
A minimum height clearance of 6 ft.
(1.85 m) is required to open the trunk lid.
1Indicator lamp
2Remote trunk lid switch
�
Pull remote trunk lid switch2.
The trunk opens. Indicator lamp1
comes on. It remains lit until you close
the trunk again.
If the trunk lid does not open, it is still
locked separately (
�page 98).
Trunk lid emergency release
The emergency release button is located in
the trunk lid.
1Handle
Illumination of the emergency release but-
ton:�
The button will blink for 30 minutes af-
ter opening the trunk.
�
The button will blink for 60 minutes af-
ter closing the trunk.
!The trunk lid swings open upwards au-
tomatically. Always make sure that
there is sufficient overhead clearance.
Page 98 of 416
98 Controls in detailLocking and unlocking
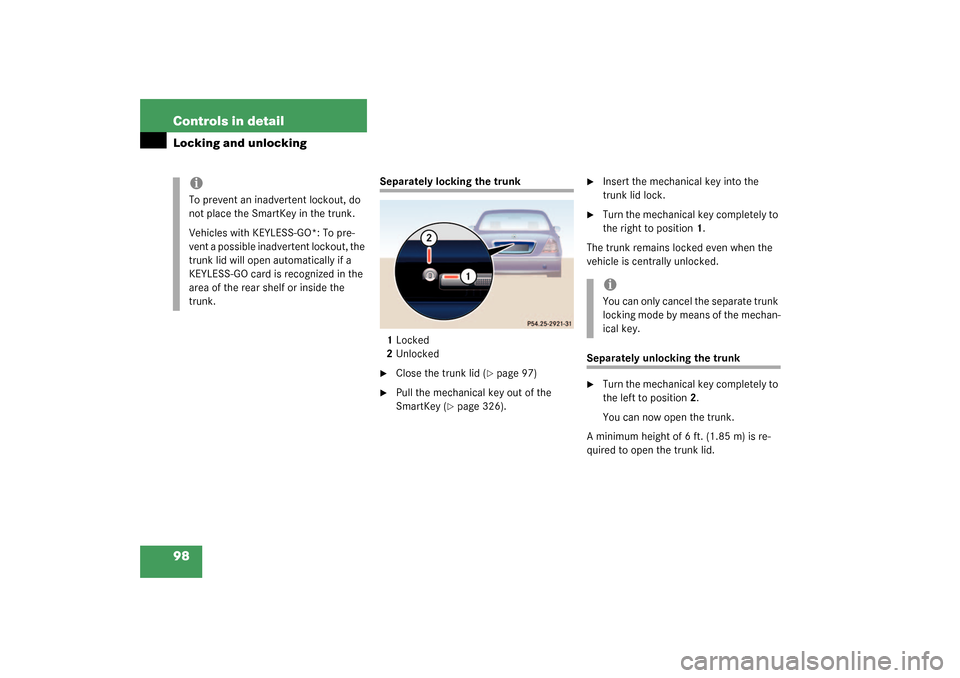
Separately locking the trunk
1Locked
2Unlocked�
Close the trunk lid (
�page 97)
�
Pull the mechanical key out of the
SmartKey (
�page 326).
�
Insert the mechanical key into the
trunk lid lock.
�
Turn the mechanical key completely to
the right to position 1.
The trunk remains locked even when the
vehicle is centrally unlocked.
Separately unlocking the trunk�
Turn the mechanical key completely to
the left to position 2.
You can now open the trunk.
A minimum height of 6 ft. (1.85 m) is re-
quired to open the trunk lid.
iTo prevent an inadvertent lockout, do
not place the SmartKey in the trunk.
Vehicles with KEYLESS-GO*: To pre-
vent a possible inadvertent lockout, the
trunk lid will open automatically if a
KEYLESS-GO card is recognized in the
area of the rear shelf or inside the
trunk.
iYou can only cancel the separate trunk
locking mode by means of the mechan-
ical key.
Page 99 of 416

99 Controls in detail
Locking and unlocking
Trunk lid opening/closing system*
You can open or close the trunk lid from
the inside if the vehicle is stationary.
A minimum height clearance of 6 ft.
(1.85 m) is required to open the trunk lid.
Opening from the inside
You can open the trunk using the trunk lid
release switch.
A minimum height of 6 ft. (1.85 m) is re-
quired to open the trunk lid.
1Indicator lamp
2Remote trunk lid switch
�
Pull remote trunk lid switch2.
The trunk opens. Indicator lamp1
comes on. It remains lit until you close
the trunk again.
The trunk can also be opened from the in-
side in an emergency, see “Trunk lid emer-
gency release” (
�page 96).
You can stop the opening process of the
trunk lid.
�
Press the remote trunk lid switch2.
The trunk lid remains in the current po-
sition.Closing from the inside
�
Press remote trunk lid switch2
(�page 96) until the trunk lid is closed
and indicator lamp1 goes out.
To interrupt the closing procedure:
�
Release remote trunk lid switch2. The
trunk lid stops moving.
If the trunk lid comes into contact with an
object while closing (e.g. luggage that has
been piled too high) in the upper motion
sequence, the closing procedure is
stopped and the trunk re-opens slightly.
!The trunk lid swings open upwards au-
tomatically. Always make sure that
there is sufficient overhead clearance.iThe vehicle must be unlocked.
If the trunk lid does not open, it is still
locked separately (
�page 98).
Warning!
G
Maintain sight of trunk area while operating
door mounted switch. Monitor the closing
procedure carefully to ensure that no one is
in danger of being injured. To interrupt the
closing procedure, release the door mount-
ed remote trunk lid switch.
Page 101 of 416

101 Controls in detail
Locking and unlocking
�
Press switch2 in the trunk lid.
The trunk lid closes automatically and
the vehicle is locked. The turn signals
flash three times to confirm locking.Limiting opening height of trunk
You can limit the opening angle of the
trunk lid. The trunk lid then opens only to
approximately the height of the roof edge.
This can be useful when there is not
enough overhead clearance space, for ex-
ample. The trunk lid opening height can be
limited when transporting goods on a roof
rack (e.g. presence of an MB sport luggage
container). When activated, the trunk lid
opens to approximately the height of the
roof edge.
�
With the trunk lid closed, press the re-
mote control switch (
�page 99) and
hold for at least five seconds.
Depending on its previous status, the
opening height restriction is then
switched either on or off.
iTo prevent a possible inadvertent lock-
out, the trunk lid will open automatical-
ly if a KEYLESS-GO card is recognized
in the area of the rear shelf or inside
the trunk.Warning!
G
Monitor the closing procedure carefully to
ensure that no one is in danger of being in-
jured. To prevent possible personal injury,
always keep hands and fingers away from
the trunk opening when closing the trunk.
Be especially careful when small children
are around. To stop the closing procedure,
press the trunk lid closing switch1 in the
trunk lid, the
Š
button on the SmartKey,
or the remote trunk lid switch (on driver’s
door control panel).
iIf the trunk lid comes into contact with
an object while closing (e.g. luggage
that has been piled too high), the clos-
ing procedure is stopped and the trunk
re-opens slightly.
The closing procedure can be stopped
at anytime by once again pressing the
closing switch in the trunk lid, the re-
mote control switch in the driver’s
door, or the
Š
button on the Smart-
Key.
Page 107 of 416

107 Controls in detailSeats
Power head restraints, rear*
You can fold the rear head restraints back-
ward or forward using head restraint fold-
ing switch. The switches are located�
on the front center console
(�page 106):
�
Make sure the ignition is switched
on.
All the lamps in the instrument clus-
ter should light up
�
Press switch1 briefly.
The rear head restraints will fold
backward.
�
Press switch1 and hold.
The rear head restraints will fold up-
right.
�
on the rear section of the door for ad-
justing the respective head restraint:�
Make sure the ignition is switched
on.
All the lamps in the instrument clus-
ter should light up
�
Press switch1 up.
The rear head restraints will fold up-
right.
�
Press switch1 down.
The rear head restraints will fold
backward.
Multicontour seat*
The multicontour seat has a movable seat
cushion and inflatable air cushions built
into the seat backrest to provide additional
lumbar and side support.
The seat cushion movement and the seat
backrest cushion height and curvature can
be continuously varied with regulators on
the right side of the seat after turning the
SmartKey in the starter switch to
position2 or pressing the KEYLESS-GO*
start/stop button twice.
Page 114 of 416
114 Controls in detailSeatsSeat bench fore and aft adjustment�
Press the switch forward or backward
in direction of arrow1.
Head restraint folding
�
Press the switch up or down in direc-
tion of arrow2.
The head restraint is folded or placed
upright.
Information on switching on seat heating*
and seat ventilation* can be found on
(
�page 110) and (
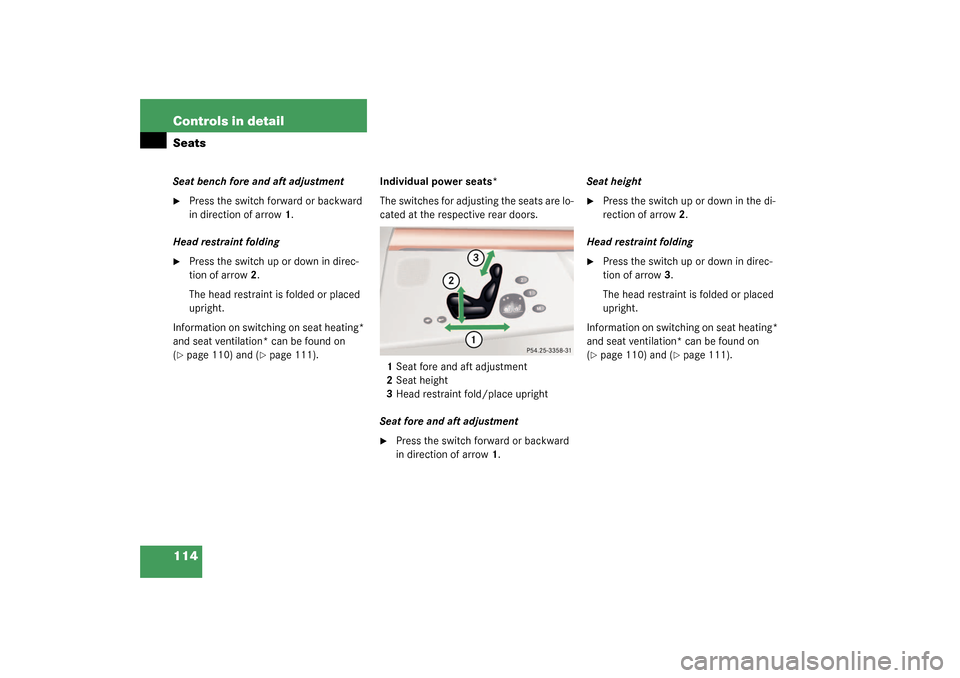
�page 111).Individual power seats*
The switches for adjusting the seats are lo-
cated at the respective rear doors.
1Seat fore and aft adjustment
2Seat height
3Head restraint fold/place upright
Seat fore and aft adjustment
�
Press the switch forward or backward
in direction of arrow1.Seat height
�
Press the switch up or down in the di-
rection of arrow2.
Head restraint folding
�
Press the switch up or down in direc-
tion of arrow3.
The head restraint is folded or placed
upright.
Information on switching on seat heating*
and seat ventilation* can be found on
(
�page 110) and (
�page 111).
Page 115 of 416

115 Controls in detailSeats
Power seat, setting passenger seat po-
sition from rear*
This function lets you adjust the position of
the passenger seat from the rear.The switch is located on the right rear pas-
senger door.
1Front passenger seat adjustment
2Rear seat adjustment
3Seat height
4Head restraint height
5Backrest tilt
6Seat fore and aft adjustment
�
Make sure the ignition is switched on.
or
�
Open the right rear passenger door.
�
Press button1 to adjust the front
passenger seat.
Warning!
G
When adjusting the passenger seat, make
sure that the seat, if occupied, is as far from
the front passenger airbag as possible.
Otherwise, the passenger could be seriously
or even fatally injured in the event of an ac-
cident or braking maneuver.
Make sure that no one is caught or injured
while the seat is being adjusted.
The power seats can also be operated with
the driver's or passenger door open. Do not
leave children unattended in the vehicle, or
with access to an unlocked vehicle. Unsu-
pervised use of vehicle equipment may
cause an accident and/or serious personal
injury
iAdjusting the passenger seat position
from the rear is not possible if you de-
activate the operation of the rear door
windows (
�page 74).
!Do not move the front passenger seat
completely forward if objects are
stored in the parcel net in the front pas-
senger-side footwell. Items in the net
may be damaged