Page 84 of 416

84 Safety and SecurityAnti-theft systemsTow-away alarm
Once the tow-away alarm is armed, a visual
and audible alarm will be triggered when
someone attempts to raise the vehicle.
Arming tow-away alarm
When you lock your vehicle, the tow-away
alarm is automatically armed after about
30 seconds.
When you unlock your vehicle, the
tow-away protection disarms automatical-
ly.Disarming tow-away alarm
To prevent triggering the tow-away alarm
feature, switch off the tow-away alarm be-
fore towing the vehicle, or when parking on
a surface subject to movement, such as a
ferry or auto train.
The switch is located on the center con-
sole.
1Tow-away alarm off switch
2Indicator lamp
�
Turn off the ignition and remove the
SmartKey.
�
Press switch1.
Indicator lamp2 in the switch lights up
briefly.
�
Exit vehicle and lock your vehicle with
the SmartKey or (vehicles with
KEYLESS-GO*) the lock button at each
door handle.
The tow-away alarm remains disarmed un-
til you lock your vehicle again.
iThe tow-away protection alarm is trig-
gered, for example, if the vehicle is lift-
ed on one side.
If the alarm stays on for more than
20 seconds, an emergency call is initi-
ated automatically by the Tele Aid sys-
tem, provided Tele Aid service was
subscribed to and properly activated
and that necessary cellular service and
GPS coverage are available.
iYou cannot disarm the tow-away alarm
if the ignition is turned on.
Page 163 of 416

163 Controls in detail
Automatic transmission
Gear selector lever position
Effect
P
Park position
Selector position when the vehicle
is parked. Only place selector lever
in positionP when vehicle is
stopped. The park position is not in-
tended to serve as a brake when
the vehicle is parked. Rather, the
driver should always set the park-
ing brake in addition to placing the
selector lever in positionP to se-
cure the vehicle.
The SmartKey can only be removed
from the starter switch with the se-
lector lever in positionP. With the
SmartKey removed, the selector le-
ver is locked in positionP.
Effect
R
Reverse gear
Place selector lever in positionR only
when vehicle is stopped.
N
Neutral
No power is transmitted from the en-
gine to the drive axle. When the
brakes are released, the vehicle can
be moved freely (pushed or towed).
To avoid damage to the transmission,
never engageN while driving.
If the ESP is deactivated or malfunc-
tioning:
Only move selector lever toN if the
vehicle is in danger of skidding (e.g.
on icy roads).
D
Drive
The transmission shifts automatical-
ly. All five forward gears are avail-
able.
!Coasting the vehicle, or driving for any
other reason with selector lever inN
can result in transmission damage that
is not covered by the Mercedes-Benz
Limited Warranty.Warning!
G
Getting out of your vehicle with the selector
lever not fully engaged in positionP is dan-
gerous. Also, positionP alone is not intend-
ed to or capable of preventing your vehicle
from moving, possibly hitting people or ob-
jects.
Always set the parking brake in addition to
shifting to positionP (
�page 44).
When parked on an incline, turn the front
wheels towards the road curb.
Page 186 of 416
186 Controls in detailAutomatic climate controlRear passenger compartment adjust-able air vents
Rear center console air vents
1Left center air vent
2Right center air vent
3Thumbwheel for center air vents with
adjustable booster blower
To open center air vents and to adjust the
booster blower:�
Turn thumbwheel3.Rear side air vents
4Rear side air vent, right and left
5Air volume control for rear side air vent
To open rear side air vents:
�
Turn thumbwheel5 towards the win-
dow.
iThe booster blower allows air volume
speed to the rear passenger compart-
ment to be increased at four different
levels.
The temperature at the air vents for
rear passenger compartment1 and2
is the same as at the dashboard center
air vents.
Page 207 of 416

207 Controls in detail
Driving systems
1Distance warning function on/off
switch
2Thumbwheel for setting distanceIncreasing distance
Increasing the distance setting causes Dis-
tronic to maintain a greater following dis-
tance to the vehicle ahead.
�
Turn thumbwheel 2 towards
¯
.
Decreasing distance
Decreasing the distance setting causes
Distronic to maintain a shorter following
distance to the vehicle ahead.
�
Turn thumbwheel2 towards
®
.Distance warning function
When Distronic is deactivated, this func-
tion will continue to warn you when recog-
nizing a stationary obstacle or a slower
vehicle moving in the vehicle’s path and
the danger of a collision exists:
�
The distance warning lamp
l
in the
instrument cluster lights up.
�
An intermittent warning sounds.
If these warnings are issued, you must
brake manually to maintain a safe distance
and avoid a collision with the vehicle
ahead.
When pressing the brake pedal, the warn-
ing sound stops. The warning sound also
stops when the distance to the vehicle
ahead is sufficient again without applying
the brake pedal. In this case the distance
warning lamp also extinguishes.
Warning!
G
I t is up t o t he d ri ver to exer c is e di s cr et io n to
select the appropriate setting given road
conditions, traffic, driver’s preferred driving
style and applicable laws and driving recom-
mendations for safe following distance.
Page 224 of 416

224 Controls in detailUseful features
Useful featuresInterior storage spaces Glove box
1Unlocked position
2Locked position
3Glove box lid release
Opening the glove box
�
Press glove box lid release3.
The glove box lid opens downward.
Closing the glove box
�
Push lid up to close.Storage compartment in the glove box
An AUX socket 1 is located on the left side
of the glove box. Portable audio devices
can be plugged in here. A storage compart-
ment is located in the cover of the glove
box. It can be used to store check cards,
pens, a flashlight, etc.
1AUX socket
2Storage compartment in glove box
�
Lightly press the marking on the lid of
storage compartment2.
The lid opens upward.
Warning!
G
To help avoid personal injury during a colli-
sion or sudden maneuver, exercise care
when stowing objects in the vehicle. Put lug-
g a g e o r c a r g o i n t h e t r u n k i f p o s s i b l e . D o n o t
pile luggage or cargo higher than the seat
backs.
Luggage nets cannot secure hard or heavy
objects.
Keep compartment lids closed. This will help
to prevent stored objects from being thrown
about and injuring vehicle occupants during
an accident.
iThe glove box can be locked and un-
locked with the mechanical key.
Page 228 of 416
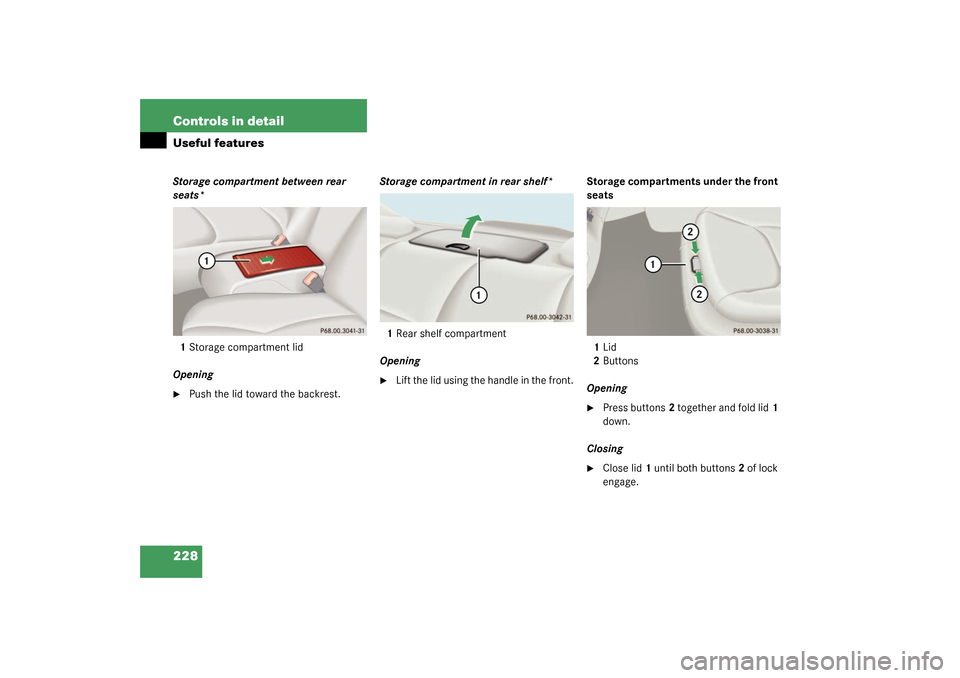
228 Controls in detailUseful featuresStorage compartment between rear
seats*
1Storage compartment lid
Opening�
Push the lid toward the backrest.Storage compartment in rear shelf*
1Rear shelf compartment
Opening
�
Lift the lid using the handle in the front.Storage compartments under the front
seats
1Lid
2Buttons
Opening
�
Press buttons2 together and fold lid1
down.
Closing
�
Close lid1 until both buttons2 of lock
engage.
Page 238 of 416

238 Controls in detailUseful featuresSystem self-check
Initially, after turning the SmartKey in
starter switch to position2, malfunctions
are detected and indicated (the indicator
lamps in the SOS button, the Roadside As-
sistance button
•
and the Information
button
¡
stay on longer than
10 seconds or do not come on). The mes-
sage
TELE AID – VISIT WORKSHOP!
ap-
pears for approximately 10 seconds in the
multifunction display.Emergency calls
An emergency call is initiated automatical-
ly:
�
Following an accident in which the
emergency tensioning devices (ETDs)
or airbags deploy
�
If the anti-theft alarm or the tow-away
alarm stays on for more than
20 seconds. See anti-theft alarm sys-
tem (
�page 82) and tow-away alarm
(
�page 84)
An emergency call can also be initiated
manually by opening the cover next to the
inside rear view mirror labeled SOS, then
briefly pressing the button located under
the cover. See below for instructions on
initiating an emergency call manually.
iThe Tele Aid system utilizes the cellular
network for communication and the
GPS (Global Positioning System) satel-
lites for vehicle location. If either of
these signals are unavailable, the Tele
Aid system may not function and if this
occurs, assistance must be summoned
by other means.
Warning!
G
If the indicator lamps in the SOS button, in
the Roadside Assistance button and/or in
the Information button remain illuminated
constantly in red and/or the message TELE AID – VISIT WORKSHOP!
is dis-
played in the multifunction display after the
system self-check, a malfunction in the sys-
tem has been detected.
If a malfunction is indicated as outlined
above, the system may not operate as ex-
pected. Have the system checked at the
nearest Mercedes-Benz Center as soon as
possible.
Page 241 of 416

241 Controls in detail
Useful features
A voice connection between the Roadside
Assistance dispatcher and the occupants
of the vehicle will be established. When a
voice connection is established, the audio
system mutes and the message
TELE AID
– ROADSIDE ASSISTANCE CALL ACTIVE
ap-
pears in the multifunction display.
�
Describe the nature of the need for as-
sistance.
The Mercedes-Benz Roadside Assistance
dispatcher will either dispatch a qualified
Mercedes-Benz technician or arrange to
tow your vehicle to the nearest
Mercedes-Benz Center. For services such
as labor and/or towing, charges may ap-
ply. Refer to the Roadside Assistance man-
ual for more information.These programs are only available in the
USA:
�
Sign and Drive services: Services such
as jump start, a few gallons of fuel or
the replacement of a flat tire with the
vehicle spare tire are obtainable.
�
Remote Vehicle Diagnostics: This func-
tion permits the Mercedes-Benz Road-
side Assistance dispatcher to
download malfunction codes and actu-
al vehicle data.
iThe indicator lamp in the Roadside As-
sistance button
•
remains illumi-
nated in red for approx. 10 seconds
during the system self-check after turn-
ing the key in the starter switch to
position2 (together with the SOS but-
ton and the Information button
¡
).
See system self-check (
�page 238)
when the indicator lamp does not light
up in red or stays on longer than ap-
proximately 10 seconds.
If the indicator lamp in the Roadside
Assistance button
•
is continuous-
ly illuminated and no voice connection
to the Response Center was estab-
lished, the Tele Aid system could not
initiate a Roadside Assistance call (e.g.
the relevant cellular phone network is
not available). The message
ROADSIDE
ASSISTANCE – CALL FAILED appears in
the multifunction display. Roadside As-
sistance calls can be terminated using
the
ì
button on the multifunction
steering wheel.