Page 21 of 416
21 At a glance
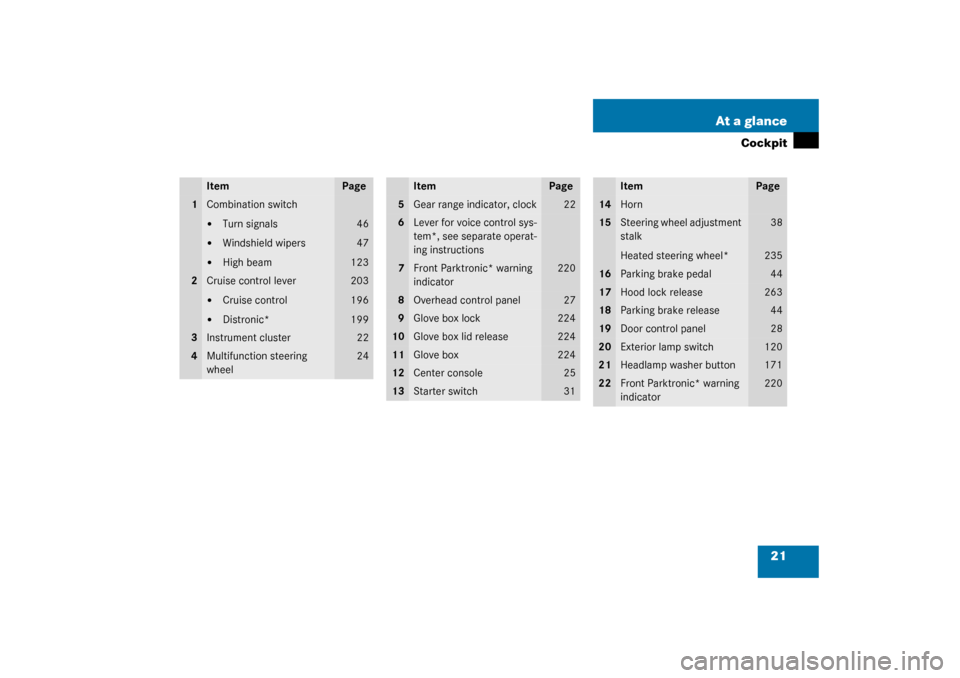
Cockpit
Item
Page
1
Combination switch�
Turn signals
�
Windshield wipers
�
High beam
46
47
123
2
Cruise control lever�
Cruise control
�
Distronic*
203
196
199
3
Instrument cluster
22
4
Multifunction steering
wheel
24
Item
Page
5
Gear range indicator, clock
22
6
Lever for voice control sys-
tem*, see separate operat-
ing instructions
7
Front Parktronic* warning
indicator
220
8
Overhead control panel
27
9
Glove box lock
224
10
Glove box lid release
224
11
Glove box
224
12
Center console
25
13
Starter switch
31
Item
Page
14
Horn
15
Steering wheel adjustment
stalk
Heated steering wheel*
38
235
16
Parking brake pedal
44
17
Hood lock release
263
18
Parking brake release
44
19
Door control panel
28
20
Exterior lamp switch
120
21
Headlamp washer button
171
22
Front Parktronic* warning
indicator
220
Page 23 of 416

23 At a glance
Instrument cluster
Item
Page
1
Coolant temperature
gauge
128
2
Fuel gauge with:Fuel reserve warning lamp
294
3
L
Left turn signal
indicator lamp
K
Right turn signal
indicator lamp
46
4
Speedometer with:v
Electronic Stability
Program (ESP)
warning lamp
l
Distance* warning
lamp
1
1Vehicles without Distronic*: Warning lamp without
function. It illuminates with SmartKey in starter
switch position2. It should go out when the engine
is running.
290
5
Tachometer
129
Item
Page
6
Right display with:-
Antilock Brake Sys-
tem (ABS) malfunc-
tion indicator lamp
290
A
High beam head-
lamp indicator
46
<
Seat belt nonusage
warning lamp
289
7
J
Reset button
127
8
Display with:
Program mode
164
Gear range
indicator
162
Digital clock (see
COMAND operat-
ing instructions)
9
Multifunction display
with:
Trip odometer
130
Main odometer
130
Stored speed for:Cruise control
196
Distronic*
142
10
Outside temperature in-
dicator
129
11
Left display with:1
Supplemental
restraint system
indicator lamp
292
;
Brake warning
lamp, except
Canada
293
3
Brake warning
lamp, Canada only
293
?
Engine malfunction
indicator lamp
294
12
Knob for instrument
cluster illumination
127
Item
Page
Page 24 of 416
24 At a glanceMultifunction steering wheel
Multifunction steering wheel
Item
Page
1
Multifunction display
130
Operating control
system
130
2
Selecting the submenu or
setting the volume
131
ç
down / to decrease
æ
up / to increase
3
Telephone*: Press button
131
í
to take a call
to dial a call
ì
to end a call
to reject an in-
coming call
Item
Page
4
Menu systems: Press
button
131
è
for next system
ÿ
for previous system
5
Moving within a menu:
Press button
131
j
for next display
k
for previous display
Page 26 of 416
26 At a glanceCenter consoleLower part
Item
Page
1
KEYLESS-GO* start / stop
button
33
2
Selector lever for
automatic transmission
43
3
PASSENGER AIRBAG OFF
indicator lamp
69
4
Thumbwheel for setting
distance in Distronic*
206
Item
Page
5
Distance warning func-
tion* on / off switch
206
6
Lower storage space
225
7
Program mode selector for
automatic transmission
164
Page 27 of 416
27 At a glance
Overhead control panel
Overhead control panel
Item
Page
1
Left reading lamp on/off
126
2
Rear interior lighting
on/off
126
3
Right reading lamp on/off
126
4
Interior lighting control
125
5
Sliding/pop-up roof
192
6
Hands-free microphone for
Tele Aid (emergency call
system), telephone*, and
voice control system* (see
separate operating instruc-
tions)
237
7
Rear view mirror
38
8
Garage door opener
245
9
Tele Aid (emergency call
system) button
240
Page 30 of 416

30 Getting startedUnlockingThe “Getting started” section provides an
overview of the vehicle’s most basic func-
tions. First-time Mercedes-Benz owners
should pay special attention to the infor-
mation given here.
If you are already familiar with the basic
functions described here, the “Controls in
detail” section will help you with further in-
formation. The corresponding page refer-
ences are at the end of each segment.
UnlockingUnlocking with the SmartKey
Your vehicle comes equipped with two
SmartKeys with integrated remote con-
trols and removable mechanical key.
The locking tabs for the mechanical key
portion of the two SmartKeys are a differ-
ent color to help distinguish each
SmartKey unit.SmartKey with remote control 1‹
Lock button
2
Š
Unlock button for trunk lid
3
Œ
Unlock button
4
Â
Panic button
�
Press unlock button
Œ
on the
SmartKey.
All turn signal lamps blink once. The
locking knobs in the doors move up.
�
Get in the vehicle and insert the
SmartKey in the starter switch.
Page 33 of 416
.
Make sur")
33 Getting started
Unlocking
1KEYLESS-GO start/stop button
Before you press the KEYLESS-GO
start/stop button, the vehicle’s on-board
electronics have status 0 (as with
SmartKey removed).
Make sure the gear selector lever is set
toP.
Do not depress the brake pedal.Position 1
�
Press the KEYLESS-GO start/stop but-
ton once.
This supplies power to some electrical
consumers, such as seat adjustment.
Ignition (or position 2)
�
Press the KEYLESS-GO start/stop but-
ton twice in immediate succession.
This supplies power to all electrical
consumers. All the lights in the instru-
ment cluster light up.More information can be found in the
“Controls in detail” section (
�page 85).
For information on starting the engine us-
ing the KEYLESS-GO start/stop button,
see “Starting with KEYLESS-GO*”
(
�page 43).
iIf you now press the KEYLESS-GO
start/stop button twice, the power
supply is again switched off.iIf you now press the KEYLESS-GO
start/stop button once, the power sup-
ply is again switched off.
Page 36 of 416

36 Getting startedAdjusting�
Turn the SmartKey in the starter switch
to position1or2.
or
�
Press the KEYLESS GO* start/stop
button once or twice.
or
�
Open the respective driver’s or passen-
ger door.
Seat height
�
Press the switch up or down in the di-
rection of arrow2.
Seat cushion tilt
�
Press the switch up or down in the di-
rection of arrow3 until your upper legs
are lightly supported.Seat cushion depth
�
Press the switch forward or backward
in the direction of arrow4 until your
legs are supported comfortably.
Seat fore and aft adjustment
�
Press the switch forward or backward
in the direction of arrow5.
Adjust to a comfortable seating posi-
tion that still allows you to reach the
accelerator / brake pedal safely. The
position should be as far to the rear as
possible, consistent with ability to
properly operate controls.Seat backrest tilt
�
Press the switch forward or backward
in the direction of arrow6 until your
arms are slightly angled when holding
the steering wheel.
iWhen moving the seat, be sure that
there are no items in the footwell or be-
hind the seats. Otherwise you could
damage the seats.