Page 142 of 416

142 Controls in detailControl systemNAVI menu
The
NAVI
menu contains the functions
needed to operate your navigation system.
�
Press button
è
or
ÿ
repeatedly
until you see the message NAVI
in the
display.
�
If the navigation system is switched off,
the message
NAVI OFF
is shown in the
display.
�
If the navigation system is on, the mes-
sage
NAVI ACTIVE
is shown in the dis-
play.
Please refer to the COMAND manual for in-
structions on how to activate the route
guidance system.
Distronic* menu
Use the Distronic menu to display the cur-
rent settings for your Distronic system.
What information is shown in the display
depends on whether the Distronic system
is active or inactive.
Please refer to the “Driving systems” sec-
tion of this manual (
�page 199) for in-
structions on how to activate Distronic.
�
Press button
è
or
ÿ
repeatedly
until you see one of the following two
pictures in the display.Distronic deactivated
When Distronic is deactivated you will see
the standard display in the display.
1Vehicle ahead, if detected
2Actual distance to vehicle ahead
3Should-be distance to vehicle ahead
4Symbol for activated distance warning
function
5Your vehicle
Page 143 of 416
143 Controls in detail
Control system
Distronic activated
When Distronic is activated,
DISTRONIC
and the set speed are seen in the display.
1Distronic activated
Trip computer menu
Use the trip computer menu to call up sta-
tistical data on your vehicle. The following
information is available:Fuel consumption statistics after start
�
Press button
ÿ
or
è
repeatedly
until you see the first function of the
Trip computer menu.
�
Press button
j
or
k
repeatedly
until you see this message in the left
display:
AFTER START
.
1Distance driven since start
2Time elapsed since start
3Average fuel consumption since start
4Average speed since start
Function
Page
Fuel consumption statistics after
start
see
below
Fuel consumption statistics
since last reset
144
Call up range (distance to empty)
145
Page 144 of 416

144 Controls in detailControl system
Fuel consumption since last reset�
Press button
ÿ
or
è
repeatedly
until you see the first function of the
trip computer menu.
�
Press button
j
or
k
repeatedly
until you see this message in the dis-
play:
AFTER RESET
.
1Distance driven since last reset
2Time elapsed since last reset
3Average fuel consumption since last re-
set
4Average speed since last resetResetting fuel consumption statistics
�
Press button
ÿ
or
è
repeatedly
until you see the first function of the
Trip computer menu.
�
Press button
j
or
k
repeatedly
until you see the reading that you want
to reset in the display.
�
Press and hold the reset button
J
in
the instrument cluster (
�page 22) un-
til the value is reset to
0.
iThe
AFTER START
display will flash until
a distance of approximately 1 mile (1.6
km) has been covered or two minutes
have elapsed since the engine was re-
started. During this period, you can in-
corporate the values for the previous
journey by pressing
J
in the instru-
ment cluster.
If button
J
is not pressed, the AFTER
START values are set to 0.
Page 145 of 416
�
Press button
ÿ
or
è
repeatedly
until you see the first function of the
Trip computer menu.
�
Press button
j
or
k
repeat")
145 Controls in detail
Control system
Call up range (distance to empty)�
Press button
ÿ
or
è
repeatedly
until you see the first function of the
Trip computer menu.
�
Press button
j
or
k
repeatedly
until you see this message in the dis-
play:
RANGE
.
In the display you will see the calculat-
ed range based on the current fuel tank
level.
Malfunction memory menu
Use the malfunction memory menu to scan
malfunction and warning messages that
may be stored in the system. What infor-
mation is shown in the display depends on
whether malfunctions have actually oc-
curred.
�
Press button
è
or
ÿ
repeatedly
until you see the malfunction message
memory in the display.
No malfunction messages
If no malfunctions have occurred, the mes-
sage in the display is:
NO MALFUNCTIONMalfunctions have occurred
If malfunctions have occurred, you will see
the number of malfunctions in the display:
1Number of malfunctions
Warning!
G
Malfunction and warning messages are only
indicated for certain systems and are inten-
tionally not very detailed. The malfunction
and warning messages are simply a remind-
er with respect to the operation of certain
systems and do not replace the owner’s
and/or driver’s responsibility to maintain
the vehicle’s operating safety by having all
required maintenance and safety checks
performed on the vehicle and by bringing
the vehicle to an authorized Mercedes-Benz
Center to address the malfunction and
warning messages (
�page 296).
Page 146 of 416

146 Controls in detailControl system�
Press button
k
or
j
.
The stored messages will now be dis-
played in the order in which the mal-
functions have occurred. See the
“Practical hints” section for malfunc-
tion and warning messages
(
�page 296).
Should any malfunctions occur while driv-
ing, the number of malfunctions will reap-
pear in the display when the SmartKey in
the starter switch is turned to position0 or
removed from the starter switch.
Settings menu
In the
SETTINGS
menu there are two func-
tions:
�
The function
TO RESET: R BUTTON FOR
3 SEC.
, with which you can reset all
settings to the original factory settings.
�
A collection of submenus with which
you can make individual settings for
your vehicle.
�
Press button
è
or
ÿ
repeatedly
until the
SETTINGS
m e n u a p p e a r s i n t h e
display.Resetting all settings
You can reset all the functions of all sub-
menus to the factory settings.
�
Press the reset button
J
in the instru-
ment cluster for approximately three
seconds.
In the display you will see the request
to press the reset button J
again to
confirm.
�
Press the reset button
J
again.
The functions of all the submenus will
reset to factory settings.
iThe message memory will be cleared
when you turn the SmartKey in the
starter switch to position1 or2. You
will then only see high priority messag-
es in the malfunction display
(�page 296).
iThe settings you have changed will not
be reset unless you confirm the action
by pressing the reset button
J
a sec-
ond time.
Due to safety reasons, resetting all of
the settings while driving will not reset
all of the values in the
LIGHTING
or the
VEHICLE
menu.
Page 147 of 416
147 Controls in detail
Control system
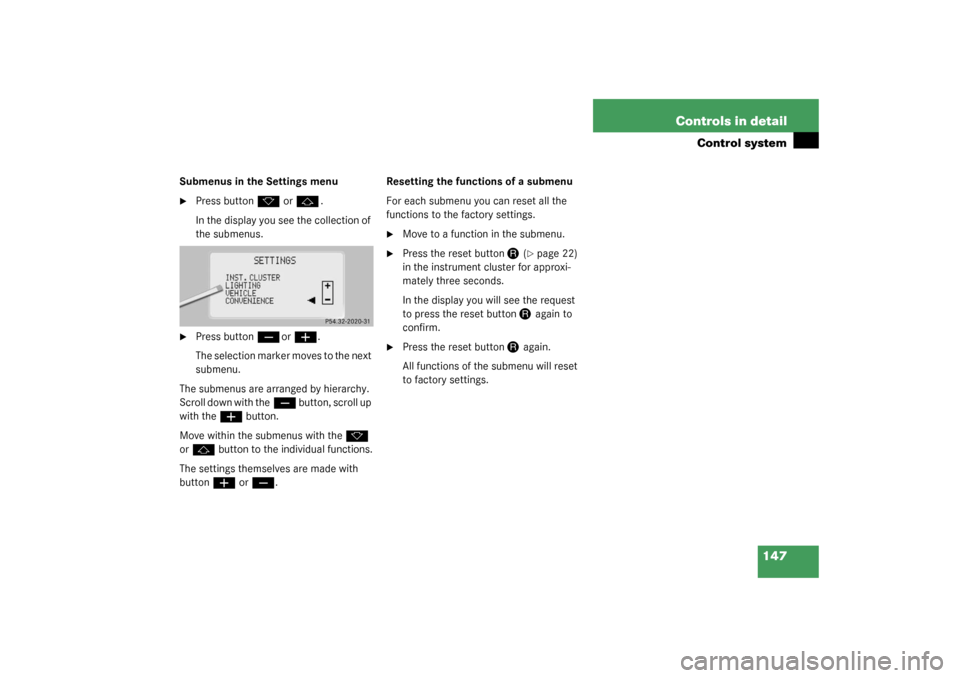
Submenus in the Settings menu�
Press button
k
or
j
.
In the display you see the collection of
the submenus.
�
Press button
ç
or
æ
.
The selection marker moves to the next
submenu.
The submenus are arranged by hierarchy.
Scroll down with the
ç
button, scroll up
with the
æ
button.
Move within the submenus with the
k
or
j
button to the individual functions.
The settings themselves are made with
buttonæ
or
ç
.Resetting the functions of a submenu
For each submenu you can reset all the
functions to the factory settings.
�
Move to a function in the submenu.
�
Press the reset button
J
(�page 22)
in the instrument cluster for approxi-
mately three seconds.
In the display you will see the request
to press the reset button
J
again to
confirm.
�
Press the reset button
J
again.
All functions of the submenu will reset
to factory settings.
Page 149 of 416

149 Controls in detail
Control system
Instrument cluster submenu
Access the
INST. CLUSTER
submenu via
the
SETTINGS
menu. Use the
INST. CLUS-
TER
submenu to change the instrument
cluster display settings. The following
functions are available:Selecting temperature display mode
�
Move the selection marker with
the
æ
or
ç
button to the
INST.
CLUSTER
submenu.
�
Press button
j
or
k
repeatedly
until you see this message in the dis-
play:
TEMP. INDICATOR
.
The selection marker is on the current
setting.
�
Press
æ
or
ç
to set the temper-
ature unit to degrees Celsius (°C) or
degrees Fahrenheit (°F).Selecting multifunction display mode
�
Move the selection marker with
the
æ
or
ç
button to the
INST.
CLUSTER
submenu.
�
Press button
j
or
k
repeatedly
until you see this message in the dis-
play:
DISPLAY VALUES IN
.
The selection marker is on the current
setting.
�
Press
æ
or
ç
to set speedome-
ter unit to
MILES
or
KM.
Function
Page
Select temperature display
mode
150
Select multifunction display
mode
149
Select language
150
Page 150 of 416
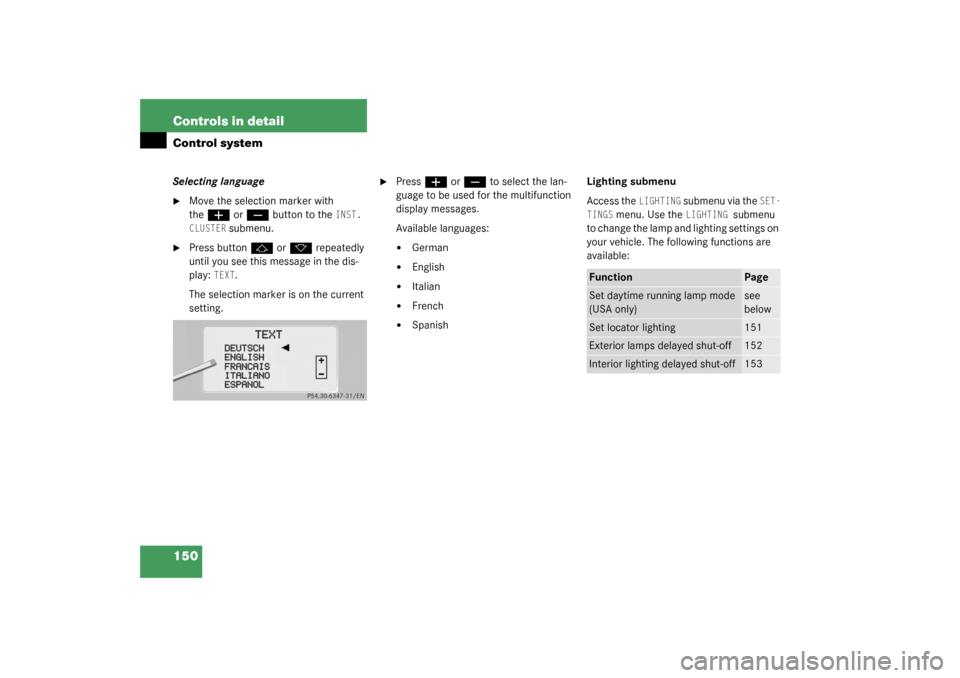
150 Controls in detailControl systemSelecting language�
Move the selection marker with
the
æ
or
ç
button to the
INST.
CLUSTER
submenu.
�
Press button
j
or
k
repeatedly
until you see this message in the dis-
play:
TEXT
.
The selection marker is on the current
setting.
�
Press
æ
or
ç
to select the lan-
guage to be used for the multifunction
display messages.
Available languages:
�
German
�
English
�
Italian
�
French
�
SpanishLighting submenu
Access the
LIGHTING
submenu via the
SET-
TINGS
menu. Use the
LIGHTING
submenu
to change the lamp and lighting settings on
your vehicle. The following functions are
available:
Function
Page
Set daytime running lamp mode
(USA only)
see
below
Set locator lighting
151
Exterior lamps delayed shut-off
152
Interior lighting delayed shut-off
153