Page 323 of 416
323 Practical hints
Where will I find ...?
The vehicle tool kit includes:�
One pair of universal pliers
�
Two open-end wrenches
�
One hex-socket wrench
�
One interchangeable slot/Phillips
screwdriver
�
One towing eye bolt
�
One wheel wrench
�
One alignment bolt
�
One fuse extractor
�
One fuse chart for the main fuse box
�
Spare fusesVehicle jack
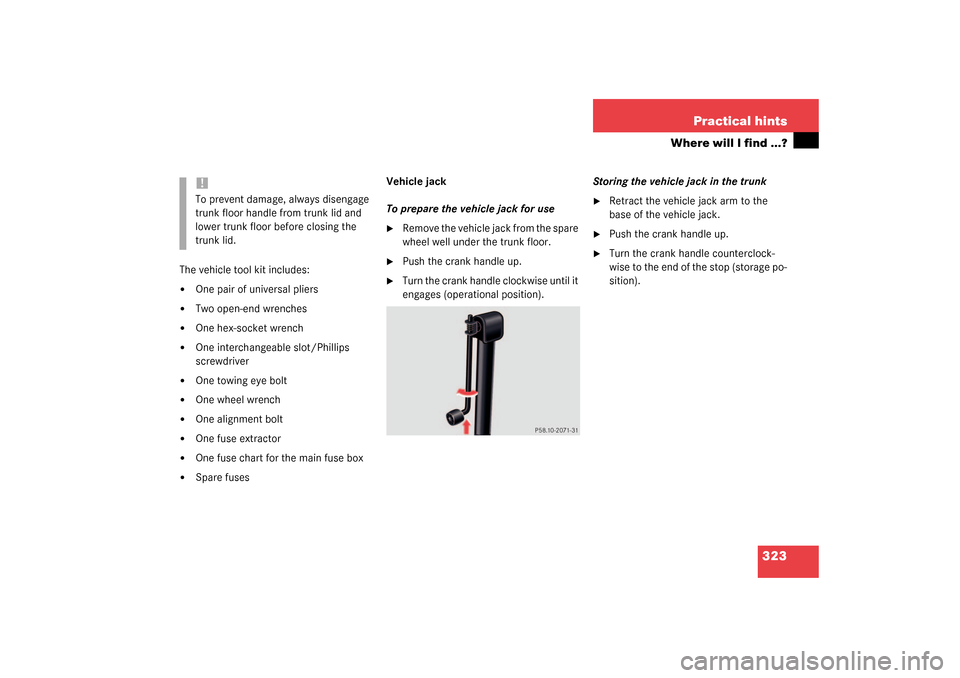
To prepare the vehicle jack for use
�
Remove the vehicle jack from the spare
wheel well under the trunk floor.
�
Push the crank handle up.
�
Turn the crank handle clockwise until it
engages (operational position).Storing the vehicle jack in the trunk
�
Retract the vehicle jack arm to the
base of the vehicle jack.
�
Push the crank handle up.
�
Turn the crank handle counterclock-
wise to the end of the stop (storage po-
sition).
!To prevent damage, always disengage
trunk floor handle from trunk lid and
lower trunk floor before closing the
trunk lid.
Page 327 of 416

327 Practical hints
Unlocking/locking in an emergency
Unlocking the trunk
If you are unable to unlock the trunk with
the SmartKey, open the trunk with the me-
chanical key as follows:Trunk lock�
Insert the mechanical key into the
trunk lid lock.
�
Turn the mechanical key counterclock-
wise to position1.
�
Press button2.
The trunk lid swings open.
Locking the vehicle
If you are unable to lock the vehicle with
the SmartKey or the KEYLESS-GO* card,
lock it with the mechanical key as follows:�
Close the passenger doors and the
trunk lid.
�
Press the central locking switch in the
center console (
�page 103).
�
Check to see whether the locking knob
on the passenger door is still visible. If
necessary push it down manually.
�
Lock the driver’s door with the me-
chanical key.
�
Lock the trunk lid if necessary with the
mechanical key (
�page 326).
!The trunk lid swings open upwards au-
tomatically. Always make sure that
there is sufficient overhead clearance.
A minimum height clearance of 6 ft.
(1.85 m) is required to open the trunk
lid.iUnlocking your vehicle with the me-
chanical key will trigger the anti-theft
alarm system. To cancel the alarm, do
one of the following:�
Press button
Œ
or
‹
on the
SmartKey.
�
Insert the SmartKey in the starter
switch.
�
If KEYLESS-GO* card present,
press the start/stop button
(�page 33).
Page 329 of 416
329 Practical hints
Unlocking/locking in an emergency
3Battery
4Contact spring�
Using a lint-free cloth, insert new bat-
teries under the contact spring with the
plus (+) side facing up.
�
Return battery compartment into hous-
ing until it locks into place.KEYLESS-GO* card
1Battery cover
Replacement batteries: Lithium, type
CR 2025 or equivalent.
�
Pry open cover 1 (e.g. by using a nar-
row blade screwdriver).
�
Remove the batteries.
�
Install new batteries as indicated by
the “+” and “-” markings in the
KEYLESS-GO card.
�
Replace battery cover 1.
Fuel filler flap
In an emergency, the fuel filler flap can be
opened from the trunk. The release lever is
located on the right-hand side in the trunk.
1Release knob�
Open the trunk with the mechanical
key (
�page 326).
�
Remove the trim inside the trunk on the
right-hand side.
�
Pull release lever1 in the direction of
the arrow.
The fuel filler flap can be opened.
Page 336 of 416
336 Practical hintsReplacing bulbsReplacing bulbs for rear lamps
Tail lamp assemblies
1Turn signal lamp (white socket)
2Tail, parking, standing, and side marker
lamp (red socket)
3Tail lamp, rear fog lamp (red socket)
4Backup lamp (black socket)
�
Switch off the lights.
�
Open trunk.
�
Turn the catch, and move the trim to
the side.
�
Turn bulb socket counterclockwise and
pull out.
�
Gently twist bulb counterclockwise and
pull out of bulb holder.
�
Insert new bulb into the holder and turn
it clockwise.
�
Reinstall bulb socket.
The bulb socket should audibly click.
�
Replace trim and secure with lock. License plate lamp
1Screws
�
Switch off the lights.
�
Loosen both screws1 and remove
lamp.
�
Replace the tubular lamp and reinstall
it.
�
Retighten the screws.
Page 339 of 416

339 Practical hints
Flat tire
Flat tire
Preparing the vehicle�
Park the vehicle as far as possible from
moving traffic on a hard surface.
�
Turn on the hazard warning flashers.
�
Engage the steering wheel lock in the
straight-ahead position and set the
parking brake.
�
Move the selector lever toP.
�
Have any passenger exit the vehicle at
a safe distance from the roadway.
Mounting the spare wheel Preparing the vehicle
�
Take vehicle tool kit tray and vehicle
jack out of trunk .
�
Take the spare wheel out of wheel well
(�page 322).
Lifting the vehicle
�
Prevent the vehicle from rolling away
by blocking wheels with wheel chocks
(not included) or other sizable objects.
When changing wheel on a level surface:
�
Place one chock in front of and one be-
hind the wheel that is diagonally oppo-
site to the wheel being changed.
When changing wheel on a hill:
�
Place chocks behind the downhill sides
of both wheels of the axle not being
worked on.
Warning!
G
Never operate the vehicle with more than
one spare wheel mounted.
The spare wheel rim is for temporary use
only. Use for over a total of 12000 miles
(20000 km) (aggregate of all uses) may
cause wheel rim failure leading to an acci-
dent and possible injuries.
The spare wheel should only be used tempo-
rarily and replaced with a regular road wheel
as quickly as possible.
S 55 AMG and Sport Package* only:
The spare wheel is for temporary use only.
When driving with spare wheel mounted, en-
sure proper tire pressure and do not exceed
vehicle speed of 50 mph (80 km/h).
The dimensions of the spare wheel are dif-
ferent from those of the road wheels. As a
result, the vehicle handling characteristics
change when driving with a mounted spare
wheel. Adapt your driving style accordingly.
��
Page 343 of 416
343 Practical hints
Flat tire
�
Before storing the jack in the trunk, it
should be fully collapsed, with handle
folded in.
�
Place the wheel bolt wrench, alignment
bolt and jack back in the vehicle tool kit
in the trunk and close the covering lid.
Replacing jack support tube cover
�
Slide tongue of cover under the upper
edge of the tube opening.
�
Applying even pressure, press cover
until it snaps into place. Be careful not
to damage the locking tabs or clamp
the plastic retaining strap.!You can also screw the faulty wheel
down into the spare wheel well in the
trunk.
Do not activate the tire inflation pres-
sure monitor until the depressurized
tire is no longer in the vehicle.
��
Page 344 of 416

344 Practical hintsBattery
Battery
The battery is located on the right side of
the trunk under the battery cover.
1Battery cover �
Pull on the outer, right-hand side of
cover1 and remove it in the direction
of the arrow.
Warning!
G
Failure to follow these instructions can re-
sult in severe injury or death.
Never lean over batteries while connecting,
you might get injured.
Battery fluid contains sulfuric acid. Do not
allow this fluid to come in contact with eyes,
skin or clothing. In case it does, immediately
flush affected area with water and seek
medical help if necessary.
A battery will also produce hydrogen gas,
which is flammable and explosive. Keep
flames or sparks away from battery, avoid
improper connection of jumper cables,
smoking etc.Warning!
G
Do not place metal objects on the battery as
this could result in a short circuit.
Use leak-proof battery only to avoid the risk
of acid burns in the event of an accident.
!Never loosen or detach battery termi-
nal clamps while the engine is running
or the SmartKey is in the starter switch.
Otherwise the alternator and other
electronic components could be se-
verely damaged.
Have the battery checked regularly by
an authorized Mercedes-Benz Center.
Refer to Service Booklet for mainte-
nance intervals or contact your autho-
rized Mercedes-Benz Center for further
information.Warning!
G
With a disconnected battery�
you will no longer be able to turn the
SmartKey in the starter switch and
pressing the KEYLESS-GO* start/stop
button (if so equipped) on the selector
lever will have no effect
�
the selector lever will remain locked in
positionP
Page 345 of 416
.
�
Remove the battery cover1.
�
Detach n")
345 Practical hints
Battery
2Positive terminal
3Negative terminalDisconnecting the battery�
Turn off all electrical consumers.
�
Open the trunk lid (
�page 95).
�
Remove the battery cover1.
�
Detach negative terminal3 of battery
with 10 mm open-end wrench from the
vehicle tool kit.
�
Remove cover from the positive
terminal2.
�
Detach the positive terminal of the bat-
tery with the 10 mm open-end wrench.
Removing the battery�
Remove the screw securing the bat-
tery.
�
Remove the battery support and
bracket.
�
Take out the battery.
Charging and reinstalling battery�
Charge battery in accordance with the
instructions of the battery charger
manufacturer.
�
Reinstall the charged battery. Follow
the previously described steps in re-
verse order.
Reconnecting the battery�
Turn off all electrical consumers.
�
Connect the positive lead and fasten its
cover2.
�
Connect negative lead3.Warning!
G
Never charge a battery while still installed in
the vehicle. Gases may escape during charg-
ing and cause explosions that may result in
paint damage, corrosion or personal injury.!Never invert the terminal connections.!The battery, its filler caps and the vent
tube must always be securely installed
when the vehicle is in operation.


2Tail, parking, standing, and side marker
lamp (red socket)
3Tail lamp, rear fog")