Page 90 of 416

90 Controls in detailLocking and unlocking
Important notes on using KEYLESS-GO�
Always carry the KEYLESS-GO card
with you.
�
Never store the KEYLESS-GO card to-
gether with:�
Electronic items such as a cellular
phone or another KEYLESS-GO card
�
Metallic objects such as coins or
metal foil
Doing so could impair the function of
the KEYLESS-GO system.
�
Always take a SmartKey with you in
case of a malfunction in the
KEYLESS-GO system.
�
To lock or unlock the vehicle, the card
must be located outside the vehicle
within approximately 3 ft. (1 m) of a
door or the trunk lid.
�
In order to start the engine with the
KEYLESS-GO card:�
The KEYLESS-GO card must be lo-
cated in the vehicle.
�
All doors must be closed.
�
If you have started the engine with the
KEYLESS-GO start/stop button, you
can only turn it off again with this but-
ton, even if you have put the SmartKey
in the starter switch in the meantime.
�
This does not apply if, after starting, the
selector lever is still in positionP. The
SmartKey will then have priority over
the card and the vehicle’s electrical
system will operate according to the
position of the SmartKey in the starter
switch, even stopping the engine.
Warning!
G
When leaving the vehicle, always remove the
SmartKey from the starter switch, take the
KEYLESS-GO card (if so equipped) with you
and lock the vehicle. Do not leave children
unattended in the vehicle, or with access to
an unlocked vehicle. Unsupervised use of
vehicle equipment may cause an accident
and/or serious personal injury.!To prevent possible malfunction, avoid
exposing the KEYLESS-GO card to high
levels of electromagnetic radiation.
Page 91 of 416
 and can no
longer be recognized by the system,")
91 Controls in detail
Locking and unlocking
�
If the KEYLESS-GO card is positioned
farther away from the vehicle (e.g. in-
side clothing or briefcase) and can no
longer be recognized by the system,
the vehicle cannot be locked or the en-
gine started via the KEYLESS-GO sys-
tem.
�
If the KEYLESS-GO card is removed
from the vehicle while the ignition is
switched on (e.g. if passenger exits the
vehicle with the card), the message CHIP CARD NOT RECOGNIZED!
will ap-
pear in the multifunction display.
Find the card or change its present lo-
cation immediately (e.g. place it on the
front passenger seat or insert it in shirt
pocket).
�
Remember that the engine can be
started by anyone with a KEYLESS-GO
card that is left inside the vehicle. If you
leave the card behind when exiting and
locking the vehicle, the message
CHIP
CARD DETECTED IN VEHICLE!
will ap-
pear in the multifunction display.Factory setting
Global unlocking
�
Grasp the door handle.
The vehicle will lock again automatically
within approximately 40 seconds of un-
locking if neither door nor trunk is opened.
Global locking
�
Press lock button at door handle
(�page 53) or trunk (
�page 93).Individual setting
If you frequently travel alone, you may wish
to reprogram the KEYLESS-GO card so that
grasping a door handle only unlocks the
driver’s door, interior lockable storage
compartments and the fuel filler flap.
1Programming button
2“Driver’s door” symbol
3“Global unlock” symbol
iThe vehicle could inadvertently be un-
locked if the KEYLESS-GO card is with-
in 3 ft. (1 m) of the vehicle and: �
the door handle is splashed with
water, or
�
you attempt to clean the door
handle
Page 104 of 416
104 Controls in detailSeats
SeatsInformation on seat adjustment can be
found in the “Getting started” section,
(�page 34).
Lumbar support
You can adjust the contour of the seat’s
lumbar support to best support your spine.
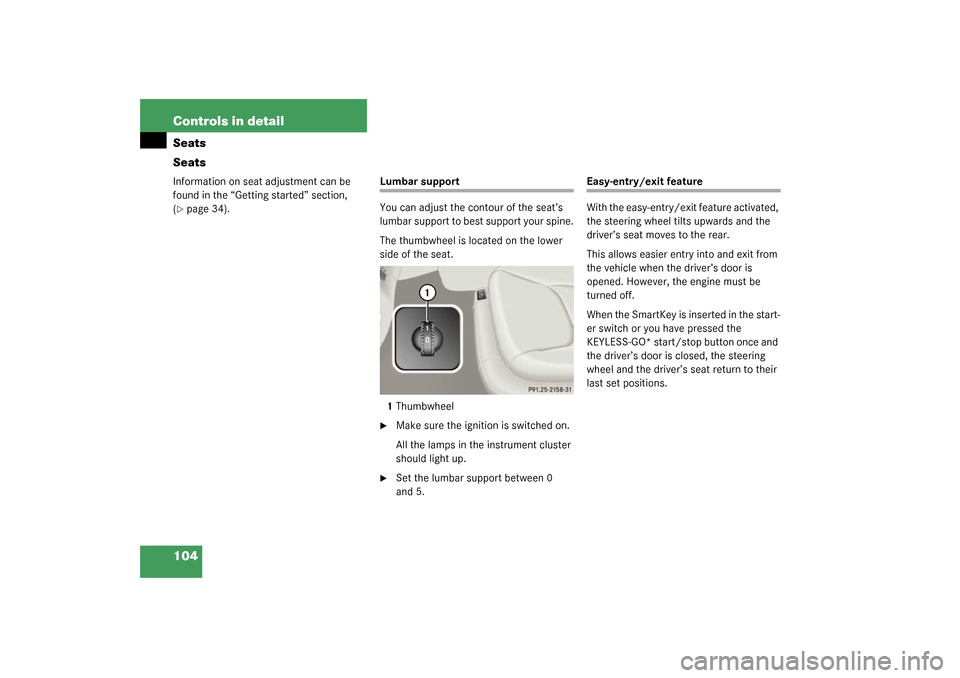
The thumbwheel is located on the lower
side of the seat.
1Thumbwheel�
Make sure the ignition is switched on.
All the lamps in the instrument cluster
should light up.
�
Set the lumbar support between 0
and 5.
Easy-entry/exit feature
With the easy-entry/exit feature activated,
the steering wheel tilts upwards and the
driver’s seat moves to the rear.
This allows easier entry into and exit from
the vehicle when the driver’s door is
opened. However, the engine must be
turned off.
When the SmartKey is inserted in the start-
er switch or you have pressed the
KEYLESS-GO* start/stop button once and
the driver’s door is closed, the steering
wheel and the driver’s seat return to their
last set positions.
Page 108 of 416
108 Controls in detailSeats1Shoulder region support
2Side bolster adjustment
3Massage function (PULSE)
4Lumbar region support
Adjusting the multicontour seat in the or-
der listed above is recommended.�
Make sure that the ignition is switched
on.
All lamps in the instrument cluster light
up.Shoulder region support
�
Press
æ
or
ç
on switch1.
The air cushion inflates or deflates.
Lumbar region support
�
Press
k
or
j
on rocker
switch4.
This selects the air cushion you wish to
adjust.
�
Press
æ
or
ç
on rocker
switch4.
The air cushion inflates or deflates.Side bolsters adjustment
�
Adjust the side bolsters so that they
provide good lateral support using
switch 2.iWhen the engine is turned off, the last
cushion setting is retained in memory
and the cushion is automatically ad-
justed to this setting when the engine
is restarted.
Page 120 of 416
.
Exterior lamp switch
The exterior lam")
120 Controls in detailLighting
LightingFor notes on how to switch on the head-
lamps and use the turn signals, see the
“Getting started” section (
�page 46).
Exterior lamp switch
The exterior lamp switch is located on the
dashboard to the left of the steering wheel.
M
Off
U
Automatic headlamp mode
C
Parking lamps (also side marker
lamps, tail lamps, license plate
lamps, instrument panel lamps)
Canada only: When engine is run-
ning, the low beam is also switched
on.
B
Parking lamps plus low beam or
high beam headlamps (combination
switch pushed forward).
ˆ
Standing lamps, right (turn left one
stop)
‚
Standing lamps, left (turn left two
stops)
iIf you remove the SmartKey and open
the driver’s door while the parking
lamps or low beam headlamps are
switched on, then: �
A warning sounds.
�
$
appears in the multifunction
display.
�
The message
TURN OFF LIGHTS!
ap-
pears in the multifunction display.
iWith the daytime running lamp mode
activated and the engine running, the
low beam headlamps cannot be
switched off manually.
Page 122 of 416

122 Controls in detailLightingDaytime running lamp mode�
Turn exterior lamp switch to
position
M
or
U
.
When the engine is running, the low beam
headlamps are automatically switched on.
In low ambient light conditions the parking
lamps will also switch on.
Canada only
When you shift from a driving position to
positionN orP, the low beam switches off
(with a three-minute delay).
For nighttime driving you should turn the
exterior lamp switch to position
B
to
permit activation of the high beam head-
lamps.USA only
The high beam headlamps can also be ac-
tivated when driving with the daytime run-
ning lamp mode activated and exterior
lamp switch in position
M
.
To activate the daytime running lamp
mode, see “Setting daytime running lamp
mode (USA only)” (
�page 151).Locator lighting and night security illu-
mination
For information on locator lighting and
night security illumination, see
(
�page 151) and (
�page 152).
Switching on front fog lamps
�
Make sure that the low beam head-
lamps are switched on.
�
Pull out exterior lamp switch to first
stop.
The green indicator lamp
‡
in the
lamp switch lights up.
iSee notes on the exterior lamp switch
(�page 120).
iFog lamps will operate with the parking
lamps and/or the low beam headlamps
on. Fog lamps should only be used in
conjunction with low beam headlamps.
Consult your State or Province Motor
Vehicle Regulations regarding allow-
able lamp operation.
Page 128 of 416
,
i.e. c")
128 Controls in detailInstrument clusterCoolant temperature gaugeDuring severe operating conditions and
stop-and-go city traffic, the coolant tem-
perature may rise close to 248° F (120°C),
i.e. close to the red zone of the tempera-
ture gauge.
The engine should not be operated with
the coolant temperature above 248° F
(120°C), i.e. in the red zone of the temper-
ature gauge. Doing so may cause serious
engine damage which is not covered by the
Mercedes-Benz Limited Warranty.
Trip odometer
Make sure you are viewing the trip odome-
ter display.�
Press the
è
or
ÿ
button on the
multifunction steering wheel repeated-
ly until the trip odometer appears if it is
not displayed (
�page 130).
�
Press and hold reset button
J
on the
instrument cluster (
�page 22) until
the trip odometer is reset.
Warning!
G
�
Driving when your engine is badly over-
heated can cause some fluids which
may have leaked into the engine com-
partment to catch fire. You could be se-
riously burned.
�
Steam from an overheated engine can
cause serious burns and can occur just
by opening the engine hood. Stay away
from the engine if you see or hear steam
coming from it.
Turn off the engine, get out of the vehicle
and do not stand near the vehicle until it
cools down.
iExcessive coolant temperatures trigger
a warning in the multifunction display.
Page 129 of 416

129 Controls in detail
Instrument cluster
Tachometer
The red marking on the tachometer de-
notes excessive engine speed.
To help protect the engine, the fuel supply
is interrupted if the engine is operated
within the red marking.
S 55 AMG
The tachometer of the S 55 AMG does not
have a red marking denoting excessive en-
gine speed.
To help protect the engine, the fuel supply
is interrupted if the engine is operated at
an excessive engine speed.
Outside temperature indicator
The temperature sensor is located in the
front bumper area. Due to its location, the
sensor can be affected by road or engine
heat during idling or slow driving. There-
fore, the accuracy of the displayed temper-
a t u r e c a n o n l y b e v e r i f i e d b y c o m p a r i s o n t o
a thermometer placed next to the sensor,
not by comparison to external displays
(e.g. bank signs etc.).When moving the vehicle into colder ambi-
ent temperatures (e.g. when leaving your
garage), you will notice a delay before the
lower temperature is displayed.
A delay also occurs when ambient temper-
atures rise. This prevents inaccurate tem-
perature indications caused by heat
radiated from the engine during idling or
slow driving.
!Avoid driving at excessive engine
speeds, as it may result in serious en-
gine damage that is not covered by the
Mercedes-Benz Limited Warranty.
Warning!
G
The outside temperature indicator is not de-
s i g n e d t o s e r v e a s a n i c e - w a r n i n g d e v i c e a n d
is therefore unsuitable for that purpose.
Indicated temperatures just above the freez-
ing point do not guarantee that the road sur-
face is free of ice. The road may still be icy,
especially in wooded areas or on bridges.

4Lumbar region support
Adjusting the multicontour seat in the or-
der listed above is recommended")