Page 30 of 416

30 Getting startedUnlockingThe “Getting started” section provides an
overview of the vehicle’s most basic func-
tions. First-time Mercedes-Benz owners
should pay special attention to the infor-
mation given here.
If you are already familiar with the basic
functions described here, the “Controls in
detail” section will help you with further in-
formation. The corresponding page refer-
ences are at the end of each segment.
UnlockingUnlocking with the SmartKey
Your vehicle comes equipped with two
SmartKeys with integrated remote con-
trols and removable mechanical key.
The locking tabs for the mechanical key
portion of the two SmartKeys are a differ-
ent color to help distinguish each
SmartKey unit.SmartKey with remote control 1‹
Lock button
2
Š
Unlock button for trunk lid
3
Œ
Unlock button
4
Â
Panic button
�
Press unlock button
Œ
on the
SmartKey.
All turn signal lamps blink once. The
locking knobs in the doors move up.
�
Get in the vehicle and insert the
SmartKey in the starter switch.
Page 32 of 416

32 Getting startedUnlockingUnlocking with KEYLESS-GO*
Vehicles with KEYLESS-GO*: In addition to
the two SmartKeys with remote controls
and removable mechanical key, your vehi-
cle comes equipped with two
KEYLESS-GO* cards.
The function of the SmartKey overrules the
KEYLESS-GO function.If you have the KEYLESS-GO function, your
vehicle checks whether the KEYLESS-GO
card is valid when you grasp the door han-
dle. If your KEYLESS-GO card is valid, the
doors will unlock, and you can open them.
�
Grasp the door handle.
All turn signal lamps blink once. The
locking knobs in the doors move up.Pressing the KEYLESS-GO start/stop but-
ton on the selector lever corresponds to
turning the key to the various starter
switch positions.iTo unlock the vehicle, the KEYLESS-GO
card must be outside the vehicle, no
further than approximately 3 feet
(1 meter) away from the door.
Warning!
G
When leaving the vehicle, always take the
SmartKey and the KEYLESS-GO card with
you, and lock the vehicle. Do not leave chil-
dren unattended in the vehicle, or with ac-
cess to an unlocked vehicle. Unsupervised
use of vehicle equipment may cause an ac-
cident and/or serious personal injury.
Page 86 of 416

86 Controls in detailLocking and unlockingIn the “Controls in detail” section you will
find detailed information on how to oper-
ate the equipment installed on your vehi-
cle. If you are already familiar with the
basic functions of your vehicle, this section
will be of particular interest to you.
To quickly familiarize yourself with the ba-
sic functions of the vehicle, see “Getting
started” (
�page 29). The corresponding
page numbers are given at the beginning of
each segment.
For information on locking and unlocking,
refer to the Getting started section on
(
�page 30) and (
�page 50).
Locking and unlockingSmartKey
Your vehicle comes supplied with two
SmartKeys with remote controls and a re-
movable mechanical key. The locking tabs
for the mechanical key portion of the two
SmartKeys are a different color to help dis-
tinguish each SmartKey unit.
The SmartKey provides an extended oper-
ating range. To prevent theft, however, it is
advisable to only unlock the vehicle when
you are in close proximity to it.
The SmartKey centrally locks and unlocks:�
the doors
�
the trunk
�
the fuel filler flap
SmartKey with remote controls1‹
Lock button
2
Š
Unlock button for trunk lid
3Mechanical key locking tab
4
Œ
Unlock button
5Battery check lamp
6
Â
Panic button (
�page 75)
!To prevent possible malfunction, avoid
exposing the SmartKey to high levels of
electromagnetic radiation.
iYou can also open and close the power
windows (
�page 190) and slid-
ing/pop-up roof (
�page 194) using
the SmartKey.
Page 88 of 416

88 Controls in detailLocking and unlockingRestoring to factory setting�
Press and hold buttons
Œ
and
‹
simultaneously for about six seconds
until battery check lamp5 blinks twice.Checking the batteries
�
Press button
‹
or
Œ
.
Battery check lamp5 lights up briefly
to indicate that the SmartKey batteries
are in order.
Warning!
G
When leaving the vehicle, always remove the
SmartKey from the starter switch, take the
KEYLESS-GO* card (if so equipped) with you
and lock the vehicle. Do not leave children
unattended in the vehicle, or with access to
an unlocked vehicle. It is possible for chil-
dren to open a locked door from the inside,
which could result in an accident and/or se-
rious injury.
!If you can no longer lock or unlock the
vehicle with the SmartKey, then either
the batteries in the SmartKey are dis-
charged or the SmartKey is malfunc-
tioning.�
Check the batteries in the
SmartKey and replace them if nec-
essary (
�page 328).
or
�
Use the mechanical key to unlock
the doors (
�page 326) and trunk
(
�page 327) as required. Lock the
vehicle using the mechanical key
(�page 327).
If the SmartKey is malfunctioning, con-
tact an authorized Mercedes-Benz Cen-
ter.
!If battery check lamp5 does not light
up briefly during check, the SmartKey
batteries are discharged.
Replace the batteries (
�page 328).
You can obtain the required batteries
at any authorized Mercedes-Benz Cen-
ter.
Page 89 of 416

89 Controls in detail
Locking and unlocking
Unlocking the trunk lid
You can unlock the trunk separately.�
Press and hold button
Š
until trunk
unlocks.Loss of SmartKey or mechanical key
If you lose a SmartKey or mechanical key,
you should do the following:
�
Have the SmartKey deactivated by an
authorized Mercedes-Benz Center.
�
Report the loss of the SmartKey or the
mechanical key immediately to your
car insurance company.
�
If necessary, have the mechanical lock
replaced.
Your authorized Mercedes-Benz Center
will be glad to supply you with a replace-
ment.
KEYLESS-GO card*
Specially equipped vehicles come with two
KEYLESS-GO cards. On these vehicles, the
validity of the KEYLESS-GO card is
checked every time you grasp a door
handle.
If the card is valid, your vehicle unlocks: �
the doors
�
the trunk lid
�
the fuel filler flap
!The trunk lid swings open upwards au-
tomatically. Always make sure that
there is sufficient overhead clearance.
A minimum height clearance of 6 ft.
(1.85 m) is required to open the trunk
lid.iIf the vehicle was previously centrally
locked with the SmartKey, the trunk lid
will lock automatically after closing it.
The turn signals will flash three times to
confirm locking.
If the trunk lid was previously locked
separately (
�page 98), it will remain
locked.
Page 94 of 416

until trunk unlocks.Loss of the KEYLESS-GO card
If you lose")
94 Controls in detailLocking and unlockingUnlocking the trunk lid
You can unlock the trunk separately.�
Press trunk lid button1 (
�page 95)
until trunk unlocks.Loss of the KEYLESS-GO card
If you lose your KEYLESS-GO card, you
should do the following:
�
Have the KEYLESS-GO card deactivat-
ed by an authorized Mercedes-Benz
Center.
�
Report the loss immediately to your car
insurance company.
�
Have the mechanical lock replaced if
necessary.
Your authorized Mercedes-Benz Center
will be glad to supply you with a replace-
ment.
Opening the doors from the inside
You can open a locked door from the in-
side. Open door only when conditions are
safe to do so.
1Locking knob
2Inside door handle�
Pull on door handle2.
If door was locked, locking knob1 will
move up.
!The trunk lid swings open upwards au-
tomatically. Always make sure that
there is sufficient overhead clearance.
A minimum height clearance of 6 ft.
(1.85 m) is required to open the trunk
lid.iIf the vehicle was previously centrally
locked with the SmartKey, the trunk lid
will lock automatically after closing it.
The turn signals will flash three times to
confirm locking.
If the trunk lid was previously locked
separately (
�page 98), it will remain
locked.
Page 98 of 416
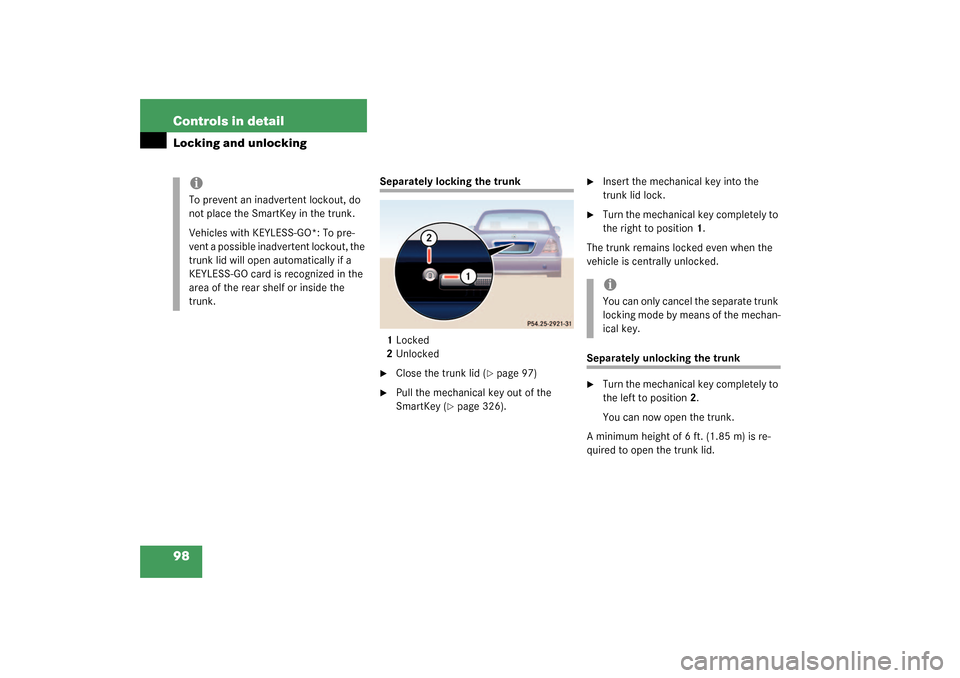
98 Controls in detailLocking and unlocking
Separately locking the trunk
1Locked
2Unlocked�
Close the trunk lid (
�page 97)
�
Pull the mechanical key out of the
SmartKey (
�page 326).
�
Insert the mechanical key into the
trunk lid lock.
�
Turn the mechanical key completely to
the right to position 1.
The trunk remains locked even when the
vehicle is centrally unlocked.
Separately unlocking the trunk�
Turn the mechanical key completely to
the left to position 2.
You can now open the trunk.
A minimum height of 6 ft. (1.85 m) is re-
quired to open the trunk lid.
iTo prevent an inadvertent lockout, do
not place the SmartKey in the trunk.
Vehicles with KEYLESS-GO*: To pre-
vent a possible inadvertent lockout, the
trunk lid will open automatically if a
KEYLESS-GO card is recognized in the
area of the rear shelf or inside the
trunk.
iYou can only cancel the separate trunk
locking mode by means of the mechan-
ical key.
Page 224 of 416

224 Controls in detailUseful features
Useful featuresInterior storage spaces Glove box
1Unlocked position
2Locked position
3Glove box lid release
Opening the glove box
�
Press glove box lid release3.
The glove box lid opens downward.
Closing the glove box
�
Push lid up to close.Storage compartment in the glove box
An AUX socket 1 is located on the left side
of the glove box. Portable audio devices
can be plugged in here. A storage compart-
ment is located in the cover of the glove
box. It can be used to store check cards,
pens, a flashlight, etc.
1AUX socket
2Storage compartment in glove box
�
Lightly press the marking on the lid of
storage compartment2.
The lid opens upward.
Warning!
G
To help avoid personal injury during a colli-
sion or sudden maneuver, exercise care
when stowing objects in the vehicle. Put lug-
g a g e o r c a r g o i n t h e t r u n k i f p o s s i b l e . D o n o t
pile luggage or cargo higher than the seat
backs.
Luggage nets cannot secure hard or heavy
objects.
Keep compartment lids closed. This will help
to prevent stored objects from being thrown
about and injuring vehicle occupants during
an accident.
iThe glove box can be locked and un-
locked with the mechanical key.