Page 172 of 321
172 Controls in detailUseful featuresTrip computer*
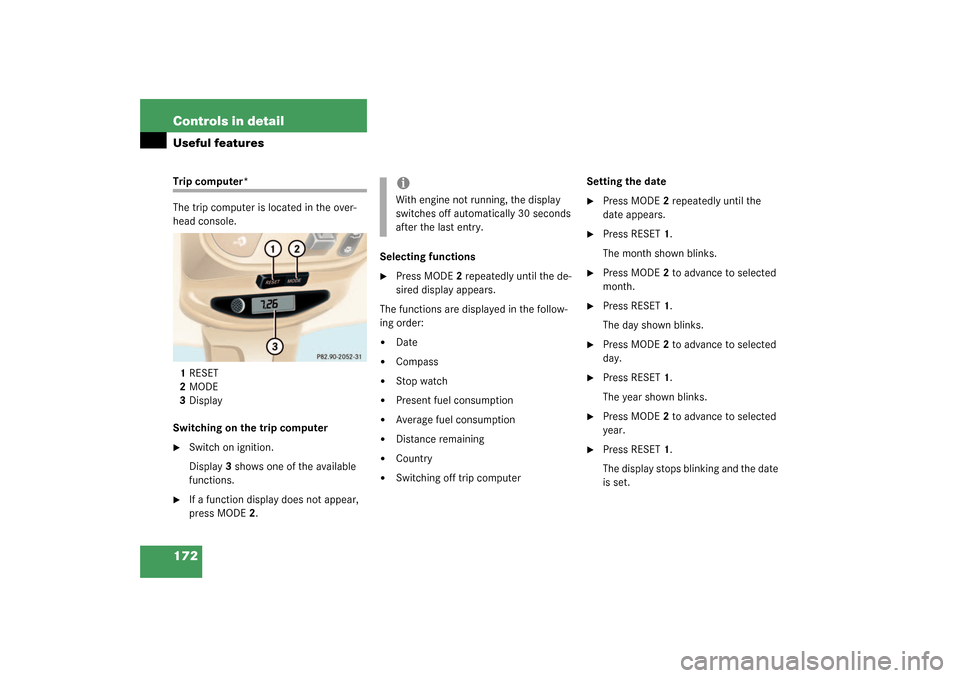
The trip computer is located in the over-
head console.
1RESET
2MODE
3Display
Switching on the trip computer�
Switch on ignition.
Display3 shows one of the available
functions.
�
If a function display does not appear,
press MODE2.Selecting functions
�
Press MODE2 repeatedly until the de-
sired display appears.
The functions are displayed in the follow-
ing order:
�
Date
�
Compass
�
Stop watch
�
Present fuel consumption
�
Average fuel consumption
�
Distance remaining
�
Country
�
Switching off trip computerSetting the date
�
Press MODE2 repeatedly until the
date appears.
�
Press RESET1.
The month shown blinks.
�
Press MODE2 to advance to selected
month.
�
Press RESET1.
The day shown blinks.
�
Press MODE2 to advance to selected
day.
�
Press RESET1.
The year shown blinks.
�
Press MODE2 to advance to selected
year.
�
Press RESET1.
The display stops blinking and the date
is set.
iWith engine not running, the display
switches off automatically 30 seconds
after the last entry.
Page 174 of 321
174 Controls in detailUseful featuresSetting the compass zone�
Determine the geographical point of
the vehicle with the aid of the zone
maps.
�
Switch on the ignition.
�
Press MODE2 (
�page 172) repeated-
ly until the compass display appears in
the trip computer display3.
�
Press RESET1 (
�page 172) to select
the compass zone mode.
The zone selected last is shown in the
display.
�
Press RESET1 repeatedly until the cor-
rect compass zone, as determined
from the zone map, is shown in the dis-
play.
�
Press MODE2 twice.
The new compass zone is activated and
the compass display will be shown.Calibrating the compass
If the vehicle was exposed to a significant
magnetic zone, such as high voltage power
lines, the compass may have to be calibrat-
ed.
To calibrate the compass correctly, ob-
serve the following:
�
Calibrate the compass in an area free
of steel superstructures and power
lines.
�
Switch off all electrical consumers (e.g.
exterior lamps, climate control, rear
window defroster etc.).
�
Do not open or close the slid-
ing/pop-up roof.
�
Close doors and liftgate.
�
Start and run the engine.
�
Press MODE2 (
�page 172) repeated-
ly until the compass display appears in
the trip computer display3.
�
Press RESET1 and afterwards press
MODE2.
In the display appears
CAL–
.
�
Press and hold RESET1 for approxi-
mately two seconds.
The calibration mode is activated and
the display shows
CAL
.
�
Drive without interruption two full cir-
cles at a speed between 3 mph
(5 km / h) and 7 mph (10 km / h).
The message
CAL
goes out after a short
time. The calibration is now complete.
iAn open liftgate triggers the
display
---
.
Page 203 of 321
203 Operation
Engine compartment
Closing�
Let the hood drop from a height of ap-
proximately 1ft (30cm).
The hood will lock audibly.
�
Check to make sure that the hood is
fully closed.
If you can raise the hood at a point
above the headlamps, then it is not
properly closed. Open it again and let it
drop with somewhat greater force.
Engine oil
The amount of oil your engine needs will
depend on a number of factors, including
driving style. Higher oil consumption can
occur when �
the vehicle is new
�
the vehicle is driven frequently at high-
er engine speeds.
Engine oil consumption checks should only
be made after the vehicle break-in period.
Checking engine oil level
When checking the oil level the vehicle
must
�
be parked on level ground
�
be at normal operating temperature
�
have been stationary for at least five
minutes with the engine turned off
Warning!
G
If you see flames or smoke coming from the
engine compartment, or if the coolant tem-
perature gauge indicates that the engine is
overheated, do not open the hood. Move
away from vehicle and do not open the hood
until the engine has cooled. If necessary,
call the fire department.Warning!
G
The engine is equipped with a transistorized
ignition system. Because of the high voltage
it is dangerous to touch any components (ig-
nition coils, spark plug sockets, diagnostic
socket) of the ignition system�
with the engine running
�
while starting the engine
�
if ignition is “on” and the engine is
turned manually
Warning!
G
Be careful that you do not close the hood on
anyone.!Do not push the hood closed manually,
as this could damage it.
Page 204 of 321

204 OperationEngine compartmentEngine oil level display
1Knob
2Display in speedometer�
Switch on the ignition and wait until the
display
- - - - - -
appears in the
speedometer display2.
�
Within one second press knob1 twice.
One of the following messages will subse-
quently appear in the display:
�
OIL i.OThe oil level is correct. Engine oil does
not to be added.
�
– 1.0 L�
Add 1 liter of engine oil.
�
– 1.5 L�
Add 1.5 liters of engine oil.
�
– 2.0 L�
Add 2 liters of engine oil.
�
OIL HIThe oil level is too high.�
Have excess oil siphoned.The display
- - - - - -
flashes in the
speedometer display if a proper oil level
check cannot be performed.
�
Repeat the engine oil level check after
a few minutes.
!Excessive oil must be siphoned or
drained off. It could cause damage to
the engine and catalytic converter not
covered by the Mercedes-Benz Limited
Warranty.
iIf the engine oil level check cannot be
performed again via the display field,
use the dipstick to perform the engine
oil level check (
�page 205).
In this case we recommend that you
have the system checked at a
Mercedes-Benz Light Truck Center.
Page 215 of 321
215 Operation
Maintenance
Maintenance
We strongly recommend that you have
your vehicle serviced by your authorized
Mercedes-Benz Light Truck Center, in ac-
cordance with the Service Booklet at the
times called for by the FSS (Flexible Ser-
vice System).
Failure to have the vehicle maintained in
accordance with the Service Booklet at the
designated times /mileage called for by
the FSS may result in vehicle damage not
covered by the Mercedes-Benz Limited
Warranty.
FSS will notify you when your next service
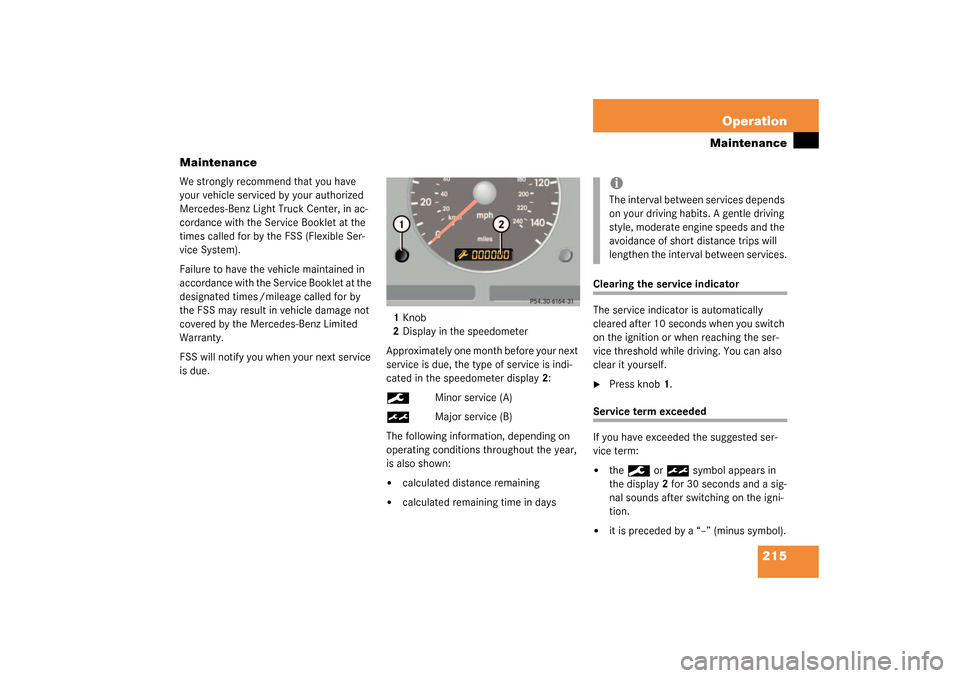
is due.1Knob
2Display in the speedometer
Approximately one month before your next
service is due, the type of service is indi-
cated in the speedometer display2:
9
Minor service (A)
½
Major service (B)
The following information, depending on
operating conditions throughout the year,
is also shown:
�
calculated distance remaining
�
calculated remaining time in days
Clearing the service indicator
The service indicator is automatically
cleared after 10 seconds when you switch
on the ignition or when reaching the ser-
vice threshold while driving. You can also
clear it yourself.�
Press knob1.
Service term exceeded
If you have exceeded the suggested ser-
vice term:�
the
9
or
½
symbol appears in
the display2 for 30 seconds and a sig-
nal sounds after switching on the igni-
tion.
�
it is preceded by a “–” (minus symbol).iThe interval between services depends
on your driving habits. A gentle driving
style, moderate engine speeds and the
avoidance of short distance trips will
lengthen the interval between services.
Page 216 of 321
216 OperationMaintenanceThe Mercedes-Benz Light Truck Center will
reset the service indicator following a com-
pleted service.Calling up the service indicator�
Within 1 second press knob1 twice.
The FSS display will appear for ten sec-
onds.
Resetting the service indicator
In the event that the service on your vehi-
cle is not carried out by an authorized Mer-
cedes-Benz Light Truck Center, you can
reset the service indicator yourself.�
Switch ignition on and immediately
press knob1 twice within one second.
The present status for days or distance
is displayed.
�
Within ten seconds turn the key in
steering lock to position0 (
�page 33).
�
Press and hold knob1 while switching
the ignition on.
The present status for days or distance
is displayed once more.
�
Continue to hold knob1.
After approximately 10 seconds a sig-
nal sounds, and the display shows
10 000 miles (Canada: 15 000 km) for
approximately 10 seconds.
�
Release knob1.
iIf the service indicator was inadvertent-
ly reset, have a Mercedes-Benz Light
Truck Center correct it.
Only reset if the proper service has
been performed. Resetting the system
without performing the proper service
as called for by the FSS will cause the
FSS to incorrectly determine the next
service interval which will result in en-
gine damage not covered by the Mer-
cedes-Benz Limited Warranty.
If the battery is disconnected, the days
of disconnection will not be included in
the count shown by the service indica-
tor. To arrive at the true service dead-
line, you will need to subtract these
days from the days shown in the ser-
vice indicator.
Do not confuse the service indicator
with the engine oil level indicator
:
.
Page 226 of 321
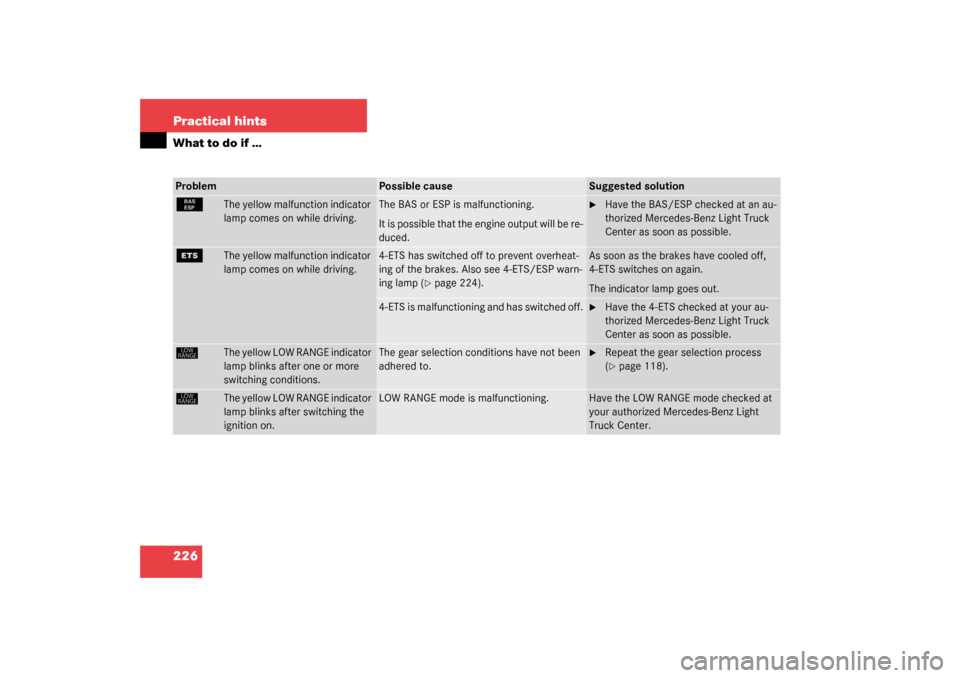
226 Practical hintsWhat to do if …¿
The yellow malfunction indicator
lamp comes on while driving.
The BAS or ESP is malfunctioning.
It is possible that the engine output will be re-
duced.
�
Have the BAS/ESP checked at an au-
thorized Mercedes-Benz Light Truck
Center as soon as possible.
{
The yellow malfunction indicator
lamp comes on while driving.
4-ETS has switched off to prevent overheat-
ing of the brakes. Also see 4-ETS/ESP warn-
ing lamp (
�page 224).
As soon as the brakes have cooled off,
4-ETS switches on again.
The indicator lamp goes out.
4-ETS is malfunctioning and has switched off.
�
Have the 4-ETS checked at your au-
thorized Mercedes-Benz Light Truck
Center as soon as possible.
ê
The yellow LOW RANGE indicator
lamp blinks after one or more
switching conditions.
The gear selection conditions have not been
adhered to.
�
Repeat the gear selection process
(�page 118).
ê
The yellow LOW RANGE indicator
lamp blinks after switching the
ignition on.
LOW RANGE mode is malfunctioning.
Have the LOW RANGE mode checked at
your authorized Mercedes-Benz Light
Truck Center.
Problem
Possible cause
Suggested solution
Page 229 of 321
229 Practical hints
What to do if …
Problem
Possible cause
Suggested solution
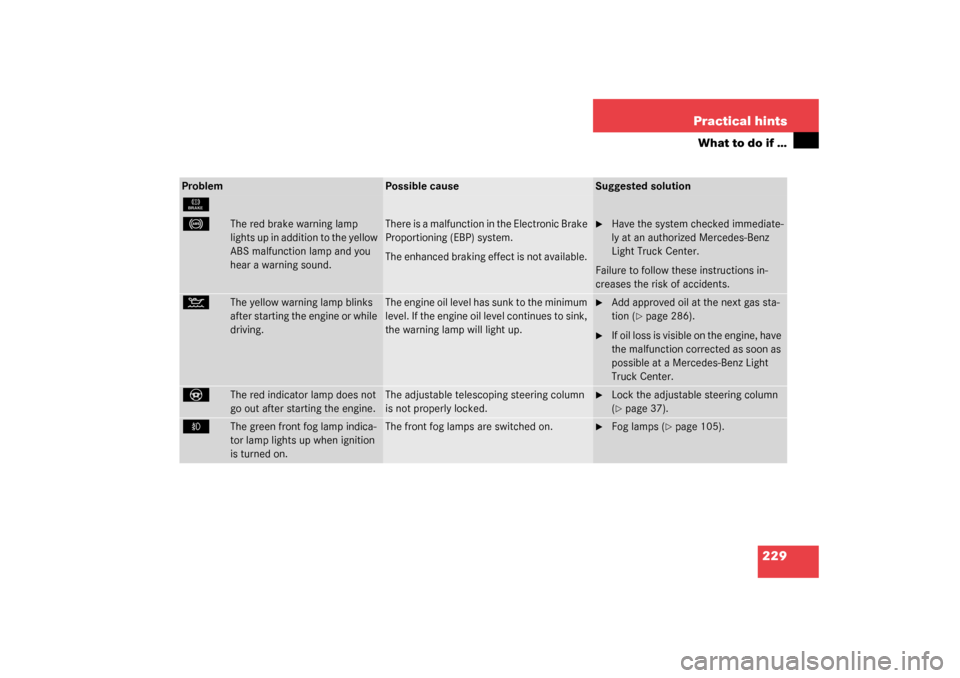
É
-
The red brake warning lamp
lights up in addition to the yellow
ABS malfunction lamp and you
hear a warning sound.
There is a malfunction in the Electronic Brake
Proportioning (EBP) system.
The enhanced braking effect is not available.
�
Have the system checked immediate-
ly at an authorized Mercedes-Benz
Light Truck Center.
Failure to follow these instructions in-
creases the risk of accidents.
:
The yellow warning lamp blinks
after starting the engine or while
driving.
The engine oil level has sunk to the minimum
level. If the engine oil level continues to sink,
the warning lamp will light up.
�
Add approved oil at the next gas sta-
tion (
�page 286).
�
If oil loss is visible on the engine, have
the malfunction corrected as soon as
possible at a Mercedes-Benz Light
Truck Center.
_
The red indicator lamp does not
go out after starting the engine.
The adjustable telescoping steering column
is not properly locked.
�
Lock the adjustable steering column
(�page 37).
‡
The green front fog lamp indica-
tor lamp lights up when ignition
is turned on.
The front fog lamps are switched on.
�
Fog lamps (
�page 105).