Page 93 of 321

93 Controls in detail
Seats
Rear seats
The rear seats are divided asymetrically.
To enlarge the cargo area you can adjust
the left and right part separately. The fol-
lowing changes are possible:�
moving the seat fore and aft
�
folding down the backrest
�
lowering the seatAdjusting rear seat fore and aft
1Release lever
�
Pull release lever1 in direction of ar-
row.
�
Slide seat to the desired position until
it locks in place.Folding down the backrest
1Lock button
�
Close cup holder in rear center console
(�page 155).
�
Move front seats forward. Manual seat
(�page 35) or power seat (
�page 37).
�
Slide seat forward.
�
Remove head restraint(s) (
�page 92).
�
Pull lock button1 up and fold backrest
forward until it locks in place.
The red backrest lock indicator at lock
button1 is not visible in the locked po-
sition.
Warning!
G
Do not adjust the rear seats while driving.
Always seat in an upright position and the
seat belts are properly positioned on the
body. Your seat must be adjusted so that
you can correctly fasten your seat belt.
Adjust head restraint to support the back of
the head approximately at ear level.
Never place hands under the seat or near
any moving parts while a seat is being ad-
justed.
Warning!
G
Failure to assure that seats are locked into
place could result in an increased chance of
injury in an accident.
Page 94 of 321

94 Controls in detailSeatsFolding up the backrest�
Pull lock button1 up and unfold back-
rest until it locks in place.
Make sure that the seat belt is not
caught in the seat.
�
Check for secure locking by pulling and
pushing on the backrest.
The red backrest lock indicator at lock
button1 is not visible in the locked po-
sition.
�
Install head restraint (
�page 92).
�
Slide seat rearward to desired position
(�page 93).
�
Adjust front seats to desired position.
Manual seats (
�page 35) and power
seats (
�page 37). Lowering the rear seat
1Release button
2Lever
3Release lever
�
Close cup holder in rear center console
(�page 155).
�
Move front seats forward. Manual seat
(�page 35) or power seat (
�page 37).
�
Press and hold release button1 to un-
lock lever2.
�
Pull lever2 in direction of arrow.
�
Pull release lever3 and push down rear
seat until it locks in place.
�
Fold down the backrest (
�page 93).
�
Adjust front seats to desired position.
Manual seats (
�page 35) and power
seats (
�page 37).
Folding up the rear seat
�
Move front seats forward. Manual seat
(�page 35) or power seat (
�page 37).
�
Pull release lever3 and raise rear seat
until it locks in place.Warning!
G
Failure to assure that seats are locked into
place could result in an increased chance of
injury in an accident.
Page 96 of 321
.
�
Remove head restraint1 from seat
c")
96 Controls in detailSeatsThird row seats* Folding down single seat
1Head restraint
2Hook
3Tensioner
4Hook and loop strip
�
Remove cargo floor plate
(�page 144).
�
Remove head restraint1 from seat
cushion.
�
Lift tensioner3 upward to a horizontal
position to release tension of the belt.
�
Disengage hook2 while holding onto
the seat firmly with one hand.
�
Attach belt at hook and loop strip4 on
underside of seat.
5Backrest release
6Seat release
�
Fold seat down until it locks securely in
place.
The red marking on the seat release
should6 not be visible.
�
Store cargo floor plates inside the
backrest (
�page 144).
�
Pull backrest release5 and unfold
backrest until it locks securely in place.
�
Install head restraint1 in backrest
(�page 92).
Warning!
G
For your protection, drive only with properly
positioned head restraints.
Adjust head restraint to support the back of
the head approximately at ear level.
Failure to assure that seats are locked into
place could result in an increased chance of
injury in an accident.
Never place hands under seat or near any
moving parts while a seat is being adjusted.
Page 97 of 321
97 Controls in detail
Seats
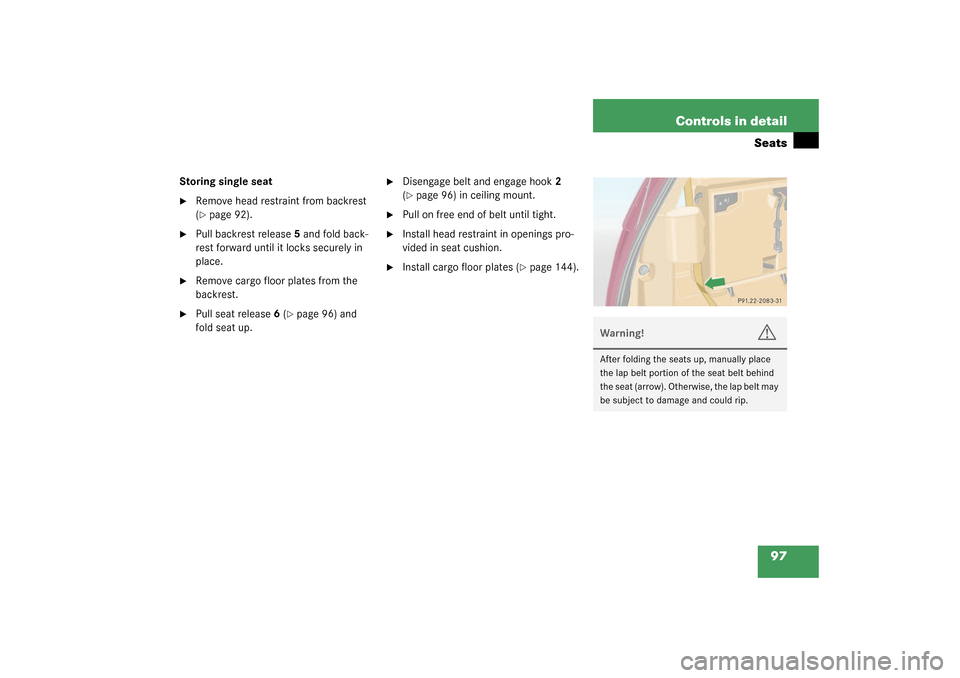
Storing single seat�
Remove head restraint from backrest
(�page 92).
�
Pull backrest release5 and fold back-
rest forward until it locks securely in
place.
�
Remove cargo floor plates from the
backrest.
�
Pull seat release6 (
�page 96) and
fold seat up.
�
Disengage belt and engage hook2
(�page 96) in ceiling mount.
�
Pull on free end of belt until tight.
�
Install head restraint in openings pro-
vided in seat cushion.
�
Install cargo floor plates (
�page 144).
Warning!
G
After folding the seats up, manually place
the lap belt portion of the seat belt behind
the seat (arrow). Otherwise, the lap belt may
be subject to damage and could rip.
Page 98 of 321
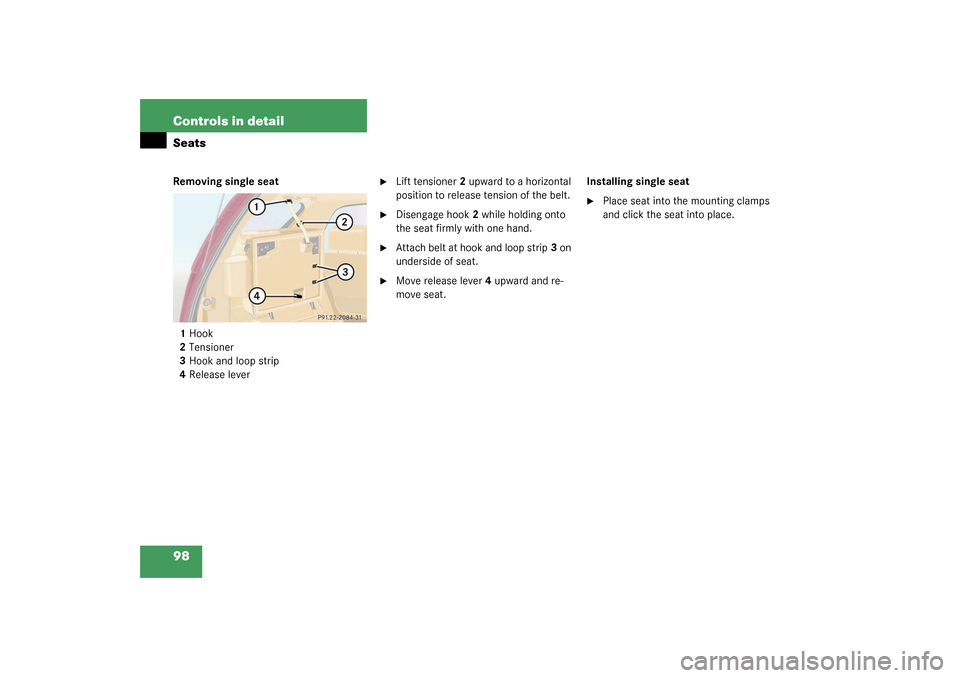
98 Controls in detailSeatsRemoving single seat
1Hook
2Tensioner
3Hook and loop strip
4Release lever
�
Lift tensioner2 upward to a horizontal
position to release tension of the belt.
�
Disengage hook2 while holding onto
the seat firmly with one hand.
�
Attach belt at hook and loop strip3 on
underside of seat.
�
Move release lever4 upward and re-
move seat.Installing single seat
�
Place seat into the mounting clamps
and click the seat into place.
Page 99 of 321

99 Controls in detail
Memory function*
Memory function*
With the memory button you can store up
to three different settings for the driver-
and passenger seat.
Together with the driver’s seat you can
store the exterior rear view mirrors.
For the front passenger seat you can store
the seat position.
1Position buttons
2Memory button
!Prior to operating the vehicle the driver
should check and adjust the seat
height, seat position fore and aft, and
seat backrest angle if necessary, to en-
sure adequate control, reach and com-
fort. The head restraint should also be
adjusted for proper height. Also see air-
bag section (
�page 55) for proper seat
positioning.
In addition, adjust the steering wheel to
ensure adequate control, reach, opera-
tion and comfort. Both the inside and
outside rear view mirrors should be ad-
justed for adequate rear vision.
Fasten seat belts. Infants and small
children should be seated in a properly
secured restraint system that complies
with U.S. Federal Motor Vehicle Safety
Standard 213 and 225 and Canadian
Motor Vehicle Safety Standard 213 and
210.2.
Warning!
G
Do not activate the memory function while
driving. Activating the memory function
while driving could cause the driver to lose
control of the vehicle.
Page 139 of 321

139 Controls in detail
Loading
Loading
Loading instructions
The total load weight including vehicle oc-
cupants and luggage / cargo should not ex-
ceed the vehicle capacity weight indicated
on the certification label which can be
found on the left door pillar.
The handling characteristics of a fully load-
ed vehicle depend greatly on the load dis-
tribution. It is therefore recommended to
load the vehicle according to the illustra-
tions shown, with the heaviest items being
placed towards the front of the vehicle.Please pay attention to and comply with
the following instructions when loading the
vehicle and transporting cargo:
�
Always place items being carried
against front or rear seat backrests,
and fasten them as securely as possi-
ble.
�
The heaviest portion of the cargo
should always be kept as low as possi-
ble against front or rear seat backrests.
For additional safety when transporting
cargo while the rear seats are unoccupied,
fasten the outer seat belts crosswise into
the opposite side buckles.
Warning!
G
Always fasten items being carried as secure-
ly as possible using cargo tie-down rings and
fastening materials appropriate for the
weight and size of the load.
In an accident, during hard braking or sud-
den maneuvers, loose items will be thrown
around inside the vehicle, and can cause in-
jury to vehicle occupants unless the items
are securely fastened in the vehicle.
To help avoid personal injury during a colli-
sion or sudden maneuver, always use parti-
tion net when transporting cargo.
Never drive vehicle with the liftgate open.
Deadly carbon monoxide (CO) gases may
enter vehicle interior resulting in uncon-
sciousness and death.
Page 219 of 321

219 Operation
Vehicle care
Paintwork, painted body components
Mercedes-Benz approved Paint Care
should be applied when water drops on the
paint surface do not “bead up”, normally
every 3 to 5 months, depending on climate
and washing detergent used.
Mercedes-Benz approved Paint Cleaner
should be applied if the paint surface
shows signs of dirt embedding (i.e. loss of
gloss).
Do not apply any of these products or wax
if your vehicle is parked in the sun or if the
hood is still hot.
Use the appropriate MB-Touch-Up Stick
for quick and provisional repairs of minor
paint damage (i.e. chips from stones, vehi-
cle doors, etc.).Engine cleaning
Prior to cleaning the engine compartment,
make sure to protect electrical compo-
nents and connectors from the intrusion of
water and cleaning agents.
Corrosion protection, such as MB Anticor-
rosion Wax should be applied to the engine
compartment after every engine cleaning.
Before applying, all control linkage bush-
ings and joints should be lubricated. The
poly-V-belt and all pulleys should be pro-
tected from any wax.
Vehicle washing
Do not use hot water or wash your vehicle
in direct sunlight. Use only a mild car wash
detergent, such as Mercedes-Benz ap-
proved Car Shampoo.Thoroughly spray the vehicle with a dif-
fused jet of water. Direct only a very weak
spray towards the ventilation intake. Use
plenty of water and rinse the sponge and
chamois frequently.
Rinse with clear water and thoroughly dry
with a chamois. Do not allow cleaning
agents to dry on the finish.
Due to the width of the vehicle, fold in out-
side mirrors prior to running the vehicle
through an automatic car wash to prevent
damage to the mirrors.
In the winter, thoroughly remove all traces
of road salt as soon as possible.
When washing the underbody, do not for-
get to clean the inner sides of the wheels.