Page 28 of 321
28 At a glanceCenter consoleLower part
Item
Page
1
Ashtray with cigarette
lighter
156
2
Selector lever for
automatic transmission
44
3
Power window switch, right
front door
134
4
Power window switch, right
rear door
134
5
Parking assist* (Parktron-
ic) deactivation switch
149
6
Storage compartment with
cup holder
154
Item
Page
7
Exterior rear view mirror
adjustment switch
38
Exterior rear view mirror
electrically folding*
120
8
Central locking switch
89
9
Power window switch, left
rear door
134
10
Switch for rear door win-
dow override
69
11
Power window switch, left
front door
134
Page 29 of 321
29 At a glance
Overhead control panel
Overhead control panel
Item
Page
1
Front left interior lighting
107
2
Signal transmitter keys for
garage door opener
168
3
Front right interior lighting
107
4
Roadside Assistance
button
163
Information button
165
5
Interior lighting control
107
6
Trip computer* display
172
7
Rear view mirror
119
Item
Page
8
Right reading lamp on/off
108
9
Automatic antiglare func-
tion* on/off
119
10
Left reading lamp on/off
108
11
Glass breakage sensor
79
12
Trip computer* control
172
Tow-away alarm switch
80
13
Tele Aid (emergency call
system) button
163
14
Sliding/pop-up roof*
switch
137
Page 32 of 321
32 Getting startedUnlockingThe “Getting started” section provides an
overview of the vehicle’s most basic func-
tions. First-time Mercedes-Benz owners
should pay special attention to the infor-
mation given here.
If you are already familiar with the basic
functions described here, the “Controls in
detail” section will help you with further in-
formation. The corresponding page refer-
ences are at the end of each segment.
UnlockingRemote control with folding keyRemote control with folding key1Â
Panic button (
�page 70)
2
Œ
Unlock button
3
‹
Lock button
4Release button for key
5
Š
Unlock button for liftgate
�
Press unlock button
Œ
on the re-
mote control.
The indicator lamps light up for a short
time. The locking knobs in the doors
move up.
�
Press release button4 on the remote
control.
The key folds out.
�
Get in the vehicle and insert the key in
the steering lock (
�page 33).
More information can be found in the
“Controls in detail” section (
�page 84).
Page 33 of 321

33 Getting started
Unlocking
Steering lock positions
Steering lock0For removing key
The steering is locked when the key is
removed from the steering lock. If nec-
essary, move steering wheel slightly to
allow the locking mechanism to en-
gage.
1Unlocking steering. Power supplies to
some electrical consumers, such as
seat adjustment
2Ignition (power supply for all electrical
consumers) and driving position (selec-
tor lever is unlocked)
3Starting positionMore information can be found in the
“Controls in detail” section (
�page 84).
Warning!
G
When leaving the vehicle always remove the
key from the steering lock and lock the vehi-
cle. Do not leave children unattended in the
vehicle, or with access to an unlocked vehi-
cle. Unsupervised use of vehicle equipment
may cause an accident and/or serious per-
sonal injury.
!To prevent accelerated battery dis-
charge and a possible dead battery, al-
ways remove the key from the steering
lock.iThe key can only be withdrawn in
position0.
If necessary, move steering wheel
slightly to allow the key to be turned
clockwise to position1.
A warning sounds when the driver’s
door is opened and the key is in steer-
ing lock position0 or1.
Page 36 of 321

36 Getting startedAdjustingBackrest tilt�
Turn handwheel3 until your hands are
slightly angled when holding the steer-
ing wheel.
Head restraint height
�
Pull up or push down on head restraint
until it is in desired position.Head restraint tilt
�
Manually adjust the angle of the head
restraint. Push or pull on the lower
edge of the head restraint cushion.
Adjusting power seats*
The seat adjustment switch is located on
the entry side of each front seat base.
�
Switch on the ignition by turning the
key in the steering lock to position2
(�page 33).
All the lights in the instrument cluster
light up.1Seat height
2Seat fore and aft adjustment
3Seat cushion tilt
4Backrest tilt
Seat height
�
Press the switch up or down in the di-
rection of arrow1.
Warning!
G
For your protection, drive only with properly
positioned head restraints.
Adjust head restraint to support the back of
the head approximately at ear level.
Do not drive the vehicle without the seat
head restraints. Head restraints are intend-
ed to help reduce injuries during an acci-
dent.
Warning!
G
The power seats can also be operated with
the appropriate door open. Do not leave
children unattended in the vehicle, or with
access to an unlocked vehicle. Unsuper-
vised use of vehicle equipment may cause
an accident and/or serious personal injury.
Page 37 of 321

37 Getting started
Adjusting
Seat fore and aft adjustment�
Press the switch forward or backward
in the direction of arrow2 until you can
comfortably press the pedals all the
way to the floor.
Seat cushion tilt
�
Press the switch up or down in the di-
rection of arrow3 until your upper legs
are lightly supported.
Backrest tilt
�
Press the switch forward or backward
in the direction of arrow4 until your
hands are slightly angled when holding
the steering wheel. Head restraint height
�
Pull up or push down on head restraint
until it is in desired position.
Head restraint tilt
�
Manually adjust the angle of the head
restraint. Push or pull on the lower
edge of the head restraint cushion.
More information can be found in the
“Controls in detail” section (
�page 91).
Steering wheel
1Lever
iWith the front door open, the seats can
still be adjusted approx. 30 minutes af-
ter the ignition has been turned off.
Warning!
G
For your protection, drive only with properly
positioned head restraints.
Adjust head restraint to support the back of
the head approximately at ear level.
Do not drive the vehicle without the seat
head restraints. Head restraints are intend-
ed to help reduce injuries during an acci-
dent.
Warning!
G
Do not adjust the steering wheel while driv-
ing. The steering wheel must be locked
while driving. Adjusting the steering wheel
while driving, or driving without the steering
column locked could cause the driver to lose
control of the vehicle.
Page 39 of 321
39 Getting started
Adjusting
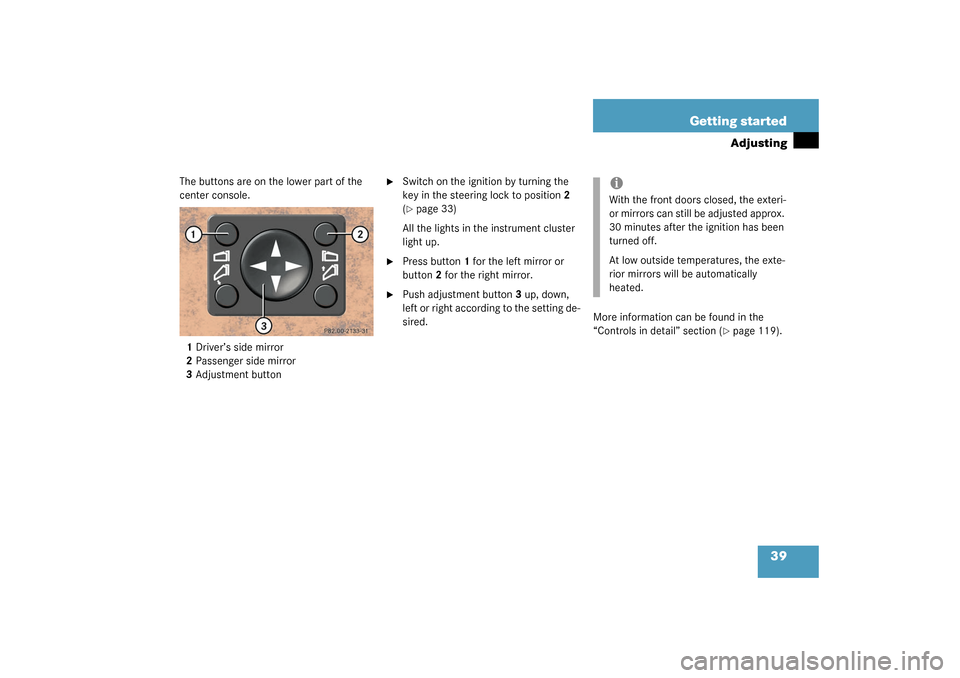
The buttons are on the lower part of the
center console.
1Driver’s side mirror
2Passenger side mirror
3Adjustment button
�
Switch on the ignition by turning the
key in the steering lock to position2
(�page 33)
All the lights in the instrument cluster
light up.
�
Press button1 for the left mirror or
button2 for the right mirror.
�
Push adjustment button3 up, down,
left or right according to the setting de-
sired.More information can be found in the
“Controls in detail” section (
�page 119).
iWith the front doors closed, the exteri-
or mirrors can still be adjusted approx.
30 minutes after the ignition has been
turned off.
At low outside temperatures, the exte-
rior mirrors will be automatically
heated.
Page 42 of 321

42 Getting startedDriving�
With a smooth motion, pull the belt
from seat belt housing4.
�
Place the belt over your shoulder.
�
Push latch plate1 into buckle2 until it
clicks.
�
If necessary, tighten the lap portion to
a snug fit by pulling shoulder portion
up.
�
I f ne ce ss ar y, a djus t the s ea t be lt to the
correct height (
�page 43).
Proper use of seat belts:
�
Do not twist the belt when fastening.
�
Adjust the seat belt so that the shoul-
der portion is located as close as possi-
ble to the middle of the shoulder (it
should not touch the neck or pass un-
der the arm).
�
Position the lap belt as low as possible
on your hips (over hip joint) and not
across the abdomen.
�
Place the seat backrest in a nearly up-
right position.
�
Each seat belt should never be used for
more than one person at a time.
�
Do not fasten a seat belt around a per-
son and another object at the same
time.
�
Check your seat belt during travel to
ensure that it is properly positioned.
�
Ensure that the seat belt is always fit-
ted snugly. You should avoid wearing
bulky clothing, such as winter coats,
when traveling in the vehicle.
Warning!
G
Do not pass belts over sharp edges. They
could tear.
Do not allow the belt to get caught in the
door or in the seat adjustment mechanism.
This could damage the belt.
Never attempt to make modifications to
seat belts. This could impair the effective-
ness of the belts.
Damaged seat belts or belts that were highly
stressed in an accident must be replaced by
an authorized Mercedes-Benz Light Truck
Center.