Page 23 of 321
23 At a glance
Cockpit
Item
Page
1
Hood lock release
202
2
Parking brake pedal
50
3
Parking brake release
50
4
Left cup holder
154
5
Combination switch�
Turn signals
�
High beam
46
6
Cruise control lever
146
7
Instrument cluster
110
8
Hazard warning flasher
switch
106
9
Lever for voice control
system*, see separate
operating instructions
Item
Page
10
Windshield wiper/washer
switch
122
11
Front Parktronic* warning
indicator
150
12
Glove box
152
13
Right cup holder
154
14
Storage compartment
15
Electrical outlet
158
16
Horn
17
Headlamp washer button*
121
18
Steering lock with ignition
33
19
Steering wheel adjustment
stalk
37
Page 26 of 321
26 At a glanceInstrument cluster
Item
Page
5
Photo sensor
(adjusts the brightness of
the digital displays located
in 1, 4 and 8)
6
Right indicator lamps
with:W
Low wind-
shield/headlamp
washer system fluid
level warning lamp
234
7
Front passenger air-
bag switched off
232
‡
Front fog lamp
switched on
105
Item
Page
_
Steering wheel ad-
justment not locked
229
<
Seat belt nonusage
warning lamp
234
1
Supplemental Re-
straint System
(SRS) indicator
227
É
Brake warning lamp
228
229
#
Charge indicator
lamp
233
A
High beam head-
lamp switched on
47
Item
Page
7
Knob for setting clock
112
8
Tachometer with:
Selector lever
position
114
Clock
112
9
K
Turn signal
indicator lamp right
10
L
Turn signal
indicator lamp left
Page 46 of 321

46 Getting startedDrivingAfter a cold start the transmission engages
at a higher revolution. This allows the cata-
lytic converter to reach its operating tem-
perature earlier.More information can be found in the “Op-
eration” section (
�page 177).
For information on off-road driving, see
Driving instructions (�page 186).
Switching on headlamps
The combination switch is on the left of the
steering column.
Combination switch1Off
2Low beam headlamps on
3High beam lamps on�
Turn the switch to
õ
.
Low beam headlamps on.
!If you hear a warning signal when driv-
ing off, you have forgotten to release
the parking brake.
Release the parking brake.Warning!
G
It is dangerous to shift the selector lever out
ofP orN if the engine speed is higher than
idle speed. If your foot is not firmly on the
brake pedal, the vehicle could accelerate
quickly forward or in reverse. You could lose
control of the vehicle and hit someone or
something. Only shift into gear when the en-
gine is idling normally and when your right
foot is firmly on the brake pedal.
Warning!
G
On slippery road surfaces, never downshift
in order to obtain braking action. This could
result in drive wheel slip and reduced vehi-
cle control. Your vehicle’s ABS will not pre-
vent this type of loss of control.
Page 47 of 321
47 Getting started
Driving
High beam�
Push the exterior lamp switch forward.
The high beam symbol
A
in the
instrument cluster lights up.
More information can be found in the
“Controls in detail” section (
�page 102)
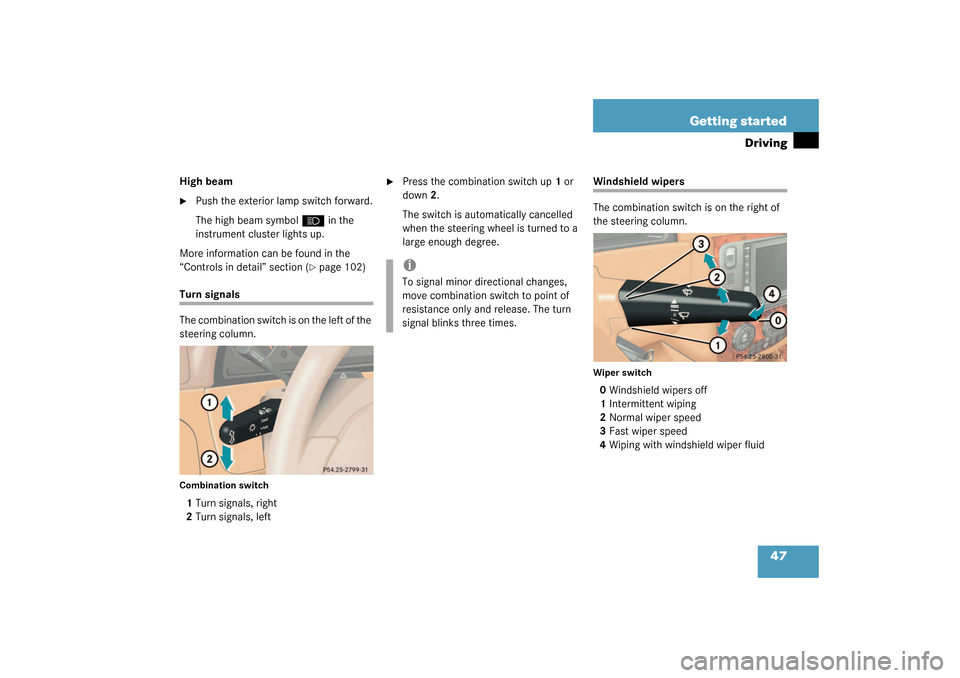
Turn signals
The combination switch is on the left of the
steering column.Combination switch1Turn signals, right
2Turn signals, left
�
Press the combination switch up1 or
down2.
The switch is automatically cancelled
when the steering wheel is turned to a
large enough degree.
Windshield wipers
The combination switch is on the right of
the steering column.Wiper switch0Windshield wipers off
1Intermittent wiping
2Normal wiper speed
3Fast wiper speed
4Wiping with windshield wiper fluid
iTo signal minor directional changes,
move combination switch to point of
resistance only and release. The turn
signal blinks three times.
Page 102 of 321
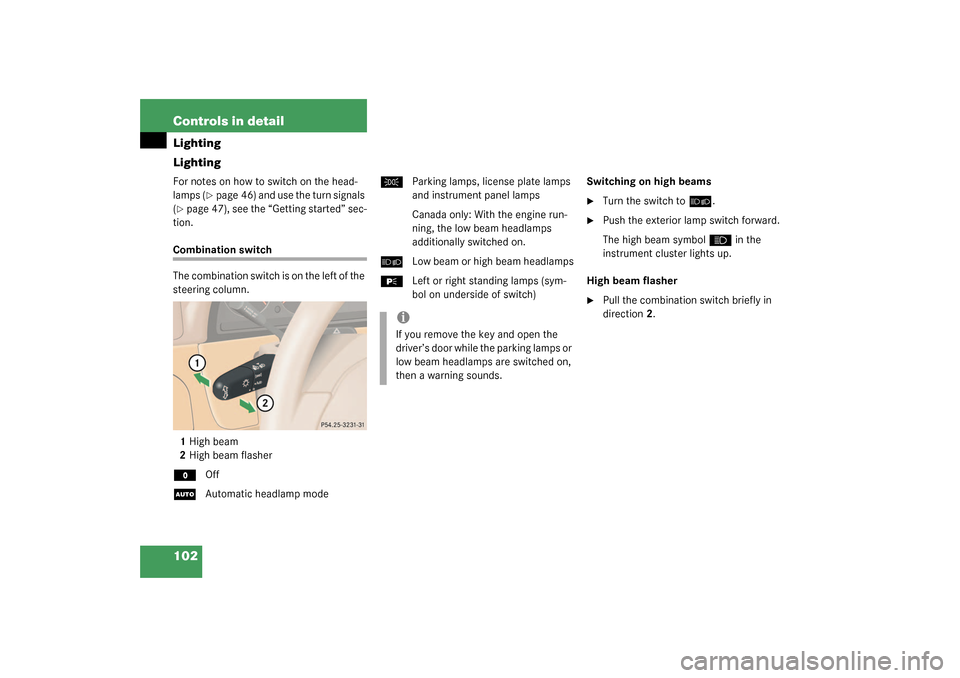
102 Controls in detailLighting
LightingFor notes on how to switch on the head-
lamps (
�page 46) and use the turn signals
(
�page 47), see the “Getting started” sec-
tion.
Combination switch
The combination switch is on the left of the
steering column.
1High beam
2High beam flasherM
Off
U
Automatic headlamp mode
C
Parking lamps, license plate lamps
and instrument panel lamps
Canada only: With the engine run-
ning, the low beam headlamps
additionally switched on.
õ
Low beam or high beam headlamps
ƒ
Left or right standing lamps (sym-
bol on underside of switch)Switching on high beams
�
Turn the switch to
õ
.
�
Push the exterior lamp switch forward.
The high beam symbol
A
in the
instrument cluster lights up.
High beam flasher
�
Pull the combination switch briefly in
direction2.
iIf you remove the key and open the
driver’s door while the parking lamps or
low beam headlamps are switched on,
then a warning sounds.
Page 103 of 321

103 Controls in detail
Lighting
Automatic headlamp mode
The parking lamps, low beam headlamps
and license plate lamps switch on and off
automatically depending on the brightness
of the ambient light.�
Turn the combination switch to
U
.Daytime running lamp mode
Canada only:
�
Turn combination switch to
position
M
or
U
.
When the engine is running, the low
beam headlamps are automatically
switched on. In low ambient light con-
ditions the parking lamps will also
switch on.
When you shift from a driving position to
positionN orP, the low beam switches off
(3 minutes delay).
For nighttime driving you should turn the
combination switch to position
õ
to
permit activation of the high beam head-
lamps.
Warning!
G
In automatic headlamp mode, the head-
lamps will not be automatically switched on
under foggy conditions. To minimize risk to
you and to others, activate headlamps by
turning combination switch to
õ
.
The driver is responsible for the operation of
the vehicle’s lights at all times. The automat-
ic headlamp feature is only an aid to the driv-
er. Switch on the vehicle lights manually
when driving or when traffic conditions re-
quire you to do so.
iIf the automatic headlamp mode is ac-
tivated, the fog lamps can also be
switched on (
�page 105). The low
beam headlamp and parking lamps are
activated simultaneously.
iIf you drive in countries where vehicles
drive on the other side of the road than
the country where the vehicle is regis-
tered, you must have the headlamps
modified for symmetrical low beams.
Relevant information can be obtained
at your authorized Mercedes-Benz
Light Truck Center.
iThe high beam flasher is always avail-
able.
Page 110 of 321
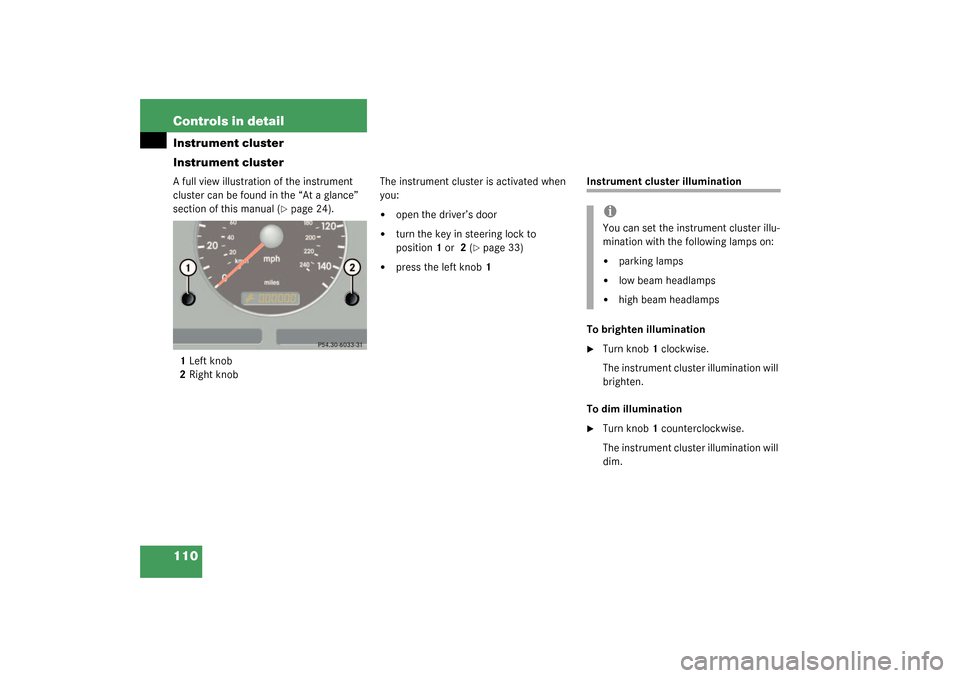
110 Controls in detailInstrument cluster
Instrument clusterA full view illustration of the instrument
cluster can be found in the “At a glance”
section of this manual (
�page 24).
1Left knob
2Right knobThe instrument cluster is activated when
you:
�
open the driver’s door
�
turn the key in steering lock to
position1 or 2 (
�page 33)
�
press the left knob1
Instrument cluster illumination
To brighten illumination�
Turn knob1 clockwise.
The instrument cluster illumination will
brighten.
To dim illumination
�
Turn knob1 counterclockwise.
The instrument cluster illumination will
dim.iYou can set the instrument cluster illu-
mination with the following lamps on:�
parking lamps
�
low beam headlamps
�
high beam headlamps
Page 247 of 321
247 Practical hints
Replacing bulbs
Replacing bulbs
Safe vehicle operation depends on proper
exterior lighting and signaling. It is there-
fore essential that all bulbs and lamp as-
semblies are in good working order at all
times.
Correct headlamp adjustment is extremely
important. Have headlamps checked and
readjusted at regular intervals and when a
bulb has been replaced. See your autho-
rized Mercedes-Benz Light Truck Center
for headlamp adjustment.
Bulbs Front lamps
iIf the headlamps are fogged up on the
inside as a result of high humidity, driv-
ing the vehicle a distance should clear
out the fogging.
Lamp
Type
1
Fog lamp
H8 35 W
2
High beam
H7 (55 W)
3
Low beam
H7 (55 W)
Xenon* D2S-35 W
4
Turn signal,
parking, stand-
ing and side
marker lamp
1157 NA
(32/3 cp bulb)
5
Additional turn
signal
LED


6
Right indicator lamps
with:W
Low wind-
shield/headlamp
washer sys")