Page 55 of 321
 im-
pacts, or side (side impact and head protec-
tio")
55 Safety and Security
Occupant safety
AirbagsWarning!
G
Airbags are designed to reduce the potential
of injury in certain frontal (front airbags) im-
pacts, or side (side impact and head protec-
tion window curtain airbags) impacts which
may cause significant injuries. However, no
system available today can totally eliminate
injuries and fatalities.
The activation of the SRS temporarily releas-
es a small amount of dust from the airbags.
This dust, however, is neither injurious to
your health, nor does it indicate a fire in the
vehicle. The dust might cause some tempo-
rary breathing difficulty for people with asth-
ma or other breathing trouble. To avoid this,
you may wish to get out of the vehicle as
soon as it is safe to do so. If you have any
breathing difficulty but cannot get out of the
vehicle after the airbag inflates, then get
fresh air by opening a window or door.
Warning!
G
To reduce the risk of injury when the front
airbags inflate, it is very important for the
driver and passenger to always be in a prop-
erly seated position and to wear your seat
belt.
For maximum protection in the event of a
collision always be in normal seated position
with your back against the backrest. Fasten
your seat belt and ensure that it is properly
positioned on your body (
�page 40).
Since the airbag inflates with considerable
speed and force, a proper seating and hands
on steering wheel position will help to keep
you at a safe distance from the airbag. Oc-
cupants who are unbelted, out of position or
too close to the airbag can be seriously in-
jured by an airbag as it inflates with great
force in the blink of an eye:
�
Sit properly belted in an upright position
with your back against the backrest.
�
Adjust the driver seat as far as possible
rearward, still permitting proper opera-
tion of vehicle controls. The distance
from the center of the driver’s breast-
bone to the center of the airbag cover on
the steering wheel must be at least ten
inches (25 cm) or more. You should be
able to accomplish this by a combina-
tion of adjustments to the seat and
steering wheel. If you have any prob-
lems, please see your authorized
Mercedes-Benz Light Truck Center.
�
Do not lean with your head or chest
close to the steering wheel or dash-
board.
�
Keep hands on the outside of steering
wheel rim. Placing hands and arms in-
side the rim can increase the risk and
potential severity of hand/arm injury
when driver front airbag inflates.
�
Adjust the passenger seat as far as pos-
sible rearward from the dashboard when
the seat is occupied.
��
Page 121 of 321

121 Controls in detail
Good visibility
Folding in�
Briefly press button 1.
The mirrors fold in.Folding out
�
Briefly press button 2.
The mirrors fold out.
Headlamp cleaning system*
The switch is located on the right side of
the dashboard.Headlamp washer switch�
Switch on ignition.
�
Briefly press the upper part of switch.
iWith the front doors closed, the exteri-
or mirrors can still be folded in and out
approximately 30 minutes after the ig-
nition has been turned off.!Before you drive the vehicle through an
automatic car wash, fold the exterior
mirrors in, otherwise they may get
damaged.iIf you are driving at more than 9 mph
(15 km/h), you will not able to fold the
exterior mirrors in.
!If an exterior mirror housing is forcibly
pushed forward (hit from the rear), re-
position it manually by applying firm
pressure until it snaps back into place.
If an exterior mirror is forcibly pushed
rearward (hit from the front) press
button1 to fold mirrors in, then press
button2 to fold mirrors out. Do not
force mirror by hand.
The mirror housing is now properly po-
sitioned and you can adjust the mirror
normally.
Page 133 of 321
133 Controls in detail
Automatic climate control
Adjusting side air outlets�
Turn thumbwheel4 (
�page 125), to
one of the following positions:Center air outlets
Opening
�
Turn thumbwheel center air outlet 1
(�page 125) upward to position
h
.
Closing
�
Turn thumbwheel center air outlet 1
downward to position
M
.
Use the left thumbwheel to adjust the cen-
ter air outlets on the left and in the center.
Use the right thumbwheel to adjust the
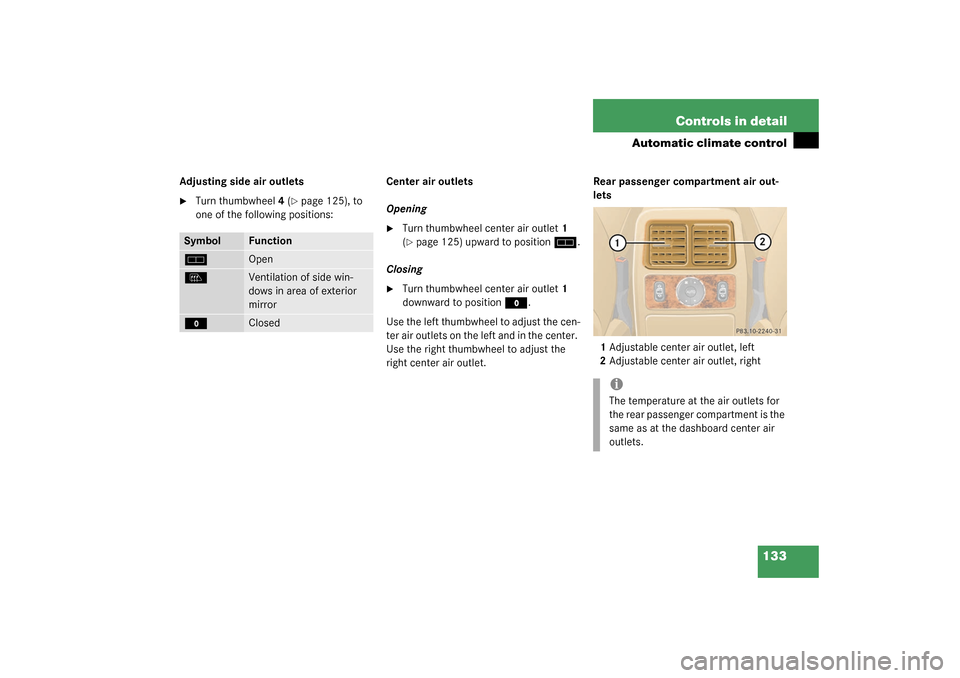
right center air outlet.Rear passenger compartment air out-
lets
1Adjustable center air outlet, left
2Adjustable center air outlet, right
Symbol
Function
h
Open
l
Ventilation of side win-
dows in area of exterior
mirror
M
Closed
iThe temperature at the air outlets for
the rear passenger compartment is the
same as at the dashboard center air
outlets.
Page 150 of 321

150 Controls in detailDriving systemsMonitoring reach of sensors
The sensors must be free of dirt, ice and
snow or they will be unable to function
properly. Clean the sensors regularly with-
out scratching or damaging them.Front sensors
Rear sensors
Minimum distance
When an obstacle is located in this area, all
warning displays will light up and a warning
tone will sound. If the vehicle moves closer
than the minimum distance to an object,
the distance may no longer be displayed.Warning indicators
The warning indicators show the distance
between the sensor and the obstacle. The
warning indicators for the front area are lo-
cated above the center air outlets in the
dashboard. The warning indicator for the
rear area is located in the rear passenger
compartment lamp.
1Segments, left side of vehicle
2Segments, right side of vehicle
Each warning indicator has 6 yellow and 2
red segments.
Center
40 in (100 cm)
Corner
24 in (60 cm)
Center
48 in (120 cm)
Corner
32 in (80 cm)
Center
6 in (15 cm)
Corner
8 in (20 cm)