Page 35 of 321
35 Getting started
Adjusting
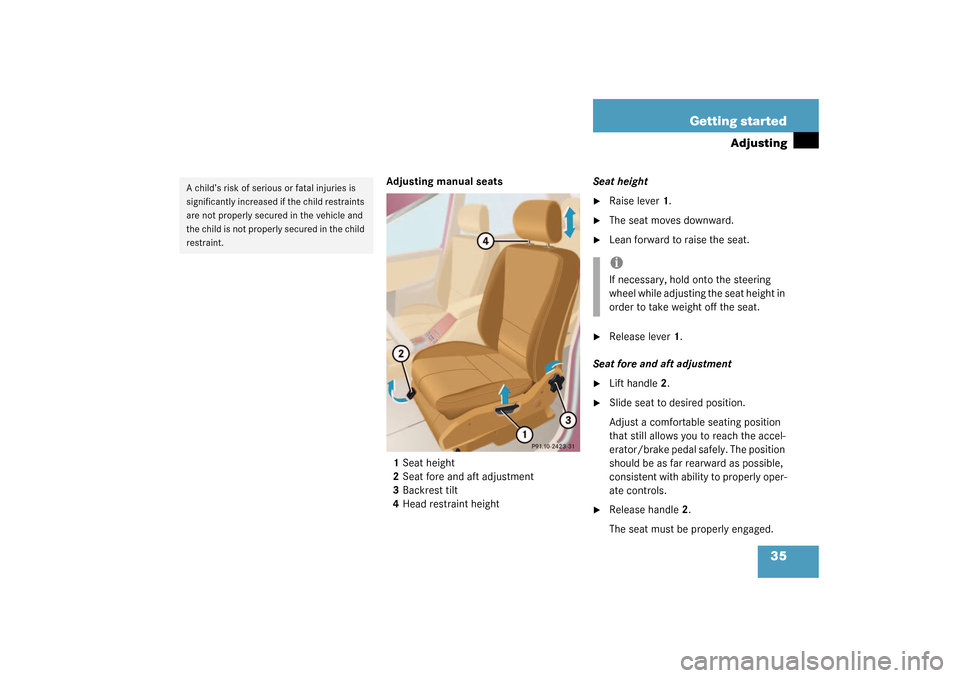
Adjusting manual seats
1Seat height
2Seat fore and aft adjustment
3Backrest tilt
4Head restraint heightSeat height
�
Raise lever 1.
�
The seat moves downward.
�
Lean forward to raise the seat.
�
Release lever1.
Seat fore and aft adjustment
�
Lift handle2.
�
Slide seat to desired position.
Adjust a comfortable seating position
that still allows you to reach the accel-
erator/brake pedal safely. The position
should be as far rearward as possible,
consistent with ability to properly oper-
ate controls.
�
Release handle2.
The seat must be properly engaged.
A child’s risk of serious or fatal injuries is
significantly increased if the child restraints
are not properly secured in the vehicle and
the child is not properly secured in the child
restraint.
iIf necessary, hold onto the steering
wheel while adjusting the seat height in
order to take weight off the seat.
Page 36 of 321

36 Getting startedAdjustingBackrest tilt�
Turn handwheel3 until your hands are
slightly angled when holding the steer-
ing wheel.
Head restraint height
�
Pull up or push down on head restraint
until it is in desired position.Head restraint tilt
�
Manually adjust the angle of the head
restraint. Push or pull on the lower
edge of the head restraint cushion.
Adjusting power seats*
The seat adjustment switch is located on
the entry side of each front seat base.
�
Switch on the ignition by turning the
key in the steering lock to position2
(�page 33).
All the lights in the instrument cluster
light up.1Seat height
2Seat fore and aft adjustment
3Seat cushion tilt
4Backrest tilt
Seat height
�
Press the switch up or down in the di-
rection of arrow1.
Warning!
G
For your protection, drive only with properly
positioned head restraints.
Adjust head restraint to support the back of
the head approximately at ear level.
Do not drive the vehicle without the seat
head restraints. Head restraints are intend-
ed to help reduce injuries during an acci-
dent.
Warning!
G
The power seats can also be operated with
the appropriate door open. Do not leave
children unattended in the vehicle, or with
access to an unlocked vehicle. Unsuper-
vised use of vehicle equipment may cause
an accident and/or serious personal injury.
Page 37 of 321

37 Getting started
Adjusting
Seat fore and aft adjustment�
Press the switch forward or backward
in the direction of arrow2 until you can
comfortably press the pedals all the
way to the floor.
Seat cushion tilt
�
Press the switch up or down in the di-
rection of arrow3 until your upper legs
are lightly supported.
Backrest tilt
�
Press the switch forward or backward
in the direction of arrow4 until your
hands are slightly angled when holding
the steering wheel. Head restraint height
�
Pull up or push down on head restraint
until it is in desired position.
Head restraint tilt
�
Manually adjust the angle of the head
restraint. Push or pull on the lower
edge of the head restraint cushion.
More information can be found in the
“Controls in detail” section (
�page 91).
Steering wheel
1Lever
iWith the front door open, the seats can
still be adjusted approx. 30 minutes af-
ter the ignition has been turned off.
Warning!
G
For your protection, drive only with properly
positioned head restraints.
Adjust head restraint to support the back of
the head approximately at ear level.
Do not drive the vehicle without the seat
head restraints. Head restraints are intend-
ed to help reduce injuries during an acci-
dent.
Warning!
G
Do not adjust the steering wheel while driv-
ing. The steering wheel must be locked
while driving. Adjusting the steering wheel
while driving, or driving without the steering
column locked could cause the driver to lose
control of the vehicle.
Page 38 of 321

38 Getting startedAdjusting�
Move lever1 to its stop down.
�
Move steering wheel up or down to de-
sired position.
�
Move lever1 to its stop up.
The steering column is locked.
Mirrors
Adjust the inside and exterior rear view
mirrors before driving so that you have a
good view of the road and traffic condi-
tions.Inside rear view mirror
�
Manually adjust the inside rear view
mirror.
Exterior rear view mirrors
!If the indicator lamp
_
(�page 26)
comes on while the engine is running,
the steering column is not locked prop-
erly.
Warning!
G
In the case of an accident, liquid electrolyte
may escape the mirror housing if the mirror
glass breaks.
Electrolyte has an irritating effect. Do not al-
low the liquid to come into contact with
eyes, skin, clothing, or the respiratory sys-
tem. In case it does, immediately flush af-
fected area with water, and seek medical
help if necessary.
Warning!
G
Exercise care when using the passenger
side exterior rear view mirror. The mirror
surface is convex (outwardly curved surface
for a wider field of view). Objects in mirror
are closer than they appear. Check your in-
side rear view mirror or glance over your
shoulder before changing lanes.!Electrolyte drops coming into contact
with the vehicle paint finish can only be
completely removed while in their liq-
uid state and by applying plenty of wa-
ter.
Page 46 of 321

46 Getting startedDrivingAfter a cold start the transmission engages
at a higher revolution. This allows the cata-
lytic converter to reach its operating tem-
perature earlier.More information can be found in the “Op-
eration” section (
�page 177).
For information on off-road driving, see
Driving instructions (�page 186).
Switching on headlamps
The combination switch is on the left of the
steering column.
Combination switch1Off
2Low beam headlamps on
3High beam lamps on�
Turn the switch to
õ
.
Low beam headlamps on.
!If you hear a warning signal when driv-
ing off, you have forgotten to release
the parking brake.
Release the parking brake.Warning!
G
It is dangerous to shift the selector lever out
ofP orN if the engine speed is higher than
idle speed. If your foot is not firmly on the
brake pedal, the vehicle could accelerate
quickly forward or in reverse. You could lose
control of the vehicle and hit someone or
something. Only shift into gear when the en-
gine is idling normally and when your right
foot is firmly on the brake pedal.
Warning!
G
On slippery road surfaces, never downshift
in order to obtain braking action. This could
result in drive wheel slip and reduced vehi-
cle control. Your vehicle’s ABS will not pre-
vent this type of loss of control.
Page 47 of 321
47 Getting started
Driving
High beam�
Push the exterior lamp switch forward.
The high beam symbol
A
in the
instrument cluster lights up.
More information can be found in the
“Controls in detail” section (
�page 102)
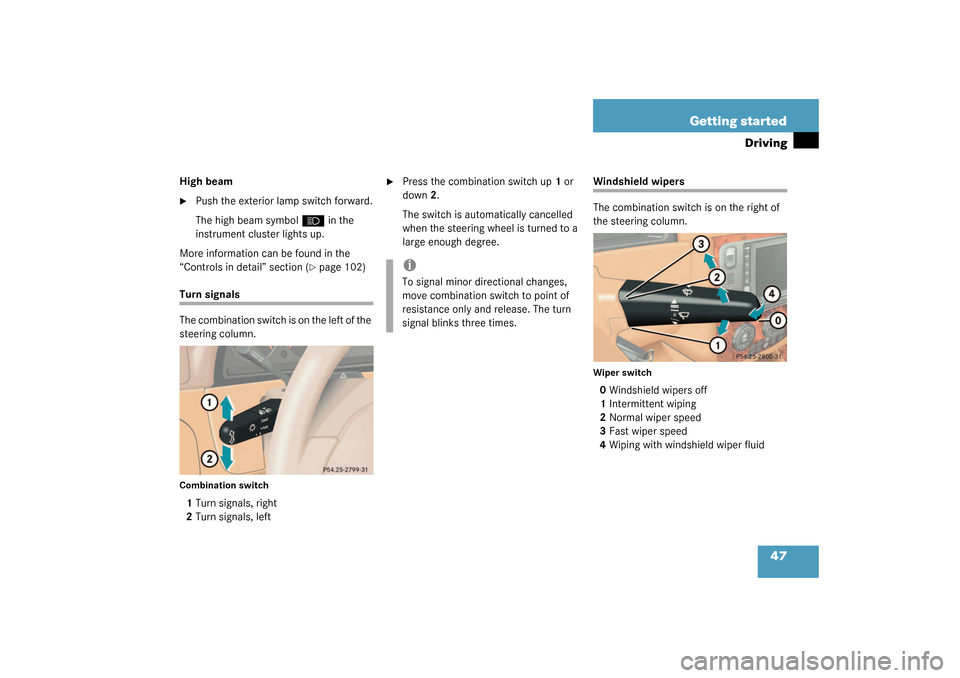
Turn signals
The combination switch is on the left of the
steering column.Combination switch1Turn signals, right
2Turn signals, left
�
Press the combination switch up1 or
down2.
The switch is automatically cancelled
when the steering wheel is turned to a
large enough degree.
Windshield wipers
The combination switch is on the right of
the steering column.Wiper switch0Windshield wipers off
1Intermittent wiping
2Normal wiper speed
3Fast wiper speed
4Wiping with windshield wiper fluid
iTo signal minor directional changes,
move combination switch to point of
resistance only and release. The turn
signal blinks three times.
Page 50 of 321

50 Getting startedParking and locking
Parking and lockingYou have now completed your first drive.
You have properly stopped and parked
your vehicle. End your drive as follows.
Parking brake
1Parking brake
2Release handle�
Step firmly on parking brake1.
When the engine is running, the indica-
tor lamp
É
in the instrument cluster
will be illuminated.
Warning!
G
Wait until the vehicle is stationary before re-
moving the key from the steering lock. The
vehicle cannot be steered when the key is
removed.Warning!
G
With the engine not running, there is no
power assistance for the steering system. In
this case, it is important to keep in mind that
a considerably higher degree of effort is nec-
essary to steer the vehicle.
Warning!
G
Do not park this vehicle in areas where com-
bustible materials such as grass, hay or
leaves can come into contact with the hot
exhaust system, as these materials could be
ignited and cause a vehicle fire.
To reduce the risk of personal injury as a re-
sult of vehicle movement, before turning off
the engine and leaving the vehicle always:�
Keep right foot on brake pedal.
�
Firmly depress parking brake pedal.
�
Move the selector lever to positionP.
�
Slowly release brake pedal.
�
When parked on an incline, turn front
wheel towards the road curb.
�
Turn the key to starter switch position 0
and remove.
�
Take the key and lock vehicle when leav-
ing.
Page 51 of 321
.
More information can be found in the
“Controls in detail” section (
�page 102).
Turnin")
51 Getting started
Parking and locking
Switching off headlamps�
Turn the combination switch to1
(�page 46).
More information can be found in the
“Controls in detail” section (
�page 102).
Turning off engine�
Place the gear selector lever inP.
�
Turn the key in the steering lock
(�page 33) to position0 and remove
it.
The immobilizer is activated.
Warning!
G
When leaving the vehicle always remove the
key from the steering lock and lock the vehi-
cle. Do not leave children unattended in the
vehicle, or with access to an unlocked vehi-
cle. Children could release the parking
brake and/or move the gear selector lever
from positionP, either of which could result
in an accident and/or serious personal
injury.
Warning!
G
Getting out of your vehicle with the selector
lever not fully engaged in positionP is dan-
gerous. Also, when parked on an incline,
positionP alone may not prevent your vehi-
cle from moving, possibly hitting people or
objects.
Always set the parking brake in addition to
shifting to positionP (
�page 50).
When parked on an incline, also turn front
wheel towards the road curb.
iAlways set the parking brake in addi-
tion to shifting to positionP.!To prevent accelerated battery dis-
charge and a possible dead battery, al-
ways remove the key from the steering
lock.