Page 172 of 321

172 Controls in detailUseful featuresTrip computer*
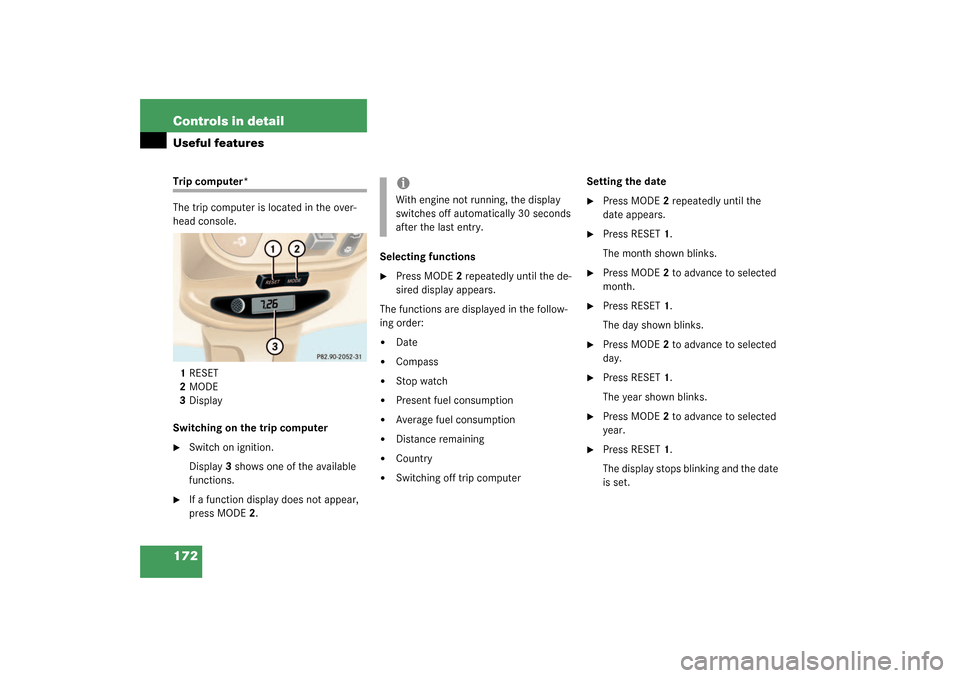
The trip computer is located in the over-
head console.
1RESET
2MODE
3Display
Switching on the trip computer�
Switch on ignition.
Display3 shows one of the available
functions.
�
If a function display does not appear,
press MODE2.Selecting functions
�
Press MODE2 repeatedly until the de-
sired display appears.
The functions are displayed in the follow-
ing order:
�
Date
�
Compass
�
Stop watch
�
Present fuel consumption
�
Average fuel consumption
�
Distance remaining
�
Country
�
Switching off trip computerSetting the date
�
Press MODE2 repeatedly until the
date appears.
�
Press RESET1.
The month shown blinks.
�
Press MODE2 to advance to selected
month.
�
Press RESET1.
The day shown blinks.
�
Press MODE2 to advance to selected
day.
�
Press RESET1.
The year shown blinks.
�
Press MODE2 to advance to selected
year.
�
Press RESET1.
The display stops blinking and the date
is set.
iWith engine not running, the display
switches off automatically 30 seconds
after the last entry.
Page 174 of 321

174 Controls in detailUseful featuresSetting the compass zone�
Determine the geographical point of
the vehicle with the aid of the zone
maps.
�
Switch on the ignition.
�
Press MODE2 (
�page 172) repeated-
ly until the compass display appears in
the trip computer display3.
�
Press RESET1 (
�page 172) to select
the compass zone mode.
The zone selected last is shown in the
display.
�
Press RESET1 repeatedly until the cor-
rect compass zone, as determined
from the zone map, is shown in the dis-
play.
�
Press MODE2 twice.
The new compass zone is activated and
the compass display will be shown.Calibrating the compass
If the vehicle was exposed to a significant
magnetic zone, such as high voltage power
lines, the compass may have to be calibrat-
ed.
To calibrate the compass correctly, ob-
serve the following:
�
Calibrate the compass in an area free
of steel superstructures and power
lines.
�
Switch off all electrical consumers (e.g.
exterior lamps, climate control, rear
window defroster etc.).
�
Do not open or close the slid-
ing/pop-up roof.
�
Close doors and liftgate.
�
Start and run the engine.
�
Press MODE2 (
�page 172) repeated-
ly until the compass display appears in
the trip computer display3.
�
Press RESET1 and afterwards press
MODE2.
In the display appears
CAL–
.
�
Press and hold RESET1 for approxi-
mately two seconds.
The calibration mode is activated and
the display shows
CAL
.
�
Drive without interruption two full cir-
cles at a speed between 3 mph
(5 km / h) and 7 mph (10 km / h).
The message
CAL
goes out after a short
time. The calibration is now complete.
iAn open liftgate triggers the
display
---
.
Page 177 of 321
177 Operation
The first 1000 miles (1500 km)
Driving instructions
At the gas station
Engine compartment
Tires and wheels
Winter driving
Maintenance
Vehicle care
Page 178 of 321
178 OperationThe first 1000 miles (1500 km)In the “Operation” section you will find de-
tailed information on operating, maintain-
ing and caring for your vehicle.
The first 1000 miles (1500 km)The more cautiously you treat your vehicle
during the break-in period, the more satis-
fied you will be with its performance later
on.�
Drive your vehicle during the first
1000 miles (1500 km) at varying but
moderate vehicle and engine speeds.
�
During this period, avoid heavy loads
(full throttle driving) and excessive en-
gine speeds (no more than 2/3 of max-
imum rpm in each gear).
�
Avoid accelerating by kick-down.
�
Do not attempt to slow the vehicle
down by shifting to a lower gear using
the selector lever.
�
Select positions3, 2 or1 only when
driving at moderate speeds (for hill
driving).
After 1000 miles (1500 km) you may grad-
ually increase vehicle and engine speeds
to the permissible maximum.
Page 179 of 321

179 Operation
Driving instructions
Driving instructions
Drive sensibly – save fuel
Fuel consumption, to a great extent, de-
pends on driving habits and operating con-
ditions.
To save fuel you should:�
Keep tires at the recommended infla-
tion pressures
�
Remove unnecessary loads
�
Allow engine to warm up under low
load use
�
Avoid frequent acceleration and decel-
eration
�
Have all maintenance work performed
at regular intervals by an authorized
Mercedes-Benz Light Truck Center
Fuel consumption is also increased by driv-
ing in cold weather, in stop-and-go traffic,
on short trips and in hilly country.
Drinking and driving
PedalsPower assistance
Warning!
G
Drinking and driving and/or taking drugs
and driving are a very dangerous combina-
tion. Even a small amount of alcohol or
drugs can affect your reflexes, perceptions
and judgement.
The possibility of a serious or even fatal ac-
cident is sharply increased when you drink
or take drugs and drive.
Don’t drink or take drugs and drive or allow
anyone to drive after drinking or taking
drugs.
Warning!
G
Keep driver’s foot area clear at all times. Ob-
jects stored in this area may impair pedal
movement.Warning!
G
When the engine is not running, there is no
power assistance for the steering system. In
this case, it is important to keep in mind that
a considerably higher degree of effort is nec-
essary to steer the vehicle.
Page 181 of 321

181 Operation
Driving instructions
Install only brake pads and brake fluid rec-
ommended by Mercedes-Benz.
After hard braking, it is advisable to drive
on for some time, rather than immediately
parking, so the air stream will cool down
the brakes faster.
Driving off
Apply the brakes to test them briefly after
driving off. Perform this procedure only
when the road is clear of other traffic.
Warm up the engine smoothly. Do not
place full load on the engine until the oper-
ating temperature has been reached.
When starting off on a slippery surface, do
not allow one drive wheel to spin for an ex-
tended period with the ESP switched off.
Doing so may cause serious damage to the
drivetrain which is not covered by the
Mercedes-Benz Limited Warranty.
Warning!
G
If other than recommended brake pads are
installed, or other than recommended brake
fluid is used, the braking properties of the
vehicle can be degraded to an extent that
safe braking is substantially impaired. This
could result in an accident.
!When driving down long and steep
grades, relieve the load on the brakes
by shifting into a lower gear to use the
engine’s braking power. This helps
prevent overheating of the brakes and
reduces brake pad wear.
Page 182 of 321

182 OperationDriving instructionsParking
Tires
Tread wear indicators (TWI) are required by
law. These indicators are located in six
places on the tread circumference and be-
come visible at a tread depth of approxi-
mately
1/16
in (1.5 mm), at which point
the tire is considered worn and should be
replaced.
!Set the parking brake whenever park-
ing or leaving the vehicle. In addition,
move selector lever to positionP.
In addition, when parking on hills, turn
front wheel towards the curb.
Warning!
G
Do not park this vehicle in areas where com-
bustible materials such as grass, hay or
leaves can come into contact with the hot
exhaust system, as these materials could be
ignited and cause a vehicle fire.
To reduce the risk of personal injury as a re-
sult of vehicle movement, before
turning off
the engine and leaving the vehicle always:
�
Keep right foot on brake pedal.
�
Firmly depress parking brake pedal.
�
Move the selector lever to positionP.
�
Slowly release brake pedal.
�
When parked on an incline, turn front
wheel towards the road curb.
�
Turn the key to steering lock position0
and remove.
�
Take the key and lock vehicle when leav-
ing.
Warning!
G
If you feel a sudden significant vibration or
ride disturbance, or you suspect that possi-
ble damage to your vehicle has occurred,
you should turn on the hazard warning flash-
ers, carefully slow down, and drive with cau-
tion to an area which is a safe distance from
the road.
Inspect the tires and the vehicle underbody
for possible damage. If the vehicle or tires
appear unsafe, have it towed to the nearest
Mercedes-Benz Light Truck Center or tire
dealer for repairs.
Page 185 of 321

185 Operation
Driving instructions
This can bring road salt impaired braking
efficiency back to normal. Be very careful
that you carry out these braking maneu-
vers without endangering any other road
users.
If the vehicle is parked after being driven
on salt-treated roads, the braking efficien-
cy should be tested as soon as possible af-
ter driving is resumed while observing the
safety rules in the previous paragraph.
For more information on winter driving
(
�page 213).
Standing water
Warning!
G
If the vehicle becomes stuck in snow, make
sure that snow is kept clear of the exhaust
pipe and from around the vehicle with the
engine running. Otherwise, deadly carbon
monoxide (CO) gases may enter vehicle in-
terior resulting in unconsciousness and
death.
To assure sufficient fresh air ventilation,
open a window slightly on the side of the ve-
hicle not facing the wind.
Warning!
G
The outside temperature indicator is not de-
s i g n e d t o s e r v e a s a n i c e - w a r n i n g d e v i c e a n d
is therefore unsuitable for that purpose. In-
dicated temperatures just above the freez-
ing point do not guarantee that the road
surface is free of ice.
!Do not drive through flooded areas or
water of unknown depth. Before driving
through water, determine its depth. It
should not be deeper than approxi-
mately 20 inches (50 cm).
If you must drive through standing wa-
ter, drive slowly to prevent water from
entering the passenger compartment
or the engine compartment. Water in
these areas could cause damage to
electrical components or wiring of the
engine or transmission, or could result
in water being ingested by the engine
through the air intake causing severe
internal engine damage. Any such dam-
age is not covered by the Mer-
cedes-Benz Limited Warranty.