Page 169 of 321

169 Controls in detail
Useful features
Programming or reprogramming the in-
tegrated remote control�
Turn key in the steering lock to
position1 or2.
�
Hold the end of the hand-held transmit-
ter of the device you wish to train
approximately 2 to 5 inches (5 cm to
12 cm) away from the surface of the in-
tegrated remote control located on the
inside rear view mirror, keeping the in-
dicator lamp in view.
�
Using both hands, simultaneously push
the hand-held transmitter button and
the desired integrated remote control
button. Do not release the buttons until
completing next step.
�
The indicator lamp on the integrated
remote control will flash, first slowly
and then rapidly. The rapid flashing
lamp indicates successful program-
ming of the new frequency signal.
Warning!
G
When programming a garage door opener,
the door moves up or down.
When programming or operating the remote
control make sure there is no possibility of
anyone being injured by the moving door.iCertain types of garage door openers
are incompatible with the integrated
opener. If you should experience diffi-
culties with programming the transmit-
ter, contact your authorized
Mercedes-Benz Center, or call
Mercedes-Benz Customer Assistance
Center (in the USA only) at
1-800-FOR-MERCedes, or Customer
Service (in Canada) at
1-800-387-0100.
iFor operation in the USA only: This de-
vice complies with Part 15 of the
FCC Rules. Operation is subject to the
following two conditions:
(1) This device may not cause harmful
interference, and
(2) this device must accept any inter-
ference received, including interfer-
ence that may cause undesired
operation.
Any unauthorized modification to this
device could void the user’s authority
to operate the equipment.
Page 171 of 321

171 Controls in detail
Useful features
Canadian programming
During programming, your hand-held
transmitter may automatically stop trans-
mitting. �
Continue to press and hold the inte-
grated remote control transmitter but-
ton (refer to steps two through four in
the “Programming” portion) while you
press and re-press (“cycle”) your
hand-held transmitter every two sec-
onds until the frequency signal has
been learned.
Upon successful training, the indicator
lamp will flash slowly and then rapidly
after several seconds.Operation of remote control
�
Turn key in steering lock to position1
or2.
�
Select and press the appropriate but-
ton to activate the remote controlled
device.
The integrated remote control trans-
mitter continues to send the signal as
long as the button is pressed – up to
20 seconds.Erasing the remote control memory
�
Turn key in steering lock to position1
or2.
�
Simultaneously hold down the left and
right side buttons for approximately
20 seconds, or until the indicator lamp
blinks rapidly.
The codes of all three channels are
erased.iIf you sell your vehicle, erase the codes
of all three channels.
Page 194 of 321
.
Most states and all Canadian provinces re-
quire�
safety chains between your tow")
194 OperationDriving instructionsAttaching a trailer
Observe maximum permitted trailer di-
mensions (width and length).
Most states and all Canadian provinces re-
quire�
safety chains between your tow vehicle
and the trailer.
The chains should be crisscrossed un-
der the trailer tongue. They must be at-
tached to the hitch receiver, and not to
the vehicle’s bumper or axle.
Be sure to leave enough slack in the
chains to permit turning corners.
�
a separate brake system at various
trailer weights.
�
a break-away switch on trailers with a
separate brake system.
The switch activates the trailer brakes
in the possible event that the trailer
might separate from the tow vehicle.Towing a trailer
There are many different laws, including
speed limit restrictions, having to do with
trailer towing. Make sure that your rig will
be legal, not only for where you reside, but
also for where you will be driving. A good
source for this information can be the po-
lice or local authorities.
Note the following points, when driving
with the trailer:
�
In order to gain skill and an under-
standing of the vehicle’s behavior, you
should practice turning, stopping and
backing up in an area which is free from
traffic.
�
Before you start driving check the�
trailer hitch
�
break-away switch
�
safety chains
�
electrical connections
�
lighting and tires
!Do not connect a trailer brake system
(if trailer is so equipped) directly to the
vehicle’s hydraulic brake system, as
your vehicle is equipped with antilock
brakes. If you do, neither the vehicle’s
brakes nor the trailer’s brakes will func-
tion properly.iThe provided vehicle electrical wiring
harness for trailer towing has a brake
signal wire (color orange) for hook-up
to a brake controller.
You should consider using a trailer
sway control system. For further infor-
mation see your authorized
Mercedes-Benz Light Truck Center.
Page 220 of 321

220 OperationVehicle careOrnamental moldings
For regular cleaning and care of very dirty
chrome-plated parts, use a chrome clean-
er.
Headlamps, tail lamps, turn signal
lenses
Use a mild car wash detergent, such as
Mercedes-Benz approved Car Shampoo,
with plenty of water.
To prevent scratches, never apply strong
force and use only a soft, non-scratchy
cloth when cleaning the lenses. Do not at-
tempt to wipe dirty lenses with a dry cloth
or sponge.Cleaning the Parktronic* system
sensor
1Parktronic system sensor
Use a mild car wash detergent, such as
Mercedes-Benz approved Car Shampoo,
with plenty of water to clean the sensor1.
When using a steam cleaner or power
washer, aim nozzle only briefly from a min-
imum distance of 4 in. (10 cm) at
sensors1.
To prevent scratches, never apply strong
force and use only a soft, non-scratchy
cloth when cleaning the sensor. Do not at-
tempt to wipe dirty sensors with a dry cloth
or sponge.Wiper blades
Clean the wiper blade inserts with a clean
cloth and detergent solution.
Window cleaning
Use a window cleaning solution on all glass
surfaces. An automotive glass cleaner is
recommended.
iFor safety reasons, remove key from
steering lock before cleaning the wiper
blades, otherwise the wiper motor can
suddenly turn on and cause injury.iFor safety reasons, switch off wipers
and remove key from steering lock be-
fore cleaning the windshield, otherwise
the wiper motor can suddenly turn on
and cause injury.
Page 247 of 321
247 Practical hints
Replacing bulbs
Replacing bulbs
Safe vehicle operation depends on proper
exterior lighting and signaling. It is there-
fore essential that all bulbs and lamp as-
semblies are in good working order at all
times.
Correct headlamp adjustment is extremely
important. Have headlamps checked and
readjusted at regular intervals and when a
bulb has been replaced. See your autho-
rized Mercedes-Benz Light Truck Center
for headlamp adjustment.
Bulbs Front lamps
iIf the headlamps are fogged up on the
inside as a result of high humidity, driv-
ing the vehicle a distance should clear
out the fogging.
Lamp
Type
1
Fog lamp
H8 35 W
2
High beam
H7 (55 W)
3
Low beam
H7 (55 W)
Xenon* D2S-35 W
4
Turn signal,
parking, stand-
ing and side
marker lamp
1157 NA
(32/3 cp bulb)
5
Additional turn
signal
LED
Page 248 of 321

248 Practical hintsReplacing bulbsRear lamps Notes on bulb replacement
�
Use only 12-volt bulbs of the same type
and with the specified watt rating.
�
Switch lights off before changing a bulb
to prevent short circuits.
�
Always use a clean lint-free cloth when
handling bulbs.
�
Your hands should be dry and free of oil
and grease.
�
If the newly installed bulb does not light
up, visit an authorized Mercedes-Benz
Light Truck Center.
�
Have the LEDs and bulbs for the follow-
ing lamps replaced by an authorized
Mercedes-Benz Light Truck Center:�
Additional turn signals in the exteri-
or rear view mirrors
�
Bi-Xenon lamps*
�
Front fog lamps (vehicles with sport
package)*
Lamp
Type
6
Brake lamp
1073
(32 cp bulb)
7
Backup lamp
1073
(32 cp bulb)
8
Turn signal lamp
PY 21 W
9
Tail, parking and
standing lamp
Rear fog lamp, driv-
er’s side
P 21/4 W
10
Side marker lamp
W5W
11
High mounted brake
lamp
1073
(32 cp bulb)
12
License plate lamps
C 5 W
Warning!
G
Keep bulbs out of reach of children.
Bulbs and bulb sockets can be very hot. Al-
low the lamp to cool down before changing
a bulb.
Halogen lamps contain pressurized gas. A
bulb can explode if you:�
touch or move it when hot
�
drop the bulb
�
scratch the bulb
Wear eye and hand protection.
Because of high voltage in xenon lamps, it is
dangerous to replace the bulb or repair the
lamp and its components. We recommend
that you have such work done by a qualified
technician.
Page 250 of 321
250 Practical hintsReplacing bulbsHigh beam bulbs
1High beam headlamp cover with lock-
ing tab�
Switch off the lights.
�
Open the hood (
�page 202).
�
Twist cover1 counterclockwise and re-
move.2Electrical connector
�
Pull electrical connector2 off.
�
Unclip the retainer springs and take out
the bulb.
�
Insert the new bulb so that the base lo-
cates in the recess on the holder.
�
Clip the retainer springs.
�
Plug the connector2 onto the bulb.
�
Align headlamp cover and click into
place.Turn signal, parking, standing and side
marker lamp bulbs
1Bulb socket
�
Switch off the lights.
�
Open the hood (
�page 202).
�
Twist bulb socket1 counterclockwise
and pull out.
�
Push bulb into socket, turn counter-
clockwise and remove.
�
Insert new bulb in socket, push in and
twist clockwise.
�
Reinstall the bulb socket.
��
Page 251 of 321
251 Practical hints
Replacing bulbs
�
Align headlamp cover and click into
place.
Fog lamp bulbs
1Fog lamp
�
Switch off the lights.
�
Use a suitable object (e.g. screwdriver)
to press on the release lever behind the
front panel.
Front fog lamp1 releases.
�
Remove fog lamp out of bumper.2Bulb socket
3Tabs
�
Twist bulb socket2 counterclockwise
to its end stop and pull out.
�
Pull bulb out of the bulb socket.
�
Insert new bulb in socket.
�
Reinstall bulb socket2.
�
Twist bulb socket2 clockwise to its
end stop.
�
Reinstall fog lamp into the bumper.
Make sure that tabs3 firmly seat into
the slots of holder.
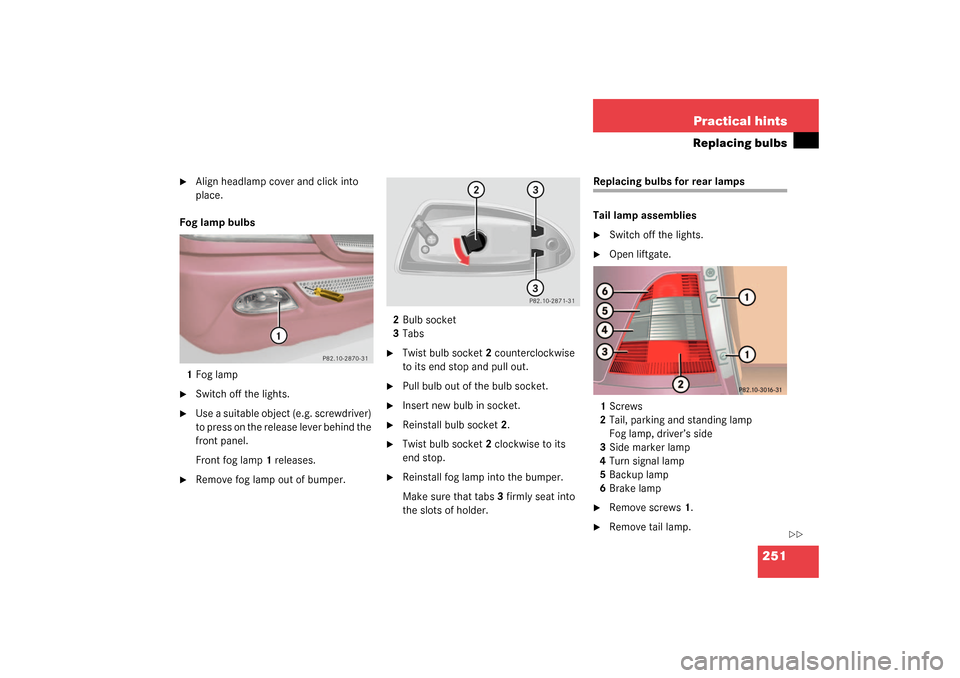
Replacing bulbs for rear lamps
Tail lamp assemblies�
Switch off the lights.
�
Open liftgate.
1Screws
2Tail, parking and standing lamp
Fog lamp, driver’s side
3Side marker lamp
4Turn signal lamp
5Backup lamp
6Brake lamp
�
Remove screws1.
�
Remove tail lamp.
��