Page 137 of 321

137 Controls in detail
Sliding/pop-up roof*
Sliding/pop-up roof*
Opening and closing the sliding/pop-up roof
1raise roof at rear
2slide roof open
3lower roof at rear
4slide roof closed
With the roof closed or tilted open, a
screen can be slid into the roof opening to
guard against sun rays. When sliding the
roof open, the screen will also retract.
To operate the sliding/pop-up roof, turn
key to position1 or 2 (
�page 33) in the
steering lock. Opening the roof
�
Press and hold the switch in
direction2.
The sliding/pop-up roof slides open un-
til the switch is released.Closing the roof
�
Press and hold the switch in
direction4.
The sliding/pop-up roof closes until the
switch is released.
Stopping the roof
�
Briefly press the switch in any direc-
tion.
The movement of the roof will stop.
Raising the roof
�
Press and hold the switch in
direction1.
The roof is raised at rear.
Lowering the roof
�
Pull and hold the switch in direction3.
The sliding/pop-up roof is lowered and
closed.
Warning!
G
When closing the sliding/pop-up roof, make
sure that there is no danger of anyone being
harmed by the closing procedure.
The closing procedure can be immediately
reversed by moving the switch in direction1
or2.
When leaving the vehicle, always remove the
key from steering lock and lock your vehicle.
Do not leave children unattended in the ve-
hicle, or with access to an unlocked vehicle.
Unsupervised use of vehicle equipment may
cause an accident and/or serious personal
injury.
Page 186 of 321

186 OperationDriving instructionsOff-road driving
Read this chapter carefully before you be-
gin off-road travel.
Familiarize yourself with the vehicle char-
acteristics and gear changing before you
attempt any difficult terrain off-road driv-
ing. We recommend that you start out with
easy off-road travel.Special driving features for off-road
driving
The following driving features are available
for specific kind of operation:
�
LOW RANGE mode (
�page 118)
�
LOW RANGE – ABS (
�page 72)
�
LOW RANGE – 4-ETS (
�page 74)
�
LOW RANGE – ESP (
�page 76)
Off-road driving rules
Engage the LOW RANGE mode before driv-
ing under off-road conditions
(
�page 118).
Fasten items being carried as securely as
possible (
�page 139).
Warning!
G
Drive slowly in unknown terrain. This will
make it easier to recognize unexpected ob-
stacles and avoid damage to the vehicle.
To help avoid the vehicle rolling over, never
turn it around on steep inclines. If the vehi-
cle cannot complete the attempted climb,
back it down in reverse gear.
Do not drive along the side of a slope (dan-
ger of vehicle rollover). The vehicle might
otherwise rollover. If in doing so the vehicle
begins to show a tendency to roll, immedi-
ately steer into a line of gravity (straight up
or downhill).
Never let the vehicle roll backwards in idle
or when the clutch is disengaged. You may
lose control of the vehicle if you use only the
service brake.
Warning!
G
Sand, dirt, mud and other material having
friction property can cause exceptional wear
and tear as well as brake failure.
Have the brakes checked for dirt build-up
and cleaned. There is otherwise a risk that
full braking power may not be available in an
emergency.
iWe recommend keeping doors, liftgate,
windows, and sliding/pop-up roof*
closed whenever driving in off-road
mode.
Page 188 of 321
.
�
Driving on embankments, slopes and
other steep inclines should only b")
188 OperationDriving instructions�
Switch to LOW RANGE mode before
starting to drive up or down steep in-
clines (
�page 118).
�
Driving on embankments, slopes and
other steep inclines should only be
done straight up or downhill, i.e. in the
line of gravity. Maximum vehicle climb-
ing ability is a 60% grade.
�
Do not drive along the side of a slope
(danger of vehicle rollover). If in doing
so, the vehicle begins to show a ten-
dency to roll, immediately steer into a
line of gravity (straight up or downhill).
�
To help avoid the vehicle rolling over,
never turn it around on steep inclines.
If the vehicle cannot complete the at-
tempted climb, back it down in reverse
gear.
�
Utilize the engine’s braking power
when descending a slope, observe the
engine speed (do not overrev the en-
gine). Apply the service brake as need-
ed.
�
Check the brakes after a lengthy down-
grade drive.
Traction in steep terrain
�
Be easy on the accelerator and watch
for continuous wheel traction when
driving in steep terrain.
The 4-ETS helps greatly when starting
out on a steep incline when the front
wheels have then the tendency to slip
due to the weight shifting away the
front axle.
The 4-ETS recognizes the situation and
limits the torque for the front wheels by
braking them. Simultaneously the
torque for the rear wheels is increased.Driving across a hilltop
�
Decelerate just ahead of a hilltop (do
not select gear rangeN), to prevent the
vehicle from speeding up too much af-
ter climbing a hill.
Use the momentum of the vehicle to
drive across the hilltop.
Driving in this manner prevents the ve-
hicle from jumping across the hilltop
and thus loosing its forward momen-
tum.
iAvoid excessive engine speeds – drive
with moderate engine speeds
(max. 3000 RPM).
Select gear range2 or1 on the auto-
matic transmission (
�page 114).
Page 271 of 321
271 Practical hintsFuses
Fuses
The fuse chart is printed on the corre-
sponding fuse box cover. The amperages
of the fuses are also indicated there.
Fuse box in engine compartment
The fuse box is located in the engine com-
partment on the left-hand side.
1Clamps
2Fuse box cover
Removing/installing cover�
Release clamps1
�
Lift fuse box cover2 up.
�
Install cover1 in reverse order.3Fuse chart
4Fuse extractor
5Spare fuses
iOnly install fuses that have been tested
and approved by Mercedes-Benz and
that have the specified amperage rat-
ing.
Never attempt to repair or bridge a
blown fuse. Have the cause determined
and remedied by an authorized
Mercedes-Benz Light Truck Center.
Page 272 of 321
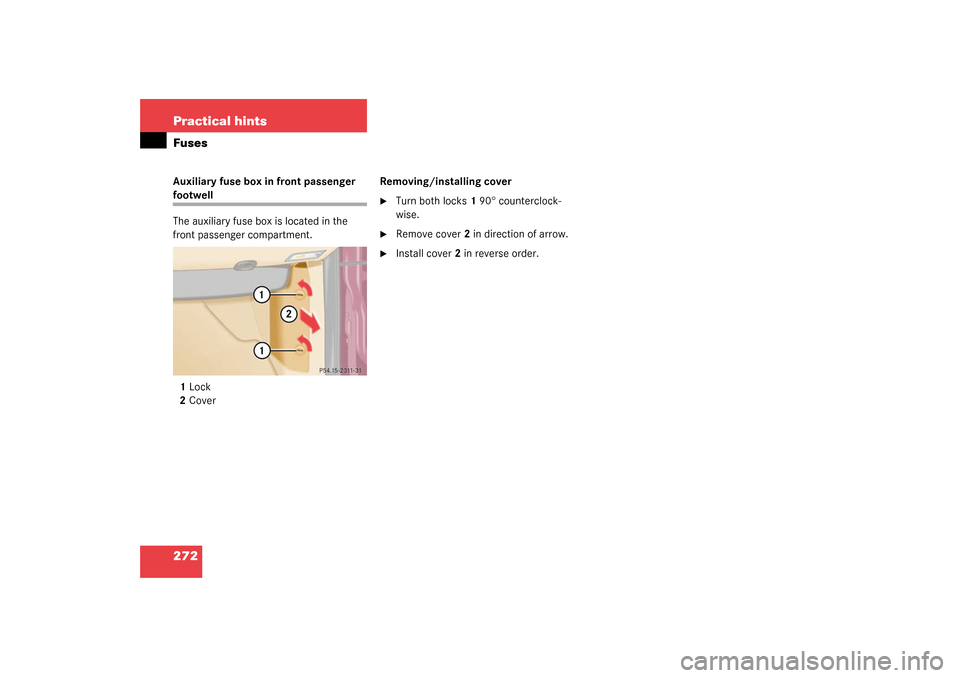
272 Practical hintsFusesAuxiliary fuse box in front passenger footwell
The auxiliary fuse box is located in the
front passenger compartment.
1Lock
2CoverRemoving/installing cover
�
Turn both locks1 90° counterclock-
wise.
�
Remove cover2 in direction of arrow.
�
Install cover2 in reverse order.