Page 93 of 321

93 Controls in detail
Seats
Rear seats
The rear seats are divided asymetrically.
To enlarge the cargo area you can adjust
the left and right part separately. The fol-
lowing changes are possible:�
moving the seat fore and aft
�
folding down the backrest
�
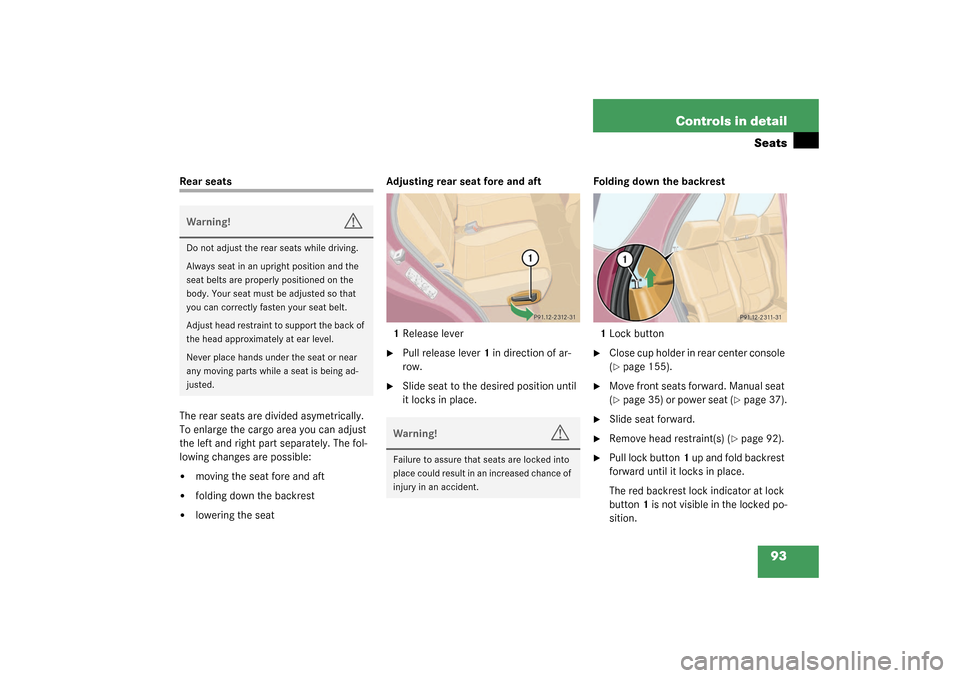
lowering the seatAdjusting rear seat fore and aft
1Release lever
�
Pull release lever1 in direction of ar-
row.
�
Slide seat to the desired position until
it locks in place.Folding down the backrest
1Lock button
�
Close cup holder in rear center console
(�page 155).
�
Move front seats forward. Manual seat
(�page 35) or power seat (
�page 37).
�
Slide seat forward.
�
Remove head restraint(s) (
�page 92).
�
Pull lock button1 up and fold backrest
forward until it locks in place.
The red backrest lock indicator at lock
button1 is not visible in the locked po-
sition.
Warning!
G
Do not adjust the rear seats while driving.
Always seat in an upright position and the
seat belts are properly positioned on the
body. Your seat must be adjusted so that
you can correctly fasten your seat belt.
Adjust head restraint to support the back of
the head approximately at ear level.
Never place hands under the seat or near
any moving parts while a seat is being ad-
justed.
Warning!
G
Failure to assure that seats are locked into
place could result in an increased chance of
injury in an accident.
Page 94 of 321

94 Controls in detailSeatsFolding up the backrest�
Pull lock button1 up and unfold back-
rest until it locks in place.
Make sure that the seat belt is not
caught in the seat.
�
Check for secure locking by pulling and
pushing on the backrest.
The red backrest lock indicator at lock
button1 is not visible in the locked po-
sition.
�
Install head restraint (
�page 92).
�
Slide seat rearward to desired position
(�page 93).
�
Adjust front seats to desired position.
Manual seats (
�page 35) and power
seats (
�page 37). Lowering the rear seat
1Release button
2Lever
3Release lever
�
Close cup holder in rear center console
(�page 155).
�
Move front seats forward. Manual seat
(�page 35) or power seat (
�page 37).
�
Press and hold release button1 to un-
lock lever2.
�
Pull lever2 in direction of arrow.
�
Pull release lever3 and push down rear
seat until it locks in place.
�
Fold down the backrest (
�page 93).
�
Adjust front seats to desired position.
Manual seats (
�page 35) and power
seats (
�page 37).
Folding up the rear seat
�
Move front seats forward. Manual seat
(�page 35) or power seat (
�page 37).
�
Pull release lever3 and raise rear seat
until it locks in place.Warning!
G
Failure to assure that seats are locked into
place could result in an increased chance of
injury in an accident.
Page 101 of 321

101 Controls in detail
Memory function*
Activating parking position
The buttons are on the lower part of the
center console.
1Deactivating parking position
2Activating parking position
3Adjustment button�
Switch ignition on (if not already on).
�
Press button2.
The passenger side exterior rear view
mirror is selected.
�
Engage reverse gearR.
The passenger side exterior rear view
mirror moves automatically to the
stored parking position. The exterior rear view mirror returns to its
stored driving position:
�
10 seconds after you put the gear se-
lector lever in positionD
�
immediately once you exceed a speed
of approx. 6 mph (10 km/h)
�
immediately when you press the
button1 for driver’s side mirrorStoring parking position
�
Stop the vehicle.
�
Switch ignition on (if not already on).
�
Press button2.
The passenger side exterior rear view
mirror is selected.
�
Adjust the exterior rear view mirror
with button3 so that you see the rear
wheel and the curb.
�
Press memory button2 (
�page 99).
�
Within three seconds, press bottom of
adjustment button3.
The parking position is stored if the
mirror does not move.
iIf the button1 is pressed, the automat-
ic passenger side exterior rear view
parking position is deactivated.
iIf the mirror does move, repeat the
above steps. After the setting is stored
you can move the mirror again.
The selected position will be stored rel-
ative to the position button1
(�page 99) pressed.
Page 105 of 321

105 Controls in detail
Lighting
Locator lighting
During darkness, the following lamps will
come on when the vehicle is unlocked by
remote control:�
Parking lamps
�
Tail lamps
�
License plate lamps
�
Front fog lamps
The combination switch must be set to
position
U
(�page 102).
The locator lighting switches off when the
driver’s door is opened. It switches off au-
tomatically after a period of approximately
40 seconds.
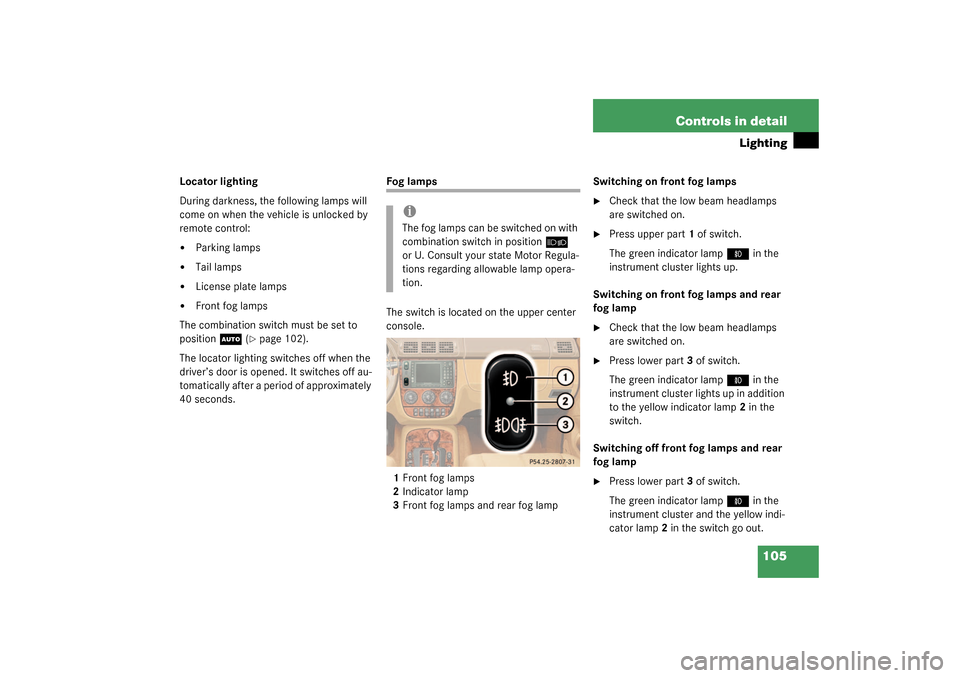
Fog lamps
The switch is located on the upper center
console.
1Front fog lamps
2Indicator lamp
3Front fog lamps and rear fog lampSwitching on front fog lamps
�
Check that the low beam headlamps
are switched on.
�
Press upper part1 of switch.
The green indicator lamp
‡
in the
instrument cluster lights up.
Switching on front fog lamps and rear
fog lamp
�
Check that the low beam headlamps
are switched on.
�
Press lower part3 of switch.
The green indicator lamp
‡
in the
instrument cluster lights up in addition
to the yellow indicator lamp2 in the
switch.
Switching off front fog lamps and rear
fog lamp
�
Press lower part3 of switch.
The green indicator lamp
‡
in the
instrument cluster and the yellow indi-
cator lamp2 in the switch go out.
iThe fog lamps can be switched on with
combination switch in position
õ
or U. Consult your state Motor Regula-
tions regarding allowable lamp opera-
tion.
Page 132 of 321

132 Controls in detailAutomatic climate controlAutomatic mode
The automatic climate control panel for the
rear is located on the rear center console.
1Air volume control
2Air distribution control
3Automatic control (air distribution, air
volume)�
Press button
U
.
The indicator lamp on the button lights
up.
The automatic climate control cools or
heats the interior depending on the
temperature selected on the front cli-
mate control unit.Adjusting air volume and air distribu-
tion manually
Adjusting air volume
�
Press upper part of button
R
.
The blower setting is increased each
time the button is pressed.
�
Press lower part of button
R
.
The blower setting is decreased each
time the button is pressed.Adjusting air distribution
�
Press
Ô
, upper part of button2.
Air is directed upwards.
�
Press
Ó
, lower part of button2.
Air is directed to the footwell.
Front and rear air outlets
iWhen the air volume or air distribution
control is pressed, the automatic mode
is switched off. The indicator lamp in
button
U
is turned off. Temperature
setting remains in automatic mode.
iFor draft-free ventilation, adjust the air
outlets upwards
To allow unrestricted operation of the
automatic climate control, the air out-
lets should remain open.
Page 134 of 321
134 Controls in detailPower windows
Power windowsOpening and closing the side windows
The power window switches are on the
front center console.
1Left front
2Right front
3Switch for rear door window override
(
�page 69)
4Left rear
5Right rear Additional switches for the rear windows
are located on the rear center console.
6Left rear
7Right rear
To operate the power windows, turn key to
position2 (
�page 33) in the steering lock.
Warning!
G
When closing the windows, make sure that
there is no danger of anyone being harmed
by the closing procedure.
When leaving the vehicle, always remove the
key from steering lock and lock your vehicle.
Do not leave children unattended in the ve-
hicle, or with access to an unlocked vehicle.
Unsupervised use of vehicle equipment may
cause an accident and/or serious personal
injury.
Page 136 of 321

136 Controls in detailPower windowsSynchronizing power windows
The side power windows must be resyn-
chronized�
after the battery has been disconnect-
ed
�
if the windows cannot be fully opened
or closed
�
Switch ignition on.
�
Press switch
j
until the window is
completely closed and hold down for
approximately 1 second. Repeat proce-
dure for each window.
Rear quarter windows*
The switches are on the upper part of the
center console.
1Left side
2Right side
To operate the power windows, turn key to
position2 (
�page 33) in the steering lock.Opening the windows
�
Press and hold the upper part of
switches1 or2.
The window will open.
Closing the windows
�
Press and hold the lower part of
switches1 or2.
The window will close.Warning!
G
When closing the windows, make sure that
there is no danger of anyone being harmed
by the closing procedure.
When leaving the vehicle, always remove the
key from the steering lock, and lock the ve-
hicle. Do not leave children unattended in
the vehicle, or with access to an unlocked
vehicle. Unsupervised use of vehicle equip-
ment may cause an accident and/or serious
personal injury.
Page 151 of 321

151 Controls in detail
Driving systems
The selector lever position determines
which warning indicator is activated.
As soon as the sensors detect an obstacle,
one or more segments light up, depending
on the distance. An intermittent acoustic
warning will also sound as the seventh seg-
ment lights up and a constant acoustic
warning lasting a maximum of 3 seconds
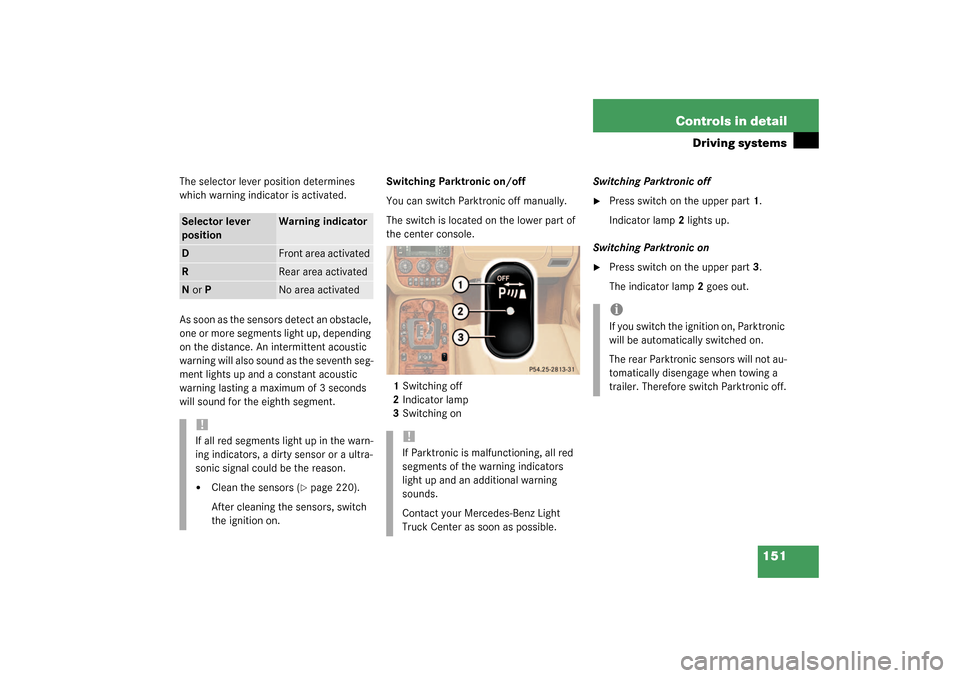
will sound for the eighth segment.Switching Parktronic on/off
You can switch Parktronic off manually.
The switch is located on the lower part of
the center console.
1Switching off
2Indicator lamp
3Switching onSwitching Parktronic off
�
Press switch on the upper part1.
Indicator lamp2 lights up.
Switching Parktronic on
�
Press switch on the upper part3.
The indicator lamp2 goes out.
Selector lever
position
Warning indicator
D
Front area activated
R
Rear area activated
N or P
No area activated
!If all red segments light up in the warn-
ing indicators, a dirty sensor or a ultra-
sonic signal could be the reason.�
Clean the sensors (
�page 220).
After cleaning the sensors, switch
the ignition on.
!If Parktronic is malfunctioning, all red
segments of the warning indicators
light up and an additional warning
sounds.
Contact your Mercedes-Benz Light
Truck Center as soon as possible.
iIf you switch the ignition on, Parktronic
will be automatically switched on.
The rear Parktronic sensors will not au-
tomatically disengage when towing a
trailer. Therefore switch Parktronic off.