Page 167 of 321

167 Controls in detail
Useful features
Remote door unlock
In case you have locked your vehicle unin-
tentionally (e.g. key inside vehicle), and no
other key is available:�
Contact the Mercedes-Benz Response
Center at 1-800-756-9018 (in the USA)
or 1-888-923-8367 (in Canada).
You will be asked to provide your pass-
word which you provided when you
completed the subscriber agreement.
�
Then return to your vehicle and pull
outside handle of the liftgate for mini-
mum of 20 seconds until the SOS but-
ton is flashing.
The message
EMERGENCY CALL –
CALL CONNECTED appears in the MCS
display.
As an alternative, you may unlock the vehi-
cle via Internet using the ID and password
sent to you shortly after the completion of
your acquaintance call.
!If the indicator lamp continues to flash
or the system does not reset, contact
the Response Center at
1-800-756-9018 (in the USA) or
1-888-923-8367 (in Canada), or Mer-
cedes-Benz Customer Assistance at
1-800-FOR-MERCedes
(1-800-367-6372) in the USA or Cus-
tomer Service at 1-800-387-0100 in
Canada.iThe indicator lamp in the respective
button flashes until the call is conclud-
ed. Calls can only be terminated by a
Response Center or Customer Assis-
tance Center representative, except
Roadside Assistance and Information
calls, which can also be terminated by
using the END button on the MCS unit.
iWhen a Tele Aid call has been initiated,
the MCS system audio is muted and
the selected mode (radio, tape or CD)
pauses. The optional cellular phone (if
installed) switches off. If you must use
this phone, the vehicle must be parked.
Disconnect the coiled cord and place
the call. The navigation system (if en-
gaged) will continue to run. A pop-up
window will appear in the MCS display
to indicate that a Tele Aid call is in
progress.
Page 170 of 321

170 Controls in detailUseful features�
When the indicator lamp flashes rapid-
ly, release both buttons.
�
To program the remaining two buttons,
repeat the steps above.Rolling code programming
To train a garage door opener (or other roll-
ing code devices) with the rolling code fea-
ture, follow these instructions after
completing the “Programming” portion of
this text. (A second person may make the
following training procedures quicker and
easier.)
�
Locate training button on the garage
door opener motor head unit.
Exact location and color of the button
may vary by garage door opener brand.
If there is difficulty locating the trans-
mitting button, reference to garage
door opener operator’s manual.
�
Press “training” button on the garage
door opener motor head unit.
The “training light” is activated.You have 30 seconds time to initiate the
following step.
�
Firmly press and release the pro-
grammed integrated remote control
transmit button.
�
Press and release same button a sec-
ond time to complete the training pro-
cess.
Some garage door openers may require
you to do this procedure a third time to
complete the training.
�
Confirm the garage door operation by
pressing the programmed button on
the integrated remote control transmit-
ter.
iIf, after several attempts, you do not
successfully program the integrated re-
mote control device to learn the signal
of the hand-held transmitter, the ga-
rage door opener could be equipped
with the “rolling code feature”.
Page 176 of 321

176 Controls in detailUseful featuresCountry�
Press MODE2 (
�page 172) repeated-
ly until the country display appears in
the trip computer display3.
�
Press and hold RESET1 a minimum of
five seconds to change the country unit
system.
Canada units system selection
You can choose between CAN-English or
CAN-French.Setting CAN-English
�
Press RESET1 repeatedly until CAN is
displayed.
�
Press MODE2 to select
–ENG
.
�
Press MODE2 again to set CAN-En-
glish.Setting CAN-French
�
Press RESET1 repeatedly until CAN is
displayed.
�
Press MODE2. –ENG
is displayed.
�
Press RESET1 to select
–Fr
.
�
Press MODE2 to set CAN-French.
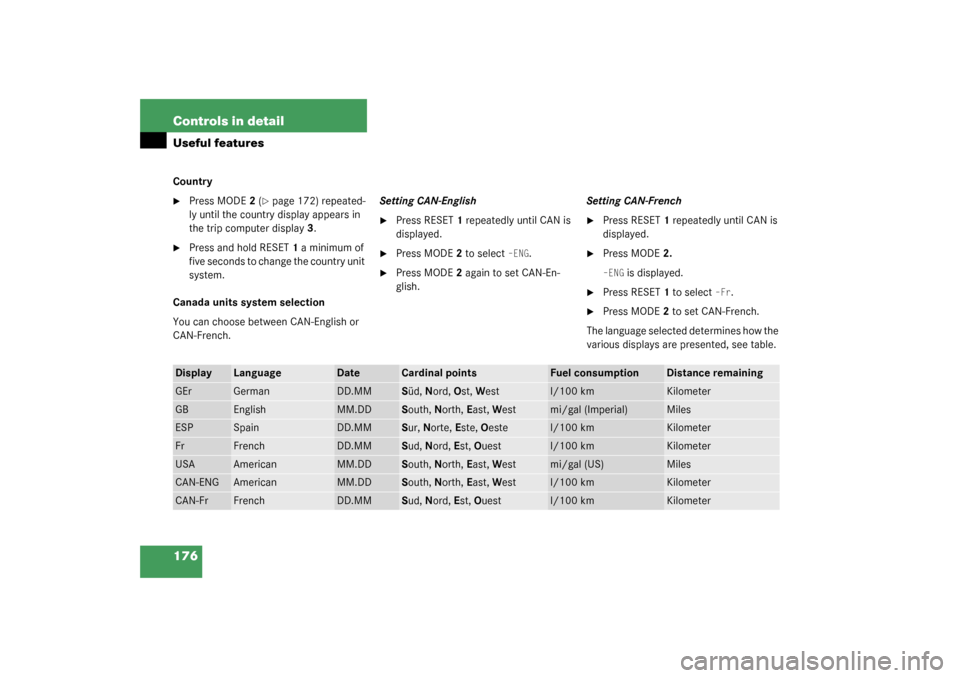
The language selected determines how the
various displays are presented, see table.
Display
Language
Date
Cardinal points
Fuel consumption
Distance remaining
GEr
German
DD.MM
Süd, Nord, Ost, West
l/100 km
Kilometer
GB
English
MM.DD
South, North, East, West
mi/gal (Imperial)
Miles
ESP
Spain
DD.MM
Sur, Norte, Este, Oeste
l/100 km
Kilometer
Fr
French
DD.MM
Sud, Nord, Est, Ouest
l/100 km
Kilometer
USA
American
MM.DD
South, North, East, West
mi/gal (US)
Miles
CAN-ENG
American
MM.DD
South, North, East, West
l/100 km
Kilometer
CAN-Fr
French
DD.MM
Sud, Nord, Est, Ouest
l/100 km
Kilometer
Page 197 of 321

197 Operation
Driving instructions
Driving abroad
Abroad, there is a widely-spread
Mercedes-Benz service network at your
disposal. If you plan to drive into areas
which are not listed in the index of your
Mercedes-Benz Light Truck Center directo-
ry, you should request pertinent informa-
tion from your authorized Mercedes-Benz
Light Truck Center.Control and operation of radio trans-
mitters
MCS, radio and telephone*Telephones and two-way radios
Radio transmitters, such as a portable tele-
phone or a citizens band unit should only
be used inside the vehicle if they are con-
nected to an antenna that is installed on
the outside of the vehicle.
Refer to the radio transmitter operation in-
structions regarding use of an external an-
tenna.Warning!
G
Do not forget that your primary responsibili-
ty is to drive the vehicle. Only operate the
MCS, radio or telephone
1 if road, weather
and traffic conditions permit.
Bear in mind that at a speed of just 30 mph
(approximately 50 km / h), your vehicle is
covering a distance of approximately
44 feet (approximately 13.5 m) every sec-
ond.
1Observe all legal requirements.
Warning!
G
Never operate radio transmitters equipped
with a built-in or attached antenna (i.e. with-
out being connected to an external antenna)
from inside the vehicle while the engine is
running. Doing so could lead to a malfunc-
tion of the vehicle’s electronic system, pos-
sibly resulting in an accident and/or
personal injury.
Page 200 of 321

200 OperationAt the gas station
At the gas stationThe fuel filler flap is located on the
left-hand side of the vehicle towards the
rear. Locking/unlocking the vehicle with
the remote control automatically
locks/unlocks the fuel filler flap.
�
Remove the key from the steering lock.
�
Open the fuel filler flap1 by pulling in
direction of the arrow.
�
Turn the fuel cap2 to the left and hold
on to it until possible pressure is re-
leased.
�
Take off the cap.
�
Only fill your tank until the filler nozzle
unit cut out – do not top up or overfill.
�
Replace the fuel cap by turning it to the
right.
You will hear when the fuel cap is tight-
ened.
�
Close the fuel filler flap.
Warning!
G
Gasoline is highly flammable and poisonous.
It burns violently and can cause serious inju-
ry. Whenever you are around gasoline, avoid
inhaling fumes and skin contact, extinguish
all smoking materials. Never allow sparks,
flame or smoking materials near gasoline!.
!The fuel filler cap is tethered to the fuel
filler neck. Do not drop the cap. It could
damage the vehicle paint finish.!To prevent damaging the lens of the
plastic tail lamp, make certain that no
gasoline comes into contact with it.
Warning!
G
Overfilling of the fuel tank may create pres-
sure in the system which could cause a gas
discharge. This could cause the gas to spray
back out when removing the fuel pump noz-
zle, which could cause personal injury.iUse only premium unleaded gasoline
with a minimum Posted Octane Rating
of 91 (average of 96 RON / 86 MON).
Information on gasoline quality can
normally be found on the fuel pump.
More information on gasoline can be
found in the Factory Approved Service
Products pamphlet.
Page 265 of 321

265 Practical hints
Jump starting
The battery is located in the engine com-
partment.�
Make sure that the two vehicles do not
touch.
�
Turn off all electrical consumers.
�
Apply parking brake.
�
Shift selector lever to positionP.1Positive terminal
2Cable clamps
3Negative terminal
4Cover
�
Remove cover4 from positive terminal
on both vehicles.
�
Connect positive terminals1 on the
batteries with the jumper cables. Start
with the charged battery.
!Jump starting may only be performed
on the battery installed in the engine
compartment.
Avoid repeated and lengthy starting at-
tempts.
Do not attempt to start the engine us-
ing a battery quick charge unit.
If engine does not run after several un-
successful starting attempts, have it
checked at the nearest authorized
Mercedes-Benz Light Truck Center.
Excessive unburned fuel generated by
repeated failed starting attempts may
damage the catalytic converter.
Make sure the jumper cables do not
have loose or missing insulation.
Make sure the cable clamps do not
touch any other metal part while the
other end is still attached to a battery.
Warning!
G
Keep flames or sparks away from battery.
Do not smoke.
Observe all safety instructions and precau-
tions when handling automotive batteries
(�page 261).