Page 68 of 321

68 Safety and SecurityOccupant safety�
When using the center second row seat
for a top tether strap, the left third row
seat should only be used for a child re-
straint system, since exiting the vehicle
may not be possible in an emergency
due to the routing of the top tether
strap.
�
When installing an infant or child re-
straint system with a top tether strap
on the left second row seat, the left
third row seat should not be occupied. Child seat anchors – “LATCH” type
This vehicle is provided with two “LATCH”
(LOWER Anchors and Tethers for CHil-
dren) type anchors (at each of the outer
rear seats and in the optional third row
seats) for installation of a “LATCH” seat
with matching mounting fittings.
1Anchors
�
Install a “LATCH” type child seat ac-
cording to the manufacturer’s instruc-
tions.
!An infant and child restraint system
must not be installed on the right
second row seat while a passenger
rides in a third row seat. An infant and
child restraint system installed on the
right second row seat will prevent the
use of the easy-entry/exit feature
(�page 95).
iWith a child seat installed in the left
rear seat, the seat belt for the center
seat occupied by a passenger must op-
erate freely. Guide seat belt between
its seat cushion mount and backrest
mount along outside of right side child
seat mount.
Non-“LATCH” type child seats may also
be used and can be installed using the
vehicle’s seat belt system. Install child
seat according to the manufacturer’s
instructions.
Page 69 of 321

69 Safety and Security
Occupant safety
Blocking of rear door window operation
1Switch for rear door window override�
Slide the switch to the right.
A dot becomes visible. The rear win-
dows can no longer be operated using
the switch in the rear doors.For more information on power windows,
see the “Controls in detail” section
(
�page 134).
Warning!
G
Install child seat according to manufactur-
er’s instructions.
T h e c h i l d s e a t m u s t b e f i r m l y a t t a c h e d i n t h e
right and left side anchors1.
An incorrectly mounted child seat may come
loose during an accident.
Damaged or impact damaged child seats or
child seat mounting fittings must be re-
placed.
Do not leave children unattended in the ve-
hicle, even if the children are secured in a
child restraint system.
Children too big for child restraint systems
must ride in back seats using regular seat
belts. Position shoulder belt across chest
and shoulder, not face or neck. A booster
seat may be necessary to achieve proper
belt positioning for children from 41 lbs. to
the point where a lap / shoulder belt fits
properly without one.
Warning!
G
Activate the override switch in the rear when
children are riding in the car. The children
could otherwise injure themselves, e.g. by
becoming trapped in the window opening.
When leaving the vehicle, always remove the
key from the steering lock, and lock the ve-
hicle. Do not leave children unattended in
the vehicle, or with access to an unlocked
vehicle. Unsupervised use of vehicle equip-
ment may cause an accident and/or serious
personal injury.
Page 83 of 321
83 Controls in detail
Locking and unlocking
Seats
Memory function*
Lighting
Instrument cluster
Automatic transmission
Transmission control – LOW RANGE mode
Good visibility
Automatic climate control
Power windows
Sliding/pop-up roof*
Loading
Driving systems
Useful features
Page 91 of 321
.
Seat heater*
The seat heaters can only be switched on
with the engine")
91 Controls in detail
Seats
Seats
Information on seat adjustment can be
found in the “Getting started” section
(�page 34).
Seat heater*
The seat heaters can only be switched on
with the engine running.
The switches are located on the upper cen-
ter console.
1Normal heating
2Rapid heatingSwitching on normal seat heating mode
�
Press upper part1 of switch.
One indicator lamp in the switch lights
up.
Switching off normal seat heating
mode
�
Press upper part1 of switch again.
The indicator lamp in the switch goes
out.
Switching on rapid seat heating mode
�
Press lower part2 of switch.
Both indicator lamps in the switch light
up.Switching off rapid seat heating mode
�
Press lower part2 of switch again.
Both indicator lamps in the switch go
out.
iThe seat heater will be automatically
switched off after approximately
20 minutes.
iThe system switches over to normal
heating mode after approximately five
minutes. Only one indicator lamp re-
mains lit.!If one or both of the lamps on the seat
heater switch are blinking, there is in-
sufficient voltage available since too
many electrical consumers are turned
on. The seat heater switches off auto-
matically.
The seat heater will switch back on
again automatically as soon as suffi-
cient voltage is available.
Page 92 of 321
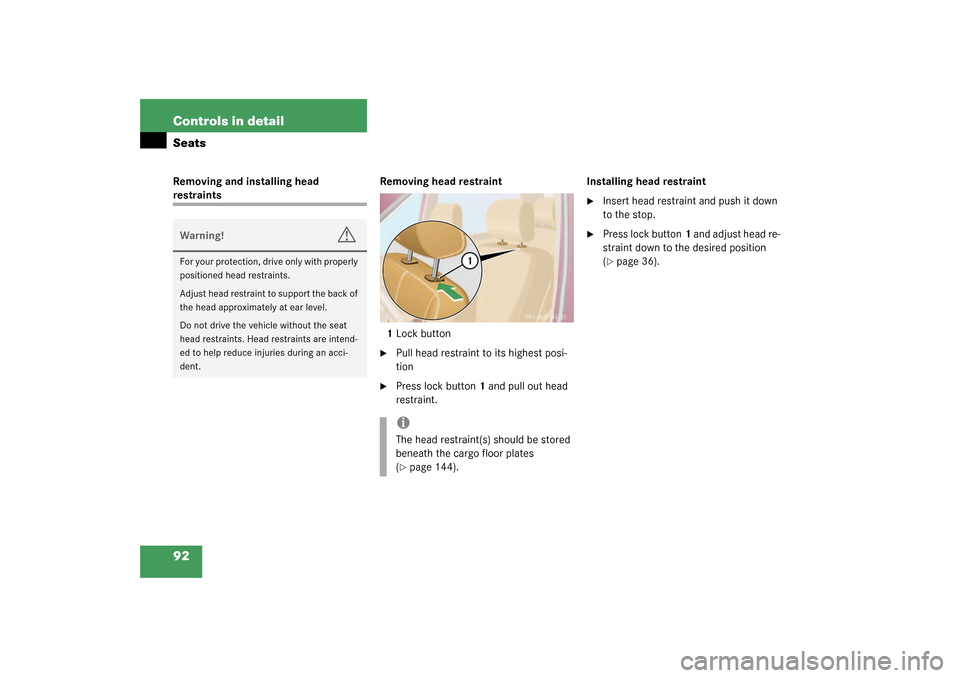
92 Controls in detailSeatsRemoving and installing head restraintsRemoving head restraint
1Lock button
�
Pull head restraint to its highest posi-
tion
�
Press lock button1 and pull out head
restraint.Installing head restraint
�
Insert head restraint and push it down
to the stop.
�
Press lock button1 and adjust head re-
straint down to the desired position
(�page 36).
Warning!
G
For your protection, drive only with properly
positioned head restraints.
Adjust head restraint to support the back of
the head approximately at ear level.
Do not drive the vehicle without the seat
head restraints. Head restraints are intend-
ed to help reduce injuries during an acci-
dent.
iThe head restraint(s) should be stored
beneath the cargo floor plates
(�page 144).
Page 93 of 321

93 Controls in detail
Seats
Rear seats
The rear seats are divided asymetrically.
To enlarge the cargo area you can adjust
the left and right part separately. The fol-
lowing changes are possible:�
moving the seat fore and aft
�
folding down the backrest
�
lowering the seatAdjusting rear seat fore and aft
1Release lever
�
Pull release lever1 in direction of ar-
row.
�
Slide seat to the desired position until
it locks in place.Folding down the backrest
1Lock button
�
Close cup holder in rear center console
(�page 155).
�
Move front seats forward. Manual seat
(�page 35) or power seat (
�page 37).
�
Slide seat forward.
�
Remove head restraint(s) (
�page 92).
�
Pull lock button1 up and fold backrest
forward until it locks in place.
The red backrest lock indicator at lock
button1 is not visible in the locked po-
sition.
Warning!
G
Do not adjust the rear seats while driving.
Always seat in an upright position and the
seat belts are properly positioned on the
body. Your seat must be adjusted so that
you can correctly fasten your seat belt.
Adjust head restraint to support the back of
the head approximately at ear level.
Never place hands under the seat or near
any moving parts while a seat is being ad-
justed.
Warning!
G
Failure to assure that seats are locked into
place could result in an increased chance of
injury in an accident.
Page 94 of 321

94 Controls in detailSeatsFolding up the backrest�
Pull lock button1 up and unfold back-
rest until it locks in place.
Make sure that the seat belt is not
caught in the seat.
�
Check for secure locking by pulling and
pushing on the backrest.
The red backrest lock indicator at lock
button1 is not visible in the locked po-
sition.
�
Install head restraint (
�page 92).
�
Slide seat rearward to desired position
(�page 93).
�
Adjust front seats to desired position.
Manual seats (
�page 35) and power
seats (
�page 37). Lowering the rear seat
1Release button
2Lever
3Release lever
�
Close cup holder in rear center console
(�page 155).
�
Move front seats forward. Manual seat
(�page 35) or power seat (
�page 37).
�
Press and hold release button1 to un-
lock lever2.
�
Pull lever2 in direction of arrow.
�
Pull release lever3 and push down rear
seat until it locks in place.
�
Fold down the backrest (
�page 93).
�
Adjust front seats to desired position.
Manual seats (
�page 35) and power
seats (
�page 37).
Folding up the rear seat
�
Move front seats forward. Manual seat
(�page 35) or power seat (
�page 37).
�
Pull release lever3 and raise rear seat
until it locks in place.Warning!
G
Failure to assure that seats are locked into
place could result in an increased chance of
injury in an accident.
Page 95 of 321
.
Folding rear seat fo")
95 Controls in detail
Seats
Easy entry/exit feature*
The easy entry/exit feature allows access
to the third row seats*. The right cargo
floor plate must be removed (
�page 144).
Folding rear seat forward
1Lever
�
Move right seat forward. Manual seats
(�page 35) and power seats
(�page 37).
�
Move rear seat forward (
�page 93).
�
Push head restraint fully down and tilt
it forward.
�
Fold backrest forward (
�page 93).
�
Pull lever1 up and fold the rear seat
forward.
Resetting rear seat
�
Pull down on seat bench until it locks
into place.
�
Pull lock button1 (
�page 93) up and
unfold backrest until it locks into place.
�
Pull down on seat bench until it locks
into place.
�
Check for secure locking by pulling and
pushing on the backrest.
The red backrest lock indicator at lock
button1 (
�page 93) is not visible in
the locked position.
�
Move the rear and front seats in de-
sired position.
�
Pull up and adjust head restraint
(�page 36).
Warning!
G
Never drive with the second row right seat
folded forward (easy entry/exit feature). It
could open and fold back unintentionally.