Page 194 of 360

194 Controls in detailUseful featuresOperation of remote control�
Turn key in starter switch to position1
or2.
�
Select and press the appropriate but-
ton to activate the remote controlled
device.
The integrated remote control trans-
mitter continues to send the signal as
long as the button is pressed – up to
20 seconds.
Erasing the remote control memory
�
Turn key in starter switch to position1
or2.
�
Simultaneously hold down the left and
right side buttons for approximately
20 seconds, or until the indicator lamp
blinks rapidly.
The codes of all three channels are
erased.
Heated steering wheel
The steering wheel heater warms up the
leather area of the steering wheel.
The lever is on the lower left-hand side of
the steering wheel.
1Switching on
2Switching off
3Indicator lampSwitching on
�
Turn key in the starter switch to
position1 or2.
�
Turn lever in direction of arrow1.
The steering wheel is heated. Indicator
lamp3 lights up.
Switching off
�
Turn the lever in direction of arrow2.
The steering wheel heater is turned off.
Indicator lamp3 goes out.
iIf you sell your vehicle, erase the codes
of all three channels.
iThe steering wheel heater does not
turn off automatically.
Page 234 of 360

234 OperationVehicle careVehicle washing
Do not use hot water or wash your vehicle
in direct sunlight. Use only a mild car wash
detergent, such as Mercedes-Benz ap-
proved Car Shampoo.
Thoroughly spray the vehicle with a dif-
fused jet of water. Direct only a very weak
spray towards the ventilation intake. Use
plenty of water and rinse the sponge and
chamois frequently.
Rinse with clear water and thoroughly dry
with a chamois. Do not allow cleaning
agents to dry on the finish.
Due to the width of the vehicle, fold in out-
side mirrors prior to running the vehicle
through an automatic car wash to prevent
damage to the mirrors.
In the winter, thoroughly remove all traces
of road salt as soon as possible.
When washing the underbody, do not for-
get to clean the inner sides of the wheels.Ornamental moldings
For regular cleaning and care of very dirty
chrome-plated parts, use a chrome clean-
er.
Headlamps, tail lamps, turn signal
lenses
Use a mild car wash detergent, such as
Mercedes-Benz approved Car Shampoo,
with plenty of water.
To prevent scratches, never apply strong
force and use only a soft, non-scratchy
cloth when cleaning the lenses. Do not at-
tempt to wipe dirty lenses with a dry cloth
or sponge.Cleaning the Rear Park Assist sensors*
1Sensor
Use a mild car wash detergent, such as
Mercedes-Benz approved Car Shampoo,
with plenty of water to clean sensor1.
To prevent scratches, never apply strong
force and use only a soft, non-scratchy
cloth when cleaning the sensor. Do not at-
tempt to wipe dirty sensors with a dry cloth
or sponge.
Page 259 of 360

259 Practical hints
What to do if …
Display
Possible cause
Suggested solution
Category
I
AUTOM. LIGHT ON
REMOVE KEY!
You have forgotten to remove the
key.
�
Remove the key from the
starter switch.
1
REPLACE KEY
VISIT WORKSHOP!
No additional code available for
SmartKey.
�
Visit an authorized
Mercedes-Benz Light Truck
Center.
2
.
3RD BRAKE LAMP
CHECK LAMP!
The high mounted brake lamp is mal-
functioning. This message will only
appear if all light emitting diodes
have stopped working.
�
Visit an authorized
Mercedes-Benz Center as
soon as possible.
2
ADD. TURN SIG LAMP, LH
CHECK LAMP!
The left turn signal in the side mirror
is malfunctioning. This message will
only appear if all light emitting
diodes have stopped working.
�
Have the LEDs replaced as
soon as possible.
2
ADD. TURN SIG LAMP, RH
CHECK LAMP!
The right turn signal in the side mir-
ror is malfunctioning. This message
will only appear if all light emitting
diodes have stopped working.
�
Have the LEDs replaced as
soon as possible.
2
AUTOM. LIGHT ON
REMOVE KEY!
You have left the key in the starter
switch.
�
Remove key from the starter
switch.
1
Page 263 of 360

263 Practical hints
What to do if …
.
TURN SIGNAL F, L
CHECK LAMP
SUBSTITUTE LAMP ON!
The left front turn signal lamp is mal-
functioning. A backup bulb is being
used.
�
Replace the bulb as soon as
possible.
2
TURN SIGNAL F, R
CHECK LAMP
SUBSTITUTE LAMP ON!
The right front turn signal lamp is
malfunctioning. A backup bulb is be-
ing used.
�
Replace the bulb as soon as
possible.
2
TURN SIGNAL R, L
CHECK LAMP
SUBSTITUTE LAMP ON!
The left rear turn signal lamp is mal-
functioning. A backup bulb is being
used.
�
Replace the bulb as soon as
possible.
2
TURN SIGNAL R, R
CHECK LAMP
SUBSTITUTE LAMP ON!
The right rear turn signal lamp is
malfunctioning. A backup bulb is be-
ing used.
�
Replace the bulb as soon as
possible.
2
!
(Canada
only)
;
(USA only)
PARKING BRAKE
RELEASE PARKING BRAKE!
You are driving with the parking
brake set.
�
Release the parking brake
(�page 44).
1
A
RESERVE FUEL
VISIT FILLING STATION!
The fuel level has dropped below the
reserve mark.
�
Refuel at the next gas station
(�page 214).
2
Display
Possible cause
Suggested solution
Category
Page 279 of 360
279 Practical hints
Replacing bulbs
Replacing bulbs
Safe vehicle operation depends on proper
exterior lighting and signaling. It is there-
fore essential that all bulbs and lamp as-
semblies are in good working order at all
times.
Correct headlamp adjustment is extremely
important. Have headlamps checked and
readjusted at regular intervals and when a
bulb has been replaced. See your autho-
rized Mercedes-Benz Light Truck Center
for headlamp adjustment.
Bulbs Front lamps
iBackup bulbs will be brought into use
when the following lamps malfunction:�
Parking lamps
�
Turn signal lamps
�
Tail lamps
Lamp
Type
1
Additional turn sig-
nal lamp
LED
2
S i d e t u r n s i g na l l a m p
WY 5 W
3
Turn signal lamp
1156 NA
4
High and low beam
H4 60 (55 W)
Parking and stand-
ing lamps
T 4 W
5
Side marker lamp
T 4 W
6
Fog lamp
H3 (55 W)
Page 280 of 360

280 Practical hintsReplacing bulbsRear lamps Notes on bulb replacement
�
Use only 12-volt bulbs of the same type
and with the specified watt rating.
�
Switch lights off before changing a bulb
to prevent short circuits.
�
Always use a clean lint-free cloth when
handling bulbs.
�
Your hands should be dry and free of oil
and grease.
�
If the newly installed bulb does not light
up, visit an authorized Mercedes-Benz
Light Truck Center.
�
Have the LEDs for the following lamps
replaced by an authorized Mer-
cedes-Benz Light Truck Center.�
The additional turn signals in the ex-
terior rear view mirrors
�
The high mounted brake lamp
Lamp
Type
7
High mounted brake
lamp
LED
8
Turn signal lamp
PY 21 W
Brake lamp
P 21 W
Tail, parking and
standing lamps
R 5 W
9
Backup lamp
P 21 W
10
License plate lamps
C 5 W
11
Side marker lamp
T 4 W
12
Rear fog lamp
P 21 W
Warning!
G
Keep bulbs out of reach of children.
Bulbs and bulb sockets can be very hot. Al-
low the lamp to cool down before changing
a bulb.
Halogen lamps contain pressurized gas. A
bulb can explode if you:�
touch or move it when hot
�
drop the bulb
�
scratch the bulb
Wear eye and hand protection.
iHave the headlamp settings checked
regularly by a Mercedes-Benz Light
Truck Center.
Do not turn the headlamp adjusting
screws. If the adjusting screws are
turned, the headlamp setting must be
checked by a Mercedes-Benz Light
Truck Center.
Page 284 of 360
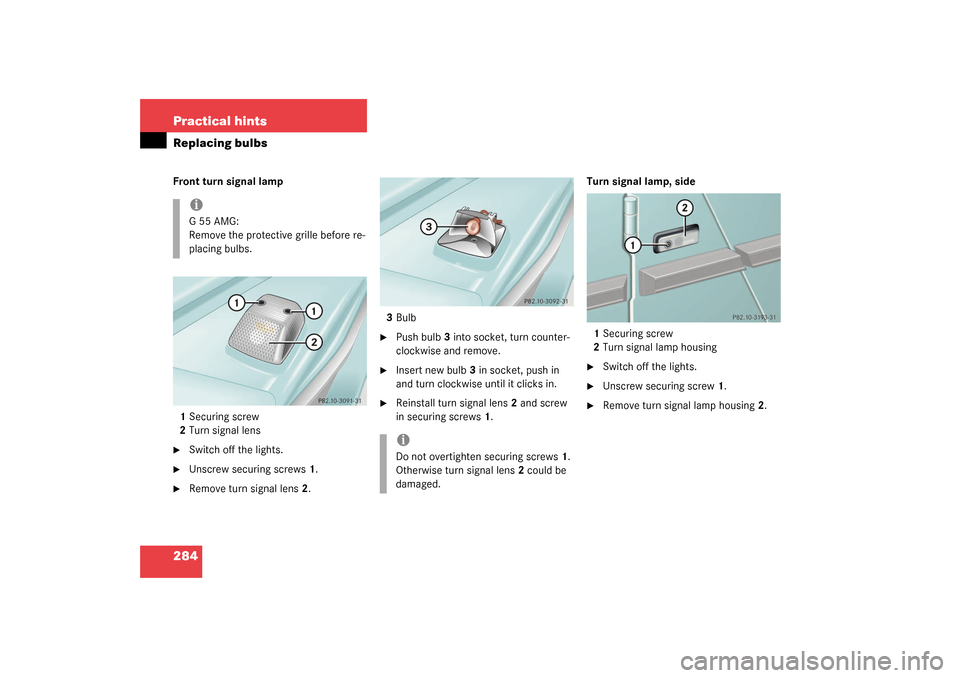
284 Practical hintsReplacing bulbsFront turn signal lamp
1Securing screw
2Turn signal lens�
Switch off the lights.
�
Unscrew securing screws1.
�
Remove turn signal lens2.3Bulb
�
Push bulb3 into socket, turn counter-
clockwise and remove.
�
Insert new bulb3 in socket, push in
and turn clockwise until it clicks in.
�
Reinstall turn signal lens2 and screw
in securing screws1.Turn signal lamp, side
1Securing screw
2Turn signal lamp housing
�
Switch off the lights.
�
Unscrew securing screw1.
�
Remove turn signal lamp housing2.
iG55AMG:
Remove the protective grille before re-
placing bulbs.
iDo not overtighten securing screws1.
Otherwise turn signal lens2 could be
damaged.
Page 285 of 360
285 Practical hints
Replacing bulbs
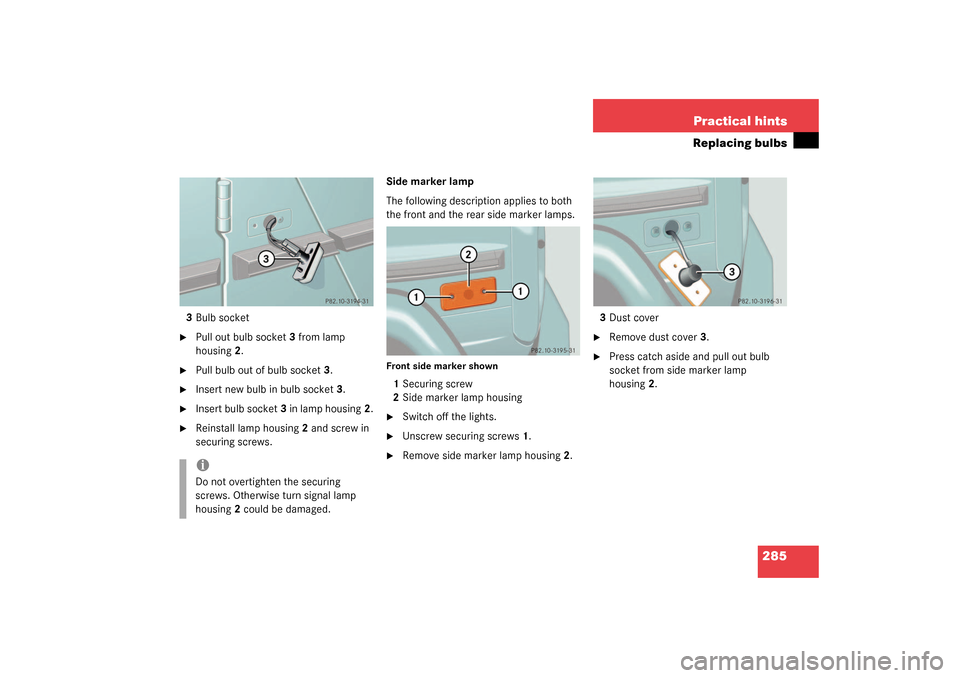
3Bulb socket�
Pull out bulb socket3 from lamp
housing2.
�
Pull bulb out of bulb socket3.
�
Insert new bulb in bulb socket3.
�
Insert bulb socket3 in lamp housing2.
�
Reinstall lamp housing2 and screw in
securing screws.Side marker lamp
The following description applies to both
the front and the rear side marker lamps.
Front side marker shown1Securing screw
2Side marker lamp housing�
Switch off the lights.
�
Unscrew securing screws1.
�
Remove side marker lamp housing2.3Dust cover
�
Remove dust cover3.
�
Press catch aside and pull out bulb
socket from side marker lamp
housing2.
iDo not overtighten the securing
screws. Otherwise turn signal lamp
housing2 could be damaged.